2003 Top Dry Service School GSI / Top Dry 2003 Service School PNEG-1314 1
003 Top Dry Service School Contents Safety Pages..........................4 Product Updates...................7 Software Revisions..............11 Batch Troubleshooting.......19 Autoflow Troubleshooting..25 Diagnostics..........................32 Warranty.............................
2003 Top Dry Service School 3
2003 Top Dry Service School Roof Damage Warning and Disclaimer GSI DOES NOT WARRANT ANY ROOF DAMAGE CAUSED BY EXCESSIVE VACUUM OR INTERNAL PRESSURE FROM FANS OR OTHER AIR MOVING SYSTEMS. ADEQUATE VENTILATION AND/OR "MAKEUP AIR" DEVICES SHOULD BE PROVIDED FOR ALL POWERED AIR HANDLING SYSTEMS. GSI DOES NOT RECOMMEND THE USE OF DOWNWARD FLOW SYSTEMS (SUCTION). SEVERE ROOF DAMAGE CAN RESULT FROM ANY BLOCKAGE OF AIR PASSAGES.
2003 Top Dry Service School Grain Systems, Inc. recommends contacting your local power company, and having a representative survey your installation so the wiring is compatible with their system, and adequate power is supplied to your unit. Safety decals should be read and understood by all people in the grain handling area. The rotating blade, fire warning decals and voltage danger decal must be displayed on the fan can.
2003 Top Dry Service School READ THESE INSTRUCTIONS BEFORE OPERATION AND SERVICE SAVE FOR FUTURE REFERENCE 1. Read and understand the operating manual before trying to operate the dryer. Use Caution in the Operation of this Equipment The design and manufacture of this 2. Power supply should be OFF for service of electrical components. Use dryer is directed toward operator CAUTION in checking voltage or other procedures requiring power to safety.
2003 Top Dry Service School GSI / Top Dry Product Updates * * * Adjustable Drying Chamber High Level Rotary Switch Plenum Hi-Limit Software Updates 7
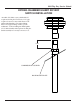
2003 Top Dry Service School DRYING CHAMBER HILIMIT ROTARY SWITCH INSTALLATION Assemble 1/4” shaft to rotary switch with 1/4” coupler and rolled pins. Next Screw 1-1/4” pipe coupler to bottom of rotary switch. Insert 1-1/4” pip through adjustable roof mount weldment. Leave 1-1/4” pipe sticking out the top of the weldment 3” as shown in Diagram. Install paddle to 1/4” shaft assembly with coupler and rolled pins. Switch assembly is now ready to mount to roof. 3.
2003 Top Dry Service School TOP DRY PLENUM HI LIMIT INSTALLATION 1. Assemble two pieces of conduit together with coupler. 2. Mount conduit clamps to conduit assembly. 3. Locate conduit assembly on the bottom of a rafter at least 2 feet to one side of the fan entrance. Do not install between two fan entrances. 4. Mark bin wall where conduit will pass through and drill a hole just large enough to allow the conduit to pass through. Seal this with caulking when complete. 5.
2003 Top Dry Service School 10
2003 Top Dry Service School GSI / Top Dry Software Revisions 11
2003 Top Dry Service School Network Autoflow Display Board Software Revisions ********************************************************************* VERSION: 2.15 REVISED BY: Steve Logue RELEASE DATE: Oct 17, 2002 NOTE: This Version does NOT support Watchdog and the Heater Version MUST be 1.09. HEATER VERS – 1.09 IO VERS – 1.07 1) The "FAN DELAY" is now called "MOTOR DELAY". 2) Added a way for GSI to reset total hours.
2003 Top Dry Service School ********************************************************************* VERSION: 2.11 REVISED BY: Steve Logue RELEASE DATE: October 27, 2000 1) Burner differential would not stay at 1 deg F when the dryer was turn off, using 2.10, now it does. 2) When grain reaches the Storage Chamber Rotary Switch, the dryer will enter a "Cool Down Mode". The fan will run and cool thegrain for 10 minutes before shutting down due to a Storage Chamber Full error.
2003 Top Dry Service School ********************************************************************* VERSION: 2.01 REVISED BY: Steve Logue RELEASE DATE: October 4, 1999 1) Attempted to fix the problem of grain setpoint changing by itself. 2) Fixed problem of batch dryer always shutting down with a "DRYING CHAMBER EMPTY" warning. A delay called the "REFILL TIMER" allows the dryer to fill back up. ********************************************************************* VERSION: 2.
2003 Top Dry Service School Heater and Batch Top Dry Revisions -------------------------------0.30 Released OCTOBER 23, 1998 -----------------------------------------------------------1) FLAME TIME OUT IS NOW 10 SECONDS. THE IGNITOR SHUTS OFF IN ABOUT 7.5 SECONDS. 0.29 Released OCTOBER 22, 1998 -----------------------------------------------------------1) ELIMINATE THE DEISEL OPTION -- FORCE THAT FLAG TO ALWAYS BE RESET. THIS CAUSED A 36 SECOND FLAG TIME OUT WHICH THE HARDWARE IS NOT SETUP TO ACCEPT.
2003 Top Dry Service School SECONDS -- EXIT THE PROGRAM MODE. 0.22 Released OCTOBER 22, 1996 -----------------------------------------------------------1) FIXED THE PROBLEM WHERE IF YOU SET IN 3.2 HOURS -- THE HOURS IMMEDIATELY WENT TO .
2003 Top Dry Service School CAN VIEW THE HOURS THAT HAVE PASSES SINCE THE SHUT DOWN BEGAN. MAX NUMBER OF HOURS = 218 HOURS ( 9.1 DAYS ) * 2) ADDED ERROR NUMBER 13 ==>> + 11 LIMIT SHORTED 3) LIMIT MAX TEMPERATURE SETTING TO 230 0.11 Released AUGUST 16, 1995 -----------------------------------------------------------1) MAKE THE SPARE RELAY ACT THE SAME AS THE FAN RELAY -- BOTH OPEN AND CLOSE AT THE SAME TIME 0.
2003 Top Dry Service School PROGRAMMABLE DELAY FOR TOP DRY FANS The dry time and cool time " carrots " on the display both flash indicating -it is in the program delay time mode.--- NOTE: THIS CAN BE DONE ON THE MASTER 0.
2003 Top Dry Service School GSI / Top Dry Series 2000 Batch Errors and troubleshooting * * * Dipswitch Settings Error Messages and solutions Operation TIps 19
03 Top Dry Service School Configuration Dip Switches (Normally Done At Gsi) These switches are used to configure the heater control for various types of heaters. Multiple heaters connected together through the serial link. Top Dry stand alone with no remote display at the bottom-dip switch 6 on/all others off. Top Dry master with a remote display at the bottomdip switch 6 & 7 on/all others off. Top Dry remote display at the bottom-dip switch 1 & 6 on/all others off.
2003 Top Dry Service School Limit Switches The following limit switch errors light up individually on the heaters LCD screen: PLENUM, HOUSING, VAPOR, TEMP HI LIMIT Multiple Heater Error Conditions Two or more heaters may be connected together through the serial link. If the master cannot communicate with a slave controller, the master will display "SLA" on the main display and the "RX" "TX" symbols will be flashing.
2003 Top Dry Service School Error Details Error #1 Plenum Temperature Probe Open. The two wires for checking this error are on terminals 24 and 25 they are labeled J7-12 and J7-13. The wires must be removed from the terminals to receive a correct reading. This must be checked with a Ohm Meter. If the probe is open you will not receive any reading on your meter because there is no continuity between the wires. It is like you cut the wire in half.
2003 Top Dry Service School We use two (2) different types of sensors (NTC thermistor on the Series 2000, and an encapsulated sensor on the E.M.C.S ) in our dryers. The resistance of the sensors varies according to the outside temperature. For example, on the E.M.C.S. for every one (1) degree rise in temperature the resistance increases 4.8 ohms. However, on the Series 2000 dryer, the sensor reacts just the opposite, the resistance rises with colder temperatures.
2003 Top Dry Service School SERIES 2000 BATCH TOPDRY TIPS Operation Tips for Top Dry Batch Special Wire Terminals J7-10 or J7-13 on stand alone unit - 12 volt Ground for use with a tester. Any unused third terminal on any network connector is also a 12 volt ground. 1. When ever you see 000 on the Screen there is an Error some where on the screen. 2. To Force a new time setting while the Dryer is running Push the “Inc” (Up Arrow) and the “Dec” (Down Arrow) keys at the same time 3.
2003 Top Dry Service School 11. DIP Switch Settings (Turn on Switches named and leave all others off) Top Dry Master Stand Alone - No Remote Display With Remote Display 6 ON 6 & 7 ON Top Dry Master with Slave With or Without Remote Display 6 & 8 ON Slave 2 and 6 ON 6,7 & 8 ON First Slave 2 & 6 ON Top Dry Master with 2 Slaves With or Without Remote Display Top Dry Remote Display Second Slave 1,2 &6 ON 1 & 6 ON 12. Temperature Sensor Testing A.
2003 Top Dry Service School GSI / Top Dry Series 2000 Autoflow Errors and troubleshooting * * 26 Error Messages and solutions Operation tips
2003 Top Dry Service School Error Messages When the dryer shuts down the user can quickly determine what caused the shutdown by viewing the display on the dryer control panel. The Electronic Monitoring Control System displays the error message and sounds a warning signal to alert the user. The displayed error conditions and their electrical cause are as follows: Burner 1 Loss Flame The flame sensor in burner number one has failed to detect flame.
2003 Top Dry Service School Fan 1 Motor Overload The thermal overload in the control box on fan number one has tripped, indicating an overcurrent condition. The overload must be reset manually. Fan 2 Motor Overload The thermal overload in the control box on fan number two has tripped, indicating an overcurrent condition. The overload must be reset manually.
2003 Top Dry Service School Wet Supply Empty Press To Dry Remaining Grain This message is displayed when the start button is pushed and grain has fallen away from the wet supply rotary switch and there is still grain against the drying chamber low level rotary switch. If the enter button is pushed the dryer will restart, but the fill system(s) will not restart.
2003 Top Dry Service School Network Autoflow Tips Present Version Numbers: Display 2.15 Heater 1.09 IO 1.07 Note: Display version 2.14 and 2.15 will not work with Heater version 1.10 you must use version 1.09. Important Software and Troubleshooting tips Special Wire Terminals - The third unused terminal on any network connector is a 12 V ground for use with a tester. 1. When ever you install a new display board.
2003 Top Dry Service School 8) Bin High Pressure Limit. The application of 12v to terminal number J2-20 will shutdown the dryer and give an indication that the bin is full due to the high level of static pressure within. "BIN AIR PRESSURE LIM" will be displayed on screen's top line until the user corrects the problem. (Originally looked for lack of 12v, reversed in 2.
Version 2.15 Changes New Features 2003 Top Dry Service School 1. Out of Grain Timer – Located under the “Setup” key. This Timer monitors how long the Load system runs including delay time and shuts down the Top Dry, goes through the “Cleanout” of the Augers procedure and then gives an “Out of Grain” Warning. Default setting is 20 minutes. The “Load” switch “ON” position works exactly like “Auto” but ignores the Timer. 2. The High Limits on the Grain and Plenum Temperatures are now settable.
2003 Top Dry Service School GSI / Top Dry Software Diagnostics * Series 2000 Batch Fan & Heater * Series 2000 Autoflow Display * Series 2000 Autoflow Fan & Heater 33
2003 Top Dry Service School Series 2000 Batch Fan / Heater Initializing the Novram • Turn the Control Power “ off “. • Hold down the Program Temperature switch. • Turn the Control Power switch “on “ with the Program Temperature switch held down. You have two seconds to depress the Increase or Decrease switches at the same time. • The NOVRAM has been initialized. • Press the Program Temperature switch again. • • Press the Increase switch until 7 is on the display.
2003 Top Dry Service School Series 2000 Batch Fan / Heater Programming Set-up Variables • Turn the Control Power “ off “ • Turn the Control Power switch “ on “ with the Program Temperature switch held down. • Press the Increase switch until 3 is on the display. • Press the Program Temperature switch again. • F or C will be displayed. • Use the Increase or Decrease switch to toggle between F or C. F - Temperatures displayed in Fahrenheit. C-Temperatures displayed in Celsius.
2003 Top Dry Service School Series 2000 Batch Fan / Heater CAUTION: DO NOT ATTEMPT BELOW PROCEDURE WITH GAS LINE CONNECTED. Diagnostic Mode 36 • Turn the Control Power “ off “. • Hold down the Program Temperature switch. • Press the Program Dry time switch to engage the Fan starter-Fan will be displayed. • Press the Increase switch to make the ignitor spark-IN will be displayed. • Turn the Control Power switch “on “ with the Program Temperature switch held down.
2003 Top Dry Service School Series 2000 Autoflow Display Keypad Test Control Switch Tests • Turn the Control Power “off”. • Turn the Control Power “off” . • Turn the Control Power switch “on” with the Help Switch pressed. • Turn the Control Power switch “on” with the Plenum and Grain Switches pressed. • The Keypad Switches can now be tested. • The Control Switches can now be tested.
2003 Top Dry Service School Series 2000 Autoflow Fan / Heater CAUTION: DO NOT ATTEMPT BELOW PROCEDURE WITH GAS LINE CONNECTED. Diagnostic Mode • Turn the Control Power “ off “. • Hold down the Program Temperature switch. • Turn the Control Power switch “on “ with the Program Temperature switch held down. 38 • Press the Program Dry time switch to engage the Fan Starter. • Press the Program Temperature switch to start theIgnitor. • Press the Hours x 1000 switch to open the Ssolenoid.
2003 Top Dry Service School THE GSI GROUP, INC. ("GSI") WARRANTS ALL PRODUCTS MANUFACTURED BY GSI TO BE FREE OF DEFECTS IN MATERIAL AND WORKMANSHIP UNDER NORMAL USAGE AND CONDITIONS FOR A PERIOD OF TWELVE MONTHS AFTER RETAIL SALE TO THE ORIGINAL END USER OF SUCH PRODUCTS. GSI'S ONLY OBLIGATION IS, AND PURCHASER'S SOLE REMEDY SHALL BE FOR GSI, TO REPAIR OR REPLACE, AT GSI'S OPTION AND EXPENSE, PRODUCTS THAT, IN GSI'S SOLE JUDGMENT, CONTAIN A MATERIAL DEFECT DUE TO MATERIALS OR WORKMANSHIP.
2003 Top Dry Service School 40