
Product Manual


1
2
2b
3
8
27
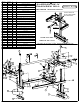
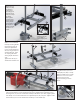
1a Attach handle boss (1) to end bracket
(8) using socket screws (2) and collar
lock washers (3). Tighten with hex head
Allen wrench (27). Repeat with other end
bracket. Make sure slot in handle boss
faces the outside, as shown. Note: (2b)
should be left somewhat loose. This is
your end bracket assembly (8a).
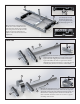
2a Attach tie bar (17), and
handle (25) to on-o bar
(19) using two carriage
bolts (9), two lock wash-
ers (23) and one hex nut
(6) and one coupling nut
(15).
2b Attach assembly to
thickness rails (10) using
two carriage bolts (9) ,
one lock washer (23)one
at washer (7) and two
coupling nuts (15). Make
sure assembly is square to
thickness rails.
15
6
9
25
17
19
23
23
9
9
10
10
15
15
7
3a Attach end bracket assemblies (8a) to
thickness rails (10) using four carriage bolts
(9), four at washers (7) and four hex nuts
(6). Tighten hex nuts nger tight. If oriented
as shown, the left end bracket will be the
thrust end, and the right end bracket will
be the nose end.
23
15
7
6
8a
8a
8a
10
9
6
7
10
2b