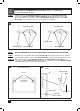
OWNER’S MANUAL 42" HAMILTON LINEAR ELECTRIC FIREPLACE WITH HEATER MODEL# EFW-TJ42A1 Wall Mounted Option Free Standing Option with Feet WARNING Read and understand this entire owner’s manual, including all safety information, before plugging in or using this product. Failure to do so could result in fire, electric shock, or serious personal injury. CAUTION Keep this owner’s manual for future reference. If you sell or give this product away, make sure this manual accompanies this product.
IMPORTANT SAFETY INSTRUCTIONS! WARNING • Read all instructions before using this heater! • This heater is hot when in use. To avoid burns, DO NOT let bare skin touch hot surfaces. If provided, use handles when moving this heater. Keep combustible materials, such as furniture, pillows, bedding, papers, clothes, and curtains at least 3 feet (36") from the front of the heater, and keep them away from the sides and rear. • Extreme caution is necessary when any heater is used.
i WARNING • For residential use only! NOT for commercial use! Any commercial or public use of this heater voids all warranties, and could cause injury. • This product is not intended to be a primary heat source. It is for supplemental heat only. • INDOOR use only! NEVER use this heater outdoors! Doing so may result in electric shock! • Risk of electric shock! DO NOT OPEN! No user-serviceable parts inside! • NEVER modify this heater. Doing so could result in personal injury or property damage.
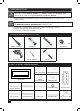
PREPARATION This product includes GLASS! ALWAYS use extreme caution when handling glass. Failure to do so could result in personal injury or property damage. • Remove all parts and hardware from the carton and place them on a clean, soft, and dry surface. Make sure all parts are dry, and the power cord and plug are not damaged. See IMPORTANT SAFETY INFORMATION on pages 2 and 3. • Compare the contents with the parts list to make sure nothing is missing. • Dispose of all packaging materials properly.
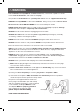
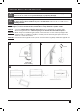
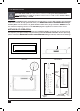
INSTALLATION AND ASSEMBLY ALWAYS make sure the unit is unplugged before beginning assembly! NEVER move or clean the heater, or change the bulb, while it is plugged in. STEP 1: Find a safe location. Minimum clearance on each side: 20". Minimum clearance below: 20". (Wall mount only). Minimum clearance above: 39.5". Minimum clearance from the front: 36". Choose a location near an outlet so an extension cord is not required. DO NOT position the unit directly below a power outlet. 1 Minimum 39.
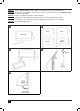
i AVOID INJURY and DAMAGE! Wood Screws(B) should be screwed directly into wall studs when possible. STEP 4: Align the holes in the Wall Bracket(E) with the pilot holes and Drywall Anchors(C). Thread three Wood Screws(B) and Metal Washers (J) through the holes in the wall bracket and directly into the wall studs and Drywall Anchors(C). Make sure the Wall Bracket(E) is level. Tighten all screws securely with a screwdriver.
MEDIA BED INSTALLATION i This next step involves GLASS! ALWAYS use extreme caution when handling glass. Failure to do so could result in personal injury or property damage. i ALWAYS keep the decorative glass OUT OF REACH OF CHILDREN AND PETS! Leave no glass pieces where children or pets can find them. Failure to do so could cause a choking hazard. NOTE: The fireplace comes with the Faux Log Bed in place, and can be used as is.
STEP 6c: Set the Shelf Insert(I) onto the ledge in the opening at the front of the fireplace. STEP 6d: Arrange the crushed glass, white stones, river rock, or faux branches on the Shelf Insert(I) in the desired position. STEP 6e: Set the front glass panel back onto the firebox. STEP 6f: Align the tabs of the glass panel with the holes on the top edge of the fireplace. Thread the screws back into the holes and tighten them both with a screwdriver. STEP 6g: Plug the backlights back in.
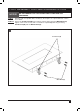
FOOT ASSEMBLY FOR FREE STANDING OPTION NOTICE WE RECOMMEND THAT TWO CAPABLE ADULTS PERFORM THIS PROCEDURE. STEP 7: With the help of a capable adult, carefully lay the fireplace on a protected work surface, on it’s back. STEP 7a: Secure the Foot Bracket(G) to the bottom of the fireplace with two M6x14 Bolts(H). Tighten each screw securely with a screwdriver. Repeat Step 7a using remaining Foot Bracket(G) and two M6x14 Bolts(H).
OPERATION Read and understand this entire owner’s manual, including all safety information, before plugging in or using this product. Failure to do so could result in electric shock, fire, serious injury, or death. POWER Make sure the ON/OFF switch, located on the left side panel, is in the OFF position. Plug the power cord into a 110 Volt 15 Amp grounded outlet (see IMPORTANT SAFETY INFORMATION on Pages 2 and 3). Make sure the outlet is in good condition and that the plug is not loose.
CONTROL PANEL FUNCTIONS NOTICE When the heat function is used for the first time, a slight odor may be present. This is normal and should not occur again unless the heater is not used for an extended period of time. CONTROLS ON FUNCTION Main Power ON/OFF Press ON. Power turns ON. All functions are enabled. Press OFF. Power, flame effect, and all functions turn off. Flame Button Press once to turn flame ON. Press again to turn flame OFF.
REMOTE CONTROL FUNCTIONS NOTICE MAIN POWER ON THE FIREPLACE CONTROL PANEL MUST BE IN THE ON POSITION TO USE REMOTE CONTROL. REMOTE CONTROL BUTTONS FUNCTION Press once to turn flame ON. Press again to turn flame OFF. Press Heater Button once, 750W (LOW HEAT) heater turns on and the fan starts to blow warm air. Press Heater Button again turns on 1,500W (HIGH HEAT) heater turns on and blows hot air. Press Heater Button again and the heater turns OFF.
REMOTE CONTROL BATTERY INFORMATION • This remote control uses one CR2032 battery (included). • Instructions for battery installation are on the Remote Control Battery compartment. PULL RELEASE RELEASE CR2032 OPEN PUSH NEVER dispose of batteries in fire. Failure to observe this precaution may result in an explosion. Dispose of batteries at your local hazardous material processing center.
LIMITED WARRANTY This warrants to the original purchaser that this product is free from defects in material and workmanship as of the date of purchase and that it will, under normal use and proper care, remain so for two years from the date of purchase. Missing or initially defective parts will be replaced free of charge during the period of this limited warranty. If parts are unavailable, comparable replacement or refund will be given. The original dated sales receipt is required for all warranty claims.