
Instructions / Assembly


D) Doors vary in thickness depending on the manufacturer. At
the edge of the door, measure the thickness of the door. Then,
determine the distance to the center to the edge of the door
(half the thickness of the door). Using the awl (or nail), mark
a point on the edge of the door where the centerline pencil
mark (from Step 1C) and the center of the edge of the door
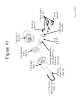
meet (half the thickness), see Figure #3.
Step 2
Drill the Door
A) Using the 2-1/8” hole saw, drill the cross bore hole centered
on the mark made on the face of the door from Step 1B. See
Figure #3. Important: To avoid splintering or marring the
door, drill from one side of the door until the pilot bit comes
through the door. Then nish drilling from the other side of
the door, using the hole made by the pilot bit as your guide
until the cross bore hole is complete.
B) Using the 1” bit, drill the edge bore hole centered on the mark
made on the edge of the door where the centerline and center
thickness met from Step 1D, see
Figure #3. Important:
Make sure that you drill a full 3-1/2” deep, to accommodate
the overall length of the 2-3/8” latch. If you are using a 2-3/4”
backset latch, then the overall depth must be at least 3-3/4”.
v
v
v
v
&ORv"ACKSET
&ORv"ACKSET
#ROSS"ORE
(OLEv
$IAMETER
-ARKFROM
3TEP"
%DGE"ORE
(OLEv
$IAMETER
-ARKFROM
3TEP$
$OOR4HICKNESS
&ACEPLATE
-ORTISE
!REA
#ENTERLINE
-ARKFROM
3TEP#
-INIMUM
vTOCENTER
LINEOFDOOR
KNOBCROSS
BOREHOLE
Door Hardware
Installation Instructions
Rosette Passage and Privacy
Carefully unpackage all components and place them within easy
reach. Find Figure #1 on Page 4 of these instructions for a listing
and drawing of each component. Detach Figure #1 and place
beside the components for easy reference. Check your door to see
if it has been prepped (pre-drilled) for installing a lock. If your
door has already been prepped for installation, start at Step 4. If
your door has not been prepped for installation, you will need a
#2 Phillips screwdriver, a drill, a 2-1/8” hole saw, a 7/64” drill bit,
a 1” drill bit, chisel, pencil, tape and an awl (or nail).
Step 1
Mark the Door
A) Locate the Door Preparation Template that is included with
the instructions. Fold the template along the “edge-of-door”
line. Important: Before positioning the template, make sure
that you are aligning it on the non-hinged edge of the door.
Carefully position the template so that the narrow portion
of the template wraps around the edge of the door, and the
large portion of the template remains on the face of the door,
see Figure #2. The centerline indicates the center of where
the knob or lever will be located. Slide the template up or
down on your door so that the horizontal centerline is located
at a height that is both comfortable to use and attractive in
appearance. Typically this will be approximately 36”-38”
from the oor, see Figure #2. Once you have chosen the
height, tape the template to the door.
B) The backset is the distance from the edge of the door to
the center of the rosette. Standard backsets are 2-3/8” and
2-3/4”. Determine the backset of your latch (Part #5), by
checking the marking on the latch itself (if marked, it will say
2-3/8” or 2-3/4”). If the latch is not marked, measure the latch
between points A and B to determine the backset, as shown
in
Figure #2. Once you know your backset, nd the point on
the template where the centerline crosses the vertical line that
corresponds with the correct backset. Using the awl (or nail)
mark this point, making sure that it is marked well enough to
see on the door once the template is removed.
C) Follow the centerline around the edge of the door and using
a pencil, extend the centerline onto the edge of the door. The
mark should be parallel to the oor. Once this mark is made,
you may remove the template from the door.
Page 1 - PK143
For
Assistance
Call:
1-800-522-7336
8 am - 5 pm, Monday - Friday, MST
(A)
(B)
Template
Edge
of
Door
Face of Door
Centerline
Latch
Backset
Measurement
2-3/8” or 2-3/4”
Figure #2
Figure #3