
Instructions / Assembly
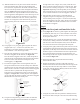

G) Using a 1” drill bit, drill a hole centered on the mark from
Step 8F. Make sure the hole is at least 5/8” deep. Clean out
any sawdust from the hole.
H) Using the strike plate for handleset (Part #26) as a template,
center the strike over the 1” hole, mark a line around it in
pencil and remove from doorjamb.
I) Using the chisel, score the outline of the strike. Next, chisel
away the material within the outline to a depth of 1/16”.
When you are done, you should be able to place the strike
in the mortised out area and it should be flush with the
doorjamb.
J) Again, using the strike as a template and the awl as a marking
tool, mark the two screws holes that will hold the strike on the
door. Remove the strike from the doorjamb to avoid marring
the finish. Then, drill the two screw holes using the 4” x
7/64” drill bit. Make sure the holes are drilled at least 3/4”
deep. Having too small or too shallow of a hole can cause the
screws to shear off.
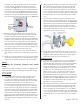
K) Install the dustbox and fasten the strike in place using two
3/4” latch & strike wood screws (Part #3) Hint: Coating the
screw threads with a small amount of soap (liquid or bar soap)
will make installation easier.
Congratulations! You are now
on your way to enriching your
life with !
Page 6 - PK 161