Grandstream Networks, Inc.
DP715/DP710 USER MANUAL Index GNU GPL INFORMATION ......................................................................... 5 CHANGE LOG ........................................................................................... 6 CHANGES FROM 1.0.0.21 USER MANUAL....................................................................................................... 6 CHANGES FROM 1.0.0.8 USER MANUAL.........................................................................................................
REGISTERING A HANDSET TO THE DP715 BASE STATION .............................................................. 28 COMPLETING CALLS ............................................................................................................................. 29 ANSWERING CALLS ............................................................................................................................... 29 INTERNAL CALLS ..........................................................................................
TABLE OF FIGURES DP715/DP710 USER MANUAL Figure 1: CONNECTING THE DP715 BASE STATION .................................................................. 9 Figure 2: CONNECTING THE DP710 CHARGER UNIT ............................................................... 11 Figure 3: INSERTING THE BATTERIES IN THE HANDSET ........................................................ 11 Figure 4: HANDSET KEYS DESCRIPTION ..................................................................................
GNU GPL INFORMATION The DP715/710 firmware contains third-party software licensed under the GNU General Public License (GPL). Grandstream uses software under the specific terms of the GPL. Please see the GNU General Public License (GPL) for the exact terms and conditions of the license. Grandstream GNU GPL related source code can be downloaded from Grandstream web site from: http://www.grandstream.com/support/faq/gnu_gpl . Firmware version 1.0.0.
CHANGE LOG This section documents significant changes from previous versions of DP71x user manuals. Only major new features or major document updates are listed here. Minor updates for corrections or editing are not documented here. CHANGES FROM 1.0.0.21 USER MANUAL Revised some web configuration options description. CHANGES FROM 1.0.0.8 USER MANUAL Added option [MWI LED BlinkingUpdate Handset Time] under Advanced Setting.
WELCOME Thank you for purchasing Grandstream’s DP715/710DECT Cordless IP Phone. The DP715/710 is the next generation of powerful, affordable, high quality and simple to configure DECT Cordless IPPhone for small business and residential users. Their compact size, superb voice quality, rich feature set, market leading price-performance and wide range radio coverage enable consumers to maximize the power of IP voice application and mobility for a minimum investment.
Caution:Changes or modifications to this product not expressly approved by Grandstream, or operation of this product in any way other than as detailed by this User Manual, could void your manufacturer warranty. Please do not use a different power adaptor with the DP715 as it may cause damage to the products and void the manufacturer warranty. This document contains links to DP715 GUI Interfaces. Please download these examples for your reference here: http://www.grandstream.
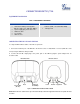
CONNECT YOUR DP715/710 EQUIPMENT PACKAGING Table 1: EQUIPMENT PACKAGING DP715 1Base unit 1 Handset including 2 rechargeable batteries (AAA, 1.2V / 500 mAh, NiMH) 1 power supply plug for the base unit 1 Ethernet cable 1 User guide 1 GPL License DP710 1 Handset including 2 rechargeable batteries (AAA, 1.2V / 500 mAh, NiMH) 1 Charger unit CONNECTING THE DP715 BASE STATION To setup the DP715 Base Station, follow the steps below: 1.
Table 2: DEFINITIONS OF THE DP715 CONNECTORS DC 6V Power adapter connection. NETWORK PORT (RJ-45) 10/100Mbps RJ-45 port toconnect to the network. RESET Factory Reset button: Press for 7 seconds to reset factory default settings. Table 3: BASIC DEFINITIONS OF THE DP715 LEDS PATTERN LEDs POWER LED NETWORK REGISTERED CALL Indicates Power. Remains green when power is connected, and orange when handset is connected for charging. Indicates Access to the Network.
CONNECTING THEDP710 CHARGER UNIT To setup the DP710, follow the steps below: Plug the 7V DC power adapter into an electrical outlet to start using the charger unit. 1 Underside of the charger unit 2 Powersupply plug 1 2 Figure 2: CONNECTING THE DP710 CHARGER UNIT SETTING UP THE DP715/710 HANDSET To setup the handset, follow the steps below: 1. Open the battery compartment (see below). 2. Insert the batteries in the correct polarity (+ and -). 3. Close the battery compartment. 4.
PRODUCT OVERVIEW The DP715/710 is the next generation of powerful, affordable, high quality and simple to configure DECT Cordless IP Phone for small business and residential users. Their compact size, superb voice quality, rich feature set, market leading price-performance and wide range radio coverage enable consumers to maximize the power of IP voice application and mobility for a minimum investment. The VoIP network signaling protocol supported is SIP.
Phonebook (Per Handset) 200 numbers (up to 24 digits) with an associated name (up to 16 characters); 10 outgoing call entries; 30 incoming calls entries Multi-language Base Station Web UI: English; Voice Prompt : English, Spanish; Handset LCD Menu (15): English, French, German, Spanish, Dutch, Italian, Czech, Danish, Greek, Norwegian, Polish, Portuguese, Russian, Swedish, Turkish.
USING THE DP715/710 HANDSET GETTING FAMILIAR WITH THE HANDSET The DP715/710 Handset has a dynamic screen. The screen displays differently depending on whether the handset is idle or in use (active screen). HANDSET KEYS DESCRIPTION 1. 2. 3. 4. 5. 6. 7. 8. 9. 10. 11. 12. 13.
- Power Key : Turn on / Off the handset On-hook: Terminate calls. - Redial List : Display your 10 last Outgoing calls Up Navigation key Increase the volume during the call. - Recall-Key/hook-flash key used to place call on hold toggle between calls. - Call List : Display your 30 last Incoming calls/Missed calls Down Navigation key Decrease the volume during the call.
HANDSET DISPLAY STRUCTURE (LCD) Icon Line Text Line DisplayMenu/OptionsMenu Figure 5: HANDSET DISPLAY STRUCTURE BATTERY DISPLAY • The batteries are fully charged. • The batteries are 75% charged. • The batteries are half charged (50%). • The batteries are only 25% charged. • The batteries are almost flat. The battery icon message appears. in the display flashes and the “Battery Low!” Table 8: LCD ICONS Icon LCD Icon Definitions On Hook. Off Hook. Ringing. Handsfree Speaker ON.
Keypad Locked: ON when the keypad is locked. Range Icon : Solid when it’s within the base unit coverage range. Flashing when it’s out of the base unit coverage range (The handset will display “Searching”). HANDSET MENU STRUCTURE The handset has an easy-to-use menu structure. Every menu opens a list of options. To open the main menu, press the right display key when the handset is ON and in standby mode. Press the key or key to scroll to the menu option you require.
HANDSET MENU OVERVIEW Display Definition Phonebook Displays the contact entries Ring Tone Internal: Allows you to specify the ring tone for internal calls. External: Allows you to specify the ring tone for external calls. Note:The Handset support up to 18 different ring tones. Handset Time Firmware version 1.0.0.23 Ringer Volume Allows you to set the ringer volume level. Handset Name Specifies the Handset Name. Keypad Beep On: Turn on the keypad beep.
Tools Set Time Format 12Hour: Time will be displayed in 12 Hours format i.e. 3:00pm 24Hour: Time will be displayed in 24 Hours format i.e. 15:53 Appointement: Allows you to set up reminders. Stop Watch: Allows you to measure a time interval. HANDSET MENU DESCRIPTION TURNING THE HANDSET ON/OFF 1. Press the power-key to turn the handset on. 2. To switch the handset off, press and hold the power-key until the handset switches off.
Deleting a Call 1. Press to access the calls list. 2. Use or to search for the number you need. 3. Press Option Softkey. 4. Press or 5. Press repeatedly, select Delete. to confirm. 6. The call is deleted and the next call appears on the display. Delete all Calls 1. Press to access the calls list. 3. Press Option Softkey. 4. Press 5. Press or repeatedly, select Delete All. to confirm. Note:Only the old calls are deleted. New calls, i.e. calls that have not been read or answered, are retained.
5. Once the number you require appears in the display and is highlighted, press Option. 6. Press or repeatedly and select Edit Entry. 7. Press to confirm. 8. Press to delete each letter individually and use the alphanumeric keys to enter the correct name. 9. Press Save. 10. Press to delete each individual digit and use the alphanumeric keys to enter the correct phone number. 11. Press Save and select the ringer melody you require. 12. Press Save to save the changes entered.
SELECTING THE MENU LANGUAGE The Handset has a number of menu languages, see software overview features. Proceed as follows to set the language: 1. Press . 2. Scroll withand to Handsetand pressto confirm. 3. Scroll withand to Language and press to confirm. The supported languages will appear on the display. 4. Scroll with and to the required language and press to confirm. 5. You will hear a beep to confirm and the display will show: Saved.
SETTING THE RINGER VOLUME ON THE HANDSET You can adjust the ringer volume for an incoming call (internal or external) to one of 6 levels (level 1 to 5 and Off). If you select Off, the icon appears in the display. The handset will not ring for incoming calls. Level 5 is the highest level. (The Handset is set to level 3 by default). In order to configure the desired ringer volume, proceed as follows: 1. Press . 2. Press or repeatedly, select Handset. 3. Press 4. Press to confirm.
SETTING THE KEY LOCK You can lock the keypad against unintentional entries. It is, however, still possible to pick up incoming calls even with the keypad locked. Enable the Keypad Lock: 1. Press and hold for approximately 2 seconds. 2. The display shows Keypad Locked briefly and the key lock icon appears in the display. Disable the Keypad Lock: 1. Press Unlock then to unlock the keys. 2. Keypad Unlocked appears briefly in the display.
EDIT HANDSET NAME The procedure for changing the name of your handset shown in the display in standby mode is as follows: 1. Press . 2. Press or 3. Press 4. Press repeatedly, select Handset. to confirm. or repeatedly, select Handset Name. 5. Press to confirm. 6. Press repeatedly to delete the letters one after the other and use the alphanumeric keys to enter a new name. 7. Press Saveto set the new handset name. SETTING AN ALARM 1. Press . 2. Press or repeatedly, selectTime. 3. Press 4.
APPOINTMENTS You can set five appointments or reminders to which you can assign a name and an alarm by date and time. 1. Press . 2. Press or repeatedly, select Tools. 3. The Appointment menu item is already highlighted. Press 4. Scroll with 5. Using or or . to one of the five appointments and press and then . select from the following options: a. Edit to edit the settings for the appointment. Edit the name of the appointment and press Save. Enter the date for the appointment and press Save.
BASIC OPERATIONS UNDERSTANDING DP715/710 VOICE PROMPT DP715 Base Station has a built-in voice prompt menu for simple device configuration. The IVR menu work with any Handset registered to the base. Pick up the handset and dial “***” to use the IVR menu.
“Device not registered” This prompt will be played immediately after off hook If the device is not register and the option “Outgoing Call without Registration” is in NO Five Success Tips when using the Voice Prompt 1. “*” shifts down to the next menu option 2. “#” returns to the main menu 3. “9” functions as the ENTER key in many cases to confirm or toggle an option 4. All entered digit sequences have known lengths - 2 digits for menu option and 12 digits for IP address.
If you want to register ahandset to a new base, it has to be first de-registered from the existing base by selecting "desubscribe handset " option under the Handsets tab on the web GUI and then repeat the above steps. COMPLETING CALLS There are three ways to complete a call: A. Dial 1. Press . 3. Dial the number you want once you hear the dial tone. 4.
b. Pick up the handset from the base or charger unit (Only if Auto Talk option is activated). To finish the call, press or place the handset in the base or the charger unit. Note: - You can switch off the ringer temporarily by pressing Silent Soft key. - When you receive a call the Handset will automatically sync up the date and time from the base station. - Due to the channal limitation, DP715 can support at most 4 simutianous calls at the same time.
Using Star Code 1. Pick up the Handset and press then dial “*47” 2. Enter the target IP address. Note: NO dial tone will be played between step 1 and 2. Examples of Direct IP Calls: a) If the target IP address is 192.168.0.160, the dialing convention is *47 or Voice Prompt with option 47, then 192*168*0*160. followed by pressing the “#” key if it is configured as a send key or wait 4 seconds. In this case, the default destination port 5060 is used if no port is specified.
b. A quick busy tone followed by a restored call (on supported platforms only): This means the transferee has received a 4xx response for the INVITE and we will try to recover the call. The busy tone is just to indicate to the transferor that the transfer has failed. c. Continuous busy tone: The phone has timed out. Note:continuous busy tone does not indicate the transfer has been successful, nor does it indicate the transfer has failed.
CALL FEATURES The DP715/710 supports all the traditional and advanced telephony features.
DP715 BASE STATION - CONFIGURATION GUIDE CONFIGURING THE BASE STATION THROUGH VOICE PROMPTS DHCP MODE Select voice menu option 01 to enable DP715 to use DHCP. STATIC IP MODE Select voice menu option 01 to enable DP715 to use STATIC IP mode, then use option 02, 03, 04, 05 to set up IP address, Subnet Mask, Gateway and DNS server respectively. Please refer to UNDERSTANDING DP715/710 VOICE PROMPT for more configuration detail.
The password is case sensitive with maximum length of 25 characters. The factory default password for End User and administrator is “123” and “admin” respectively. Only an administrator can access the “ADVANCED SETTINGS”, “HANDSET SETTINGS” and “PROFILE SETTINGS” configuration pages. Please refer to the GUI pages using the following link: http://www.grandstream.com/products/dp_series/dp71x/documents/dp715_gui.zip.
G726-32 Table 11: BASIC SETTINGS End User Password Password to access the Web Configuration Menu. This field is case sensitive with a maximum length of 25 characters. Web Port By default, HTTP uses port 80. This field is for customizable web port. Telnet Server Default is set to YES. IP Address There are two modes to operate the DP715: DHCPmode: all the field values for the Static IP mode are not used (even though they are still saved in the Flash memory.
Allow DHCP server to set Time Zone Default No. Let the DHCP server handle the Time Zone Language Languages supported with voice prompt and web interface, except Spanish that it is only in IVR. Reset Type • Full Reset: This will make a full reset • ISP Data: This will reset only the basic settings, like IP mode, PPPoE and Web port • VOIP Data: This will reset only the data related with a service provider like SIP server, sip user ID, provisioning and others.
Handset Status Displays relevant information regarding the Handset status. • • • • Core Dump Handset Hook Handset 1 On Hook SIP Registration Registered DND Forward Yes 613 Busy Forward Delayed Forward Handset 1 is registered with SIP Server. Handset 1 user has set Do Not Disturb. Handset 1 user has set his calls to be unconditionally forwarded to ext 613. Handset 1 user has not set Busy or Delay call Forward. Download core dump file for troubleshooting when necessary.
Via TFTP Server This is the IP address of the configured TFTP server. If selected and it is non-zero or not blank, the DP715 retrieves the new configuration file or new code image from the specified TFTP server at boot time. After 5 attempts, the system will timeout and will start the boot process using the existing code image in the Flash memory. If a TFTP server is configured and a new code image is retrieved, the new downloaded image is saved into the Flash memory.
Authenticate Conf File If set to Yes, config file is authenticated before acceptance. This protects the configuration from an unauthorized change. Firmware Key Used for firmware encryption. Should be 32 digit in hexadecimal representation. End user should keep it blank. SSL Certificate The user specifies SSL certificate used for SIP over TLS in X.509 format. SSL Private Key The user specifies SSL private key used for SIP over TLS in X.509 format.
Syslog Server The IP address or URL of System log server. This feature is especially useful for the ITSP (Internet Telephone Service Provider) Syslog Level Select the DP715 to report the log level. Default is NONE. The level is one of DEBUG, INFO, WARNING or ERROR. Syslog messages are sent based on the following events: 1. product model/version on boot up (INFO level) 2. NAT related info (INFO level) 3. sent or received SIP message (DEBUG level) 4. SIP message summary (INFO level) 5.
If activated (by choosing “Yes”) and a STUN server is also specified, then the DP715 performs according to the STUN client specification. Using this mode, the embedded STUN client will detect if and what type of firewall/NAT. If the detected NAT is a Full Cone, Restricted Cone, or a Port-Restricted Cone, the DP715 will use its mapped public IP address and port in all of its SIP and SDP messages.
message Check SIP User ID for incoming INVITE RFC rules. If message will not pass validation process, call will be rejected. Default is No. Check the incoming SIP User ID in Request URI. If they don’t match, the call will be rejected. If this option is enabled, the device will not be able to make direct IP calls. Authenticate incoming INVITE Allow Incoming SIP Messages from SIP Proxy Only SIP T1 Timeout After enable, unit will chanllenge any incoming INVITE with the SIP account password.
to “Yes”, “#” will send the number. In this case, this key is essentially equivalent to the “Dial” key. If set to “No”, this “#” key can be included as part of number. Dial Plan Dial Plan Rules: 1. Accepted Digits: 1,2,3,4,5,6,7,8,9,0 , *, #, A,a,B,b,C,c,D,d 2.
for On-Hold Call Anonymous Call Rejection Session Expiration Min-SE Default is “No”. If set to “Yes”, anonymous call will be rejected. The SIP Session Timer extension enables SIP sessions to be periodically “refreshed” via a SIP request (UPDATE, or re-INVITE. Once the session interval expires, if there is no refresh via a UPDATE or re-INVITE message, the session is terminated.
first vocoder in the above vocoder Preference List or the actual used payload type negotiated between the 2 conversation parties at run time. Symmetric RTP Default is 2, up to 10/20/32/64 for G711/G726/G723/other codecs respectively) Default is No. When set to “Yes” the device will change the destination to send RTP packets to the source IP address and port of the inbound RTP packet last received by the device.
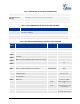
SAVING THE CONFIGURATION CHANGES Click the “Update” button in the Configuration page to save the changes to the DP715 configuration. The following screen confirms that the changes are saved. Reboot or power cycle the DP715 to make the changes take effect. REBOOTING THE DP715 BASE STATION FROM REMOTE Press the “Reboot” button at the bottom of the configuration menu to reboot the DP715 Base Station remotely. The web browser will then display a message window to confirm that reboot is underway.
SOFTWARE UPGRADE Software upgrade can be done via either TFTP or HTTP or HTTPS. The corresponding configuration settings are in the ADVANCED SETTINGS configuration page. FIRMWARE UPGRADE THROUGH TFTP/HTTP/HTTPS To upgrade via TFTP or HTTP/HTTPS, the “Firmware Upgrade and Provisioning upgrade via” field needs to be set to TFTP HTTP or HTTPS, respectively. “Firmware Server Path” needs to be set to a valid URL of a TFTP or HTTP server, server name can be in either FQDN or IP address format.
INSTRUCTIONS FOR UPLOAD FROM LOCAL DIRECTORY 1. Download the firmware file from Grandstream web site 2. Unzip it and copy the file in to a folder in your PC 3. From the DP715 web interface (Advanced Settings page) you can browse your hard drive and select the folder where you previously saved the file. 4. Click “Upload Firmware” and wait few minutes until the new program is loaded. Note: Always check the status page to see that the program version has changed.
Similarly, Config File Prefix and Postfix allows device to download the configuration file with the matching Prefix and Postfix. Thus multiple configuration files for the same device can be stored in one directory. In addition, when the field “Check New Firmware only when F/W pre/suffix changes” is set to “Yes”, the device will only issue firmware upgrade request if there are changes in the firmware Prefix or Postfix.
RESTORE FACTORY DEFAULT SETTING WARNING! Restoring the Factory Default Setting will DELETE all configuration information of the phone. Please BACKUP or PRINT out all the settings before you approach to following steps. Grandstream will not take any responsibility if you lose all the parameters of setting and cannot connect to your VoIP service provider. BASE STATION There are Three (3) methods for resetting the DECT base station: 1.
VOIP Data: This will reset only the data related with a service provider like SIP server, sip user ID, provisioning and others. Note: 1. Factory Reset will be disabled if the “Lock keypad update” is set to “Yes”. 2. If the DP715 was previously locked by your local service provider, pressing the RESET button will only restart the unit. The device will not return to factory default settings. HANDSET Press and hold the 'R' key for about 9 sec until "Handset Reset?" appears on the display.