GXP-2000 IP Phone Quick Installation Guide WARNING: Please DO NOT power cycle the GXP-2000 when LED lights are flashing during system boot up or firmware upgrade. You may corrupt firmware images and cause the unit to malfunction. WARNING: use only the power adapter included in the GXP-2000 package. Using an alternative non-qualified power adapter may possibly damage the unit.
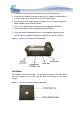
1. Connect the handset and main phone case with the phone cord. 2. Connect the LAN port of the phone to the RJ-45 socket of a hub/switch or a router (LAN side of the router) using the Ethernet cable. 3. Connect the 5V DC output plug to the power jack on the phone; plug the power adapter into an electrical outlet. 4. The LCD will display provisioning or firmware upgrade information. Before continuing, wait for the date/time icon to light up. 5.
Configuring the GXP-2000 using a Web Browser • If DHCP is enabled in your network, the phone’s IP address will be displayed. • Using a PC on the same network, type the IP address (from the screen display) in the URL of your browser. • The default administrator password is “admin”; the default end-user password is “123”. To configure the phone via the web browser, you will need the following information: 1. IP address, subnet mask and gateway IP or available DHCP. 2.
. The phone automatically exits MENU mode with an incoming call, the phone is off-hook or the MENU mode if left idle for 20 seconds GXP-2000 Key Pad Configuration Menu Call History Displays histories of incoming, dialed and missed calls. Status Displays the network status, account statuses, software version and MAC-address of the phone. Phone Book Displays the phonebook. Instant Messages Goes to Instant Messages if the Presence if supported by the service provider or PBX.