TABLE OF CONTENTS GXP USER MANUAL WELCOME .................................................................................................................................................................4 INSTALLATION.........................................................................................................................................................5 EQUIPMENT PACKAGING ........................................................................................................................
Table 8: LCD Buttons.................................................................................................................... 12 Table 9: LCD Icons ....................................................................................................................... 12 Table 10: GXP Keypad Buttons .................................................................................................... 14 Table 11: GXP Call Features .....................................................................
Welcome Your Grandstream GXP Series IP phone features a new sophisticated design and is very easy to use. The GXP combines advanced feature functionality with the latest technology to offer excellent audio quality, ease of use, expandability, and broad interoperability with 3rd party SIP platforms. It is ideal for the enterprise customer. The GXP Series supports a broad range of codecs, security protection, PoE, dual 10/100mbps Ethernet ports and are very easy to manage.
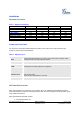
Installation EQUIPMENT PACKAGING Table 1: Equipment Packaging Main Case Handset Phone Cord Power Adaptor Ethernet Cable High Phone Stand Low Phone Stand Wall Mount Spacers (2) GXP-1200 Yes Yes Yes Yes Yes Yes No Yes GXP-2000 Yes Yes Yes Yes Yes No No No GXP-2010 Yes Yes Yes Yes Yes Yes Yes Yes GXP-2020 Yes Yes Yes Yes Yes Yes Yes Yes CONNECTING YOUR PHONE The connectors of the GXP1200/2010/2020 are located on the bottom of the device while they are located on the back side of the GXP2000.
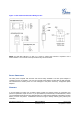
2) One PS2 cable 3) One connection plate 4) One Universal Power Adaptor FIGURE 1: CONNECTING THE GXP–2000 AND THE GXP–EXTENSION GXP–2000 w/GXP–Extension GXP Extension Connecting the GXP–2000 w/GXP–Extension Reverse side of connection w/connection plate Connect the first GXP –EXT to the GXP–2000 using the PS2 cable found in the GXP Extension package. The first GXP–Ext draws power directly from the phone. Connect the second GXP Extension unit using the connection plate and the PS2 cable.
Figure 2: GXP–2000 Internal Headset Wiring Schema NOTE: For GXP-2000 HW REV. 0.3 and 0.4, a 3.5mm to 2.5mm plug converter is required to use a 2.5mm headset. The converter can be purchased at any electronics store. SAFETY COMPLIANCES The GXP phone complies with FCC/CE and various safety standards. The GXP power adaptor is compliant with the UL standard. Only use the universal power adaptor provided with the GXP package.
Product Overview Table 3: GXP Product Models Model Picture Overview GXP1200 is an entry-level SIP phone. It features: y y Two lines Three XML programmable soft keys GXP-1200 GXP2000 is a mainstream SIP phone. It features: y y GXP-2000 Four lines Seven programmable hard keys GXP2010 is a key system SIP phone. It features: y y y GXP-2010 Four lines Eighteen programmable hard keys Three XML programmable soft keys GXP2020 is an executive SIP phone.
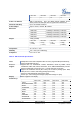
Programmable Hard Keys No 7 18 7 Soft Keys 3 No 3 4 Extension Module No Yes, up to 2 Expansion Modules, 56 nodes each Yes Yes Table 5: GXP Key Features in a Glance Features Benefits Open Standards Compatible SIP 2.0, TCP/IP/UDP, RTP/RTCP, HTTP/HTTPS, ARP/RARP, ICMP, DNS (A record and SRV), DHCP (both client and server), PPPoE, TFTP, NTP, Telnet, and TLS. Superb Audio Quality Advanced Digital Signal Processing (DSP), Silence suppression, VAD, CNG, AGC.
GXP-1200 GXP-2000 GXP-2010 GXP-2020 3 11 22 13 Power over Ethernet Built-in auto-sensing: Cisco and IEEE 802.3af standard: phone draws power from both spare lines or signal lines from Ethernet Universal Switching Power Adaptor Input: 100-240VAC 50-60 Hz Output: +5VDC, 1200mA, UL certified Dimension GXP-1200 GXP-2000 GXP-2010 GXP-2020 210mm(l) x 195mm(w) x 77mm(h) 220mm(l) x 215mm(w) x 57mm(h) 210mm(l) x 250mm(w) x 77mm (h) 251mm(l) x 202mm(w) x 77mm(h) 1.66kg (3.
MSG MENU NAVIGATION (4) Device Management Audio Features Telephony Features Network and Provisioning Firmware Upgrades Advanced Server Features Security Yes Yes Yes Yes Yes Yes Yes Yes Yes Yes Yes Yes NAT-friendly remote software upgrade (via TFTP/HTTP) for deployed devices including behind firewall/NAT Auto/manual provisioning system, GUI Interface Support Layer 2 (802.1Q, VLAN, 802.
Using the GXP SIP Enterprise Phone GETTING FAMILIAR WITH THE LCD GXP-20xx has a dynamic and customizable screen. The screen displays differently depending on whether the phone is idle or in use (active screen). Table 8: LCD Buttons Key Button Key Button Definitions LINE SELECTORS Selects the phone line printed on its right-hand side. SIP PHONE LINES Displays the available phone lines. Choose a phone line by pressing the corresponding line selector on the left-hand side.
Speaker Phone Status Icon: FLASH when phone rings or a call is pending OFF when the speakerphone is off ON when the speakerphone is on DND Icon: ON when the “do not disturb” is activated Activate by pressing MUTE/DEL button twice Calls Forwarded Icon: INDICATES calls are forwarded Follow ‘call forwarding’ procedures Handset, Speakerphone and Ring Volume Icon: Each icon appears next to the volume icon To adjust volume, use the up/down button AM PM Real–time Clock: Synchronized to Internet time server Time
Table 10: GXP Keypad Buttons Key Button Key Button Definitions LINE BUTTONS Line keys with LED, can be configured to different SIP profiles TRANSFER TRANSFER key: Transfer an ACTIVE call to another number CONF Press CONF button to connect Calling/Called party into conference MUTE Mute an active call; or Delete a key entry Also used to ‘REJECT’ incoming call.
MAKING PHONE CALLS Handset, Speakerphone and Headset Mode Handset can be toggled between Speaker and Headset. To switch between Handset and Speaker/Headset, press the Hook Flash in the handset cradle or press the SPEAKER button. Multiple SIP Accounts and Lines GXP can support up to six independent SIP accounts depending on the product model. Each account is capable of independent SIP server, user and NAT settings. Each of the line buttons is “virtually” mapped to an individual SIP account.
3. CALL RETURN: To call the last phone number that called your phone. When returning a call, the phone will use the same SIP account as the call was made to. Thus, when returning a call made to the third SIP account, the phone will use the third SIP account return the call. i. Hand-free option 1. Press the CALL RETURN soft-key ii. Hand-set option 1. Take the Handset off-hook 2. Press the CALL RETURN soft-key 4.
Note: The multi-functional buttons will function as LINE keys when all LINEs are busy. The LED will flash in red to indicate an incoming call. Press the button to pick up the call. If any one of the Multi Purpose Keys is associated with a call, the button’s speed dial/BLF function will not work. Making Calls using IP Addresses Direct IP calling allows two phones to talk to each other in an ad hoc fashion without a SIP proxy.
ANSWERING PHONE CALLS Receiving Calls 1. Incoming single call: Phone rings with selected ring-tone. The corresponding account LINE flashes red. Answer call by taking Handset/SPEAKER/Headset off hook or pressing SPEAKER or by pressing the corresponding account LINE button. 2. Incoming multiple calls: When another call comes in while having an active call, the phone will produce a Call Waiting tone (stutter tone). Next available lines will flash red (as described in section 4.3.2).
5-Way Conferencing GXP can host conference calls and supports 5-way conference calling. 1. Initiate a Conference Call: Establish a connection with two or more parties Press CONF button Choose the desired line to join the conference by pressing the corresponding LINE button. Repeat step 2 and 3 for all parties that you want to join the conference. This can be done at any time, thus also if a n 2. Cancel Conference: Canceling establishing conference call.
CALL FEATURES The GXP supports traditional and advanced telephony features including caller ID, caller ID w/name, call forward/transfer/park/hold as well as intercom/paging and BLF.
Customizable Idle Screen and Soft-buttons GXP also allows you to customize the idle-screen using your own logo on the display of the phone, instead of the Grandstream logo. In addition to the logo, you can reprogram the soft-keys on GXP-1200/GXP2010/GXP2020 for your own customized applications. For more information about creating a custom idle screen and/or reprogramming the soft-keys, please visit our website at: http://www.grandstream.com/resources.html. Grandstream Networks, Inc.
Configuration Guide The GXP can be configured in two ways. Firstly, using the Key Pad Configuration Menu on the phone; secondly, through embedded web-configuration menu. CONFIGURATION VIA KEYPAD To enter the MENU, press the round button. Navigate the menu by using the arrow keys: up/down and left/right. Press the OK button to confirm a menu selection, delete an entry by pressing the MUTE/DEL button.
Configure Press Menu button to display the configuration selections: • Network. To enable/disable DHCP. To setup IP-address, Net mask and Gateway address • SIP To change SIP-server settings for primary account. • Audio • Upgrade In this menu setting regarding the firmware server and config server can be changed. It also enables the user to make the phone attempt to download new firmware. • Factory Reset Key in the physical/MAC address on back of the phone.
FIGURE 3: KEY PAD GUI CALL FLOW Grandstream Networks, Inc. GXP User Manual Firmware 1.1.5.
CONFIGURATION VIA WEB BROWSER The GXP embedded Web server responds to HTTP/HTTPS GET/POST requests. Embedded HTML pages allow a user to configure the IP phone through a Web browser such as Microsoft’s IE or Mozilla Firefox.
Table 13: Device Configuration - Status Hardware Revision Hardware version number: Main Board, Interface Board MAC Address The device ID, in HEXADECIMAL format. IP Address This field shows IP address of GXP Product Model This field contains the product model information. Software Version • • Program: This is the main software (firmware) release number, always used to identify the software (firmware) system of the phone.
Display Clock instead of Choose to display clock or date on LCD. This option applies to GXP-1200/GXP2000 only. Date Daylight Savings Time This parameter controls time displayed in daylight savings time. If set to “Yes”, then the displayed time will be 1 hour ahead of normal time. The “Optional Rule” is configured to automatically adjust the Daylight Savings Time (DST) based on the rule set in this field.
Table 15: Advanced Settings Admin Password Administrator password. Only the administrator can access the “Advanced Settings” and “Account Settings” page. Password field is purposely blank for security reasons after clicking update and saved. The maximum password length is 25 characters. G723 rate Encoding rate for G723 codec. By default, 6.3kbps rate is set. iLBC frame size iLBC packet frame size. Default is 20ms. For Asterisk PBX, 30ms might be required. iLBC payload type Payload type for iLBC.
Use # as Dial Key This parameter allows users to configure the “#” key as the “Send” (or “Dial”) key. If set to “Yes”, the “#” key will immediately send the call. In this case, this key is essentially equivalent to the “(Re)Dial” key. If set to “No”, the “#” key is included as part of the dial string. Local RTP port This parameter defines the local RTP-RTCP port pair used to listen and transmit. It is the base RTP port for channel 0.
Allow DHCP Option 66 to override server Default is Yes. This allows device gets provisioned automatically. Authenticate Conf File Default is “No”. If set to “Yes”, configuration file would be authenticated before acceptance. End user should use default setting. Automatic Upgrade This function is used by ITSP. End user should NOT touch these parameters. Default is No. Choose “Yes” to enable automatic HTTP upgrade and provisioning.
Distinctive Ring Caller ID must be configured. Select a Distinctive Ring Tone 1 through 3 for a particular Caller ID. The GXP will ONLY use selected ring tones for particular Caller IDs. For all Tone other calls, the GXP will use System Ring Tone. When selected and no Caller ID is configured, the selected ring tone will be used for all incoming calls. System Ring Tone System ring tone. Default is North American standard. Adjust system ring tone frequencies and cadences based on local telecom standard.
Outbound Proxy IP address or Domain name of Outbound Proxy, Media Gateway, or Session Border Controller. Used for firewall or NAT penetration in different network environment. If the system detects symmetric NAT, STUN will not work. ONLY outbound proxy can provide solution for symmetric NAT. SIP User ID User account information provided by VoIP service provider (ITSP); either an actual phone number or formatted like one. Authenticate ID SIP service subscriber’s Authenticate ID used for authentication.
Subscribe for MWI: Default is No. When set to “Yes” a SUBSCRIBE for Message Waiting Indication will be sent periodically. PUBLISH for Presence Enable Presence feature. Proxy-Require SIP Extension to notify SIP server that the unit is behind the NAT/Firewall. Voice Mail UserID When configured, user can access messages by pressing “MSG” button. This ID is usually the VM portal access number. Send DTMF This parameter specifies the mechanism to transmit DTMF digit.
Enable 100rel PRACK (Provisional Acknowledgment) method enables reliability to SIP provisional responses (1xx series). This is required to support PSTN internetworking.. Account Ring Tone There are 4 uniquely defined ring tones: • One (1) System Ring Tone: when selected, all calls will ring with system ring tone. • Three (3) Customer Ring Tones: when selected, incoming calls from designated account will play selected ring tone.
Special Feature Default is Standard. Choose the selection to meet special requirements from Soft Switch vendors. SAVING THE CONFIGURATION CHANGES After the user makes a change to the configuration, press the “Update” button in the Configuration Menu. The web browser will then display a message window to confirm saved changes. Grandstream recommends reboot or power cycle the IP phone after saving changes.
Software Upgrade & Customization Software (or firmware) upgrades are completed via either TFTP or HTTP. configuration settings are in the ADVANCED SETTINGS configuration page. The corresponding FIRMWARE UPGRADE THROUGH TFTP/HTTP To upgrade via TFTP or HTTP, select TFTP or HTTP upgrade method. “Upgrade Server” needs to be set to a valid URL of a HTTP server. Server name can be in either FQDN or IP address format. Here are examples of some valid URLs. • • firmware.mycompany.com:6688/Grandstream/1.1.5.
Instructions for local TFTP Upgrade: 1. Unzip the file and put all of them under the root directory of the TFTP server. 2. The PC running the TFTP server and the GXP should be in the same LAN segment. 3. Go to File -> Configure -> Security to change the TFTP server's default setting from "Receive Only" to "Transmit Only" for the firmware upgrade. 4. Start the TFTP server, in the phone’s web configuration page 5. Configure the Firmware Server Path with the IP address of the PC 6.
Restore Factory Default Setting WARNING: Restoring the Factory Default Setting will delete all configuration information of the phone. Please backup or print all the settings before you restoring factory default settings. Grandstream is not responsible for restoring lost parameters and cannot connect your device to your VoIP service provider.