Grandstream Networks, Inc.
GXP1160/GXP1165 User Manual Index GNU GPL INFORMATION........................................................................... 2 CHANGE LOG............................................................................................. 2 FIRMWARE VERSION 1.0.5.2 .............................................................................................................. 2 WELCOME .................................................................................................. 2 PRODUCT OVERVIEW ..........
CUSTOMIZED LCD SCREEN & XML ................................................................................................... 2 CONFIGURATION GUIDE........................................................................... 2 CONFIGURATION VIA KEYPAD ........................................................................................................... 2 CONFIGURATION VIA WEB BROWSER ............................................................................................. 2 DEFINITIONS ...........
Table of Figures GXP1160/GXP1165 User Manual Figure 1: GXP1160/GXP1165 Ports.............................................................................................................. 2 Figure 2: GXP1160/GXP1165 Keypad MENU Flow...................................................................................... 2 Figure 3: GXP1160/GXP1165 Web GUI - Contacts ...................................................................................... 2 Figure 4: GXP1160/GXP1165 Click-to-Dial...................
GNU GPL INFORMATION GXP1160/GXP1165 firmware contains third-party software licensed under the GNU General Public License (GPL). Grandstream uses software under the specific terms of the GPL. Please see the GNU General Public License (GPL) for the exact terms and conditions of the license. Grandstream GNU GPL related source code can be downloaded from Grandstream web site from: http://www.grandstream.com/support/faq/gnu_gpl. FIRMWARE VERSION 1.0.5.
CHANGE LOG This section documents significant changes from previous versions of GXP1160/GXP1165 user manuals. Only major new features or major document updates are listed here. Minor updates for corrections or editing are not documented here. FIRMWARE VERSION 1.0.5.2 This is the initial version. FIRMWARE VERSION 1.0.5.
WELCOME Thank you for purchasing Grandstream GXP1160/GXP1165 Small-Medium Business IP Phone. GXP1160/GXP1165 is a next generation small-to-medium business IP phone that features single SIP account, up to 2 call appearances, a 128 x 40 graphical LCD, 3 XML programmable context-sensitive soft keys, dual network ports with integrated PoE (GXP1165 only), 3-way conference, and Electronic Hook Switch (EHS) with Plantronics headset.
PRODUCT OVERVIEW FEATURE HIGHTLIGHTS 128 x 40 pixel graphical LCD display; Single SIP account, up to 2 call appearances, 3 XML programmable context-sensitive soft keys, 3-way conference; Phonebook with up to 500 contacts and call history with up to 200 records; Automated personal information service (e.g.
Wall Mountable Yes QoS Layer 2 (802.1Q, 802.1p) and Layer 3 (ToS, DiffServ, MPLS) QoS Security User and administrator level passwords, MD5 and MD5-sess based authentication, AES encrypted configuration file, SRTP, TLS, 802.
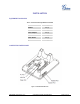
INSTALLATION EQUIPMENT PACKAGING Table 2: GXP1160/GXP1165 EQUIPMENT PACKAGING Main Case Yes (1) Handset Yes (1) Phone Cord Yes (1) Power Adaptor Yes (1) Ethernet Cable Yes (1) Phone Stand Yes (1) Quick Start Guide Yes (1) CONNECTING YOUR PHONE Figure 1: GXP1160/GXP1165 Ports FIRMWARE VERSION 1.0.5.
Table 3: GXP1160/GXP1165 CONNECTORS Handset Port RJ9 handset connector port Headset Port RJ9 headset connector port, supporting EHS (Electronic Hook-Switch) with Plantronics headsets LAN Port 10/100Mbps RJ-45 port connecting to Ethernet, integrated PoE (GXP1165 only) PC Port 10/100Mbps RJ-45 port for PC connection Power Jack 5V DC Power connector port To set up the GXP1160/GXP1165, follow the steps below: 1. Attach the phone stand to the back of the phone where there are slots; 2.
Authorization) number before the product is returned. Grandstream reserves the right to remedy warranty policy without prior notification. Warning: Use the power adapter provided with the phone. Do not use a different power adapter as this may damage the phone. This type of damage is not covered under warranty. FIRMWARE VERSION 1.0.5.
USING THE GXP1160/GXP1165 GETTING FAMILAR WITH THE LCD GXP1160/GXP1165 has a dynamic and customizable screen. The screen displays differently depending on whether the phone is idle or in use (active). The following table describes the items displayed on the GXP1160/GXP1165 idle screen. Table 4: GXP1160/GXP1165 DISPLAY DEFINITIONS DATE AND TIME Displays the current date and time. It can be synchronized with Internet time servers. LOGO NAME Displays company logo name.
OFF - handset on hook ON - handset off hook Speaker Status. OFF - speaker off ON - speaker on Headset Status. OFF - headset off ON - headset on DND Status. OFF - Do Not Disturb disabled ON - Do Not Disturb enabled Call Forward Status. OFF - Call Forward feature disabled ON - Call Forward feature enabled MUTE Status. OFF - The active call is not muted ON - The active call is muted SRTP Status.
Bring up a new line; or answer the second incoming call. Speaker. Send/Redial. Send. Enter the digits and then press Send to dial out the number; Redial. Redial when there is a previously dialed call. Voicemail. Press to retrieve voice mails. Phonebook. Brings phonebook on screen. Navigation Keys/Menu.
dial out the number with the current line. During the call, users can press the FLASH key to hold the current call and make/answer another call. If they are 2 calls established, users can switch the two lines by pressing the FLASH key. COMPLETING CALLS There are several ways to complete a call on GXP1160/GXP1165. On hook dialing. Enter the number when the phone is on hook and then send out.
Press SEND key to dial out. Via Phonebook. Dial the number from the phonebook. Press MENU button to bring up the main menu; Select and enter Phonebook; Select the phonebook entry you would like to call using the navigation "UP" and "DOWN" arrow keys; Press SEND key to dial out. Via Page/Intercom.
can be made between two phones if: Both phones have public IP addresses; or Both phones are on the same LAN/VPN using private or public IP addresses; or Both phones can be connected through a router using public or private IP addresses (with necessary port forwarding or DMZ).
192.168.0.2 calling 192.168.0.123 -- dial #123 followed by # “SEND”; 192.168.0.2: dial #3 and #03 and #003 results in the same call -- call 192.168.0.3. Note: The # will represent colon ":" in direct IP call rather than SEND key as in normal phone call; If you have a SIP server configured, direct IP call still works. If you are using STUN, direct IP call will also use STUN; Configure the "Use Random Port" to "No" when completing direct IP calls.
Hold. Place a call on hold by pressing the HOLD key Resume. Resume call by pressing the HOLD key Multiple calls. Automatically place active call on hold or switch between two calls by pressing the FLASH key ; again; . Call waiting tone (stutter tone) will be audible on incoming call during the active call. MUTE During an active call, press the MUTE softkey to mute/unmute the microphone.
Auto-Attended Transfer. Set "Auto-Attended Transfer" to "Yes" under Web GUI->Advanced Settings page. And then click "Update" on the bottom of the page; Establish one call first; During the call, press TRANSFER key . A new line will be brought up and the first call will be automatically placed on hold; Enter the number and press SEND key After the second call is established, press TRANSFER key to establish the second call; again.
This will resume the 2-way conversation with the current line. Split and Re-conference. During the 3-way conference, press HOLD key . The conference call will be split and both calls will be put on hold separately; Press FLASH key If users would like to re-establish conference call, press the ReConf softkey. to resume the 2-way conversation with the second established call; End Conference. Press HOLD key to split the conference call.
Cancel Conference. If users decides not to conference after establishing the second call, press EndCall softkey; This will end the second call and the screen will show the first call on hold. End Conference. Press HOLD key to split the conference call. The conference call will be ended with both calls on hold; Or Users could press the EndCall softkey or simply hang up the call to terminate the conference call.
*31 *67 *82 *70 *71 *72 *73 *90 *91 Send Caller ID (for all subsequent calls) Off hook the phone; Dial *31. Block Caller ID (per call) Off hook the phone; Dial *67 and then enter the number to dial out. Send Caller ID (per call) Off hook the phone; Dial *82 and then enter the number to dial out. Disable Call Waiting (per Call) Off hook the phone; Dial *70 and then enter the number to dial out.
*92 *93 Hang up the call. Delayed Call Forward. To set up delayed call forward: Off hook the phone; Dial *92 and then enter the number to forward the call; Press OK softkey or SEND key. Cancel Delayed Call Forward. To cancel the delayed call forward: Off hook the phone; Dial *93; Hang up the call. CUSTOMIZED LCD SCREEN & XML The GXP1160/GXP1165 IP phone supports the following XML applications. Please refer to the corresponding link for documentation and templates.
CONFIGURATION GUIDE The GXP1160/GXP1165 can be configured via two ways: LCD Configuration Menu using the phone's keypad; Web GUI embedded on the phone using PC's web browser. CONFIGURATION VIA KEYPAD To configure via the LCD configuration menu using phone's keypad, follow the instructions below: Enter MENU options. When the phone is in idle, press the round MENU button to enter the configuration menu; Navigate in the menu options.
searching. Instant Messages Displays received instant messages. Direct IP Call Makes direct IP call. Preference Preference sub menu includes the following options: Do Not Disturb Enables/disables Do Not Disturb on the phone. Forward Call Configures call forward feature on selected account, forward type and number. Ring Tone Configures different ring tones for incoming call. Ring Volume Adjusts ring volume by pressing left/right arrow key.
Upgrade Configures firmware server and config server for upgrading and provisioning the phone. Factory Reset Resets the phone to factory default settings. Layer 2 QoS Configures 802.1Q/VLAN Tag and priority value. Factory Functions Factory Functions sub menu includes the following options: Audio Loopback Speak to the phone using speaker/handset/headset. If you can hear your voice, your audio is working fine. Press Menu button to exit audio loopback mode.
MENU Call History Status Answered Calls Dialed Calls Missed Calls Transferred Calls Forwarded Calls Clear All Back Groups New Entry Search Download Phonebook XML Delete All Entries Back Phone Book LDAP Search LDAP Configuration Back Directory Instant Messages Direct IP Call Preference Config Factory Do Not Disturb Forward Call Ring Tone Ring Volume LCD Contrast Download SCR XML Erase Custom SCR Display Language Time Settings Back SIP Upgrade Factory Reset Layer 2 QoS Back Functions Network Audio Lo
CONFIGURATION VIA WEB BROWSER The GXP1160/GXP1165 embedded Web server responds to HTTP/HTTPS GET/POST requests. Embedded HTML pages allow a user to configure the IP phone through a Web browser such as Microsoft’s IE, Mozilla Firefox and Google Chrome. To access the GXP1160/GXP1165 Web GUI: 1. Connect the computer to the same network as the phone; 2. Make sure the phone is turned on and shows its IP address. You may check the IP address by pressing NextScr softkey or go to MENU->Status; 3.
an administrator or an end user. Status: Displays the Account status, Network status, and System Info of the phone; Account: To configure the SIP account; Basic Settings: To configure basic network settings, time settings, Line keys, and etc; Advanced Settings: To configure advanced network settings, upgrading and provisioning, language settings, call features, and etc. STATUS PAGE DEFINITIONS Global unique ID of device, in HEX format.
Secondary SIP Server The URL or IP address, and port of the SIP server. This will be used when the primary SIP server fails. IP address or Domain name of the Primary Outbound Proxy, Media Gateway, or Session Border Controller. It's used by the phone for Outbound Proxy Firewall or NAT penetration in different network environments. If a symmetric NAT is detected, STUN will not work and ONLY an Outbound Proxy can provide a solution.
registration with the specified registrar. The default value is 60 minutes. The maximum value is 64800 minutes (about 45 days). Specifies the time frequency (in seconds) that the phone sends Reregister Before Expiration re-registration request before the Register Expiration. The default value is 0. Local SIP Port Defines the local SIP port used to listen and transmit. The default value is 5060 for Account 1 and 5062 for Account 2.
When set to "Yes", a SUBSCRIBE for Message Waiting Indication will SUBSCRIBE for MWI be sent periodically. The phone supports synchronized and non-synchronized MWI. The default setting is "No". SUBSCRIBE for Registration When set to "Yes", a SUBSCRIBE for Registration will be sent out periodically. The default setting is "No". This feature is used for Broadsoft call feature synchronization.
Example 1: {[369]11 | 1617xxxxxxx} Allow 311, 611, and 911 or any 10 digit numbers with leading digits 1617; Example 2: {^1900x+ | <=1617>xxxxxxx} Block any number of leading digits 1900 or add prefix 1617 for any dialed 7 digit numbers; Example 3: {1xxx[2-9]xxxxxx | <2=011>x+} Allows any number with leading digit 1 followed by a 3 digit number, followed by any number between 2 and 9, followed by any 7 digit number OR Allows any length of numbers with leading digit 2, replacing the 2 with 011 wh
Account 1. Configures Call Log setting on the phone. You can log all calls, only log Call Log incoming/outgoing calls or disable call log. The default setting is "Log All Calls". The SIP Session Timer extension that enables SIP sessions to be periodically "refreshed" via a SIP request (UPDATE, or re-INVITE). If there is no refresh via an UPDATE or re-INVITE message, the session Session Expiration will be terminated once the session interval expires.
with selected distinctive ringtone. Matching rules: Specific caller ID number. For example, 8321123; A defined pattern with certain length using x and + to specify, where x could be any digit from 0 to 9. Samples: xx+ : at least 2-digit number; xx : only 2-digit number; [345]xx: 3-digit number with the leading digit of 3, 4 or 5; [6-9]xx: 3-digit number with the leading digit from 6 to 9. Alert Info text Users could configure the matching rule as certain text (e.g.
SIP 401 Unauthorized response. The PBX will need resend the SIP INVITE request with authentication credentials. The default setting is "No". 7 different vocoder types are supported on the phone, including G.711 Preferred Vocoder U-law (PCMU), G.711 A-law (PCMA), G.723.1, G.729A/B, G.722 (wide band), iLBC and G72-32. Users can configure vocoders in a preference list that is included with the same preference order in SDP message. SRTP Mode Symmetric RTP Enables the SRTP mode based on your selection.
setting is "Medium". Conference URI Configures the conference URI when using Broadsoft N-way calling feature. DND Call Feature On Configures DND feature code to turn on DND. DND Call Feature Off Configures DND feature code to turn off DND. Controls whether the Privacy Header will present in the SIP INVITE message or not. The default setting is "default", which is when "Huawei Use Privacy Header IMS" special feature is on, the Privacy Header will not show in INVITE.
Allow DHCP Option 120 to Enables DHCP Option 120 from local server to override the SIP Server override SIP Server on the phone. The default setting is "No". PPPoE Account ID Enter the PPPoE account ID. PPPoE Password Enter the PPPoE Password. PPPoE Service Name Enter the PPPoE Service Name. IPv4 Address Enter the IP address when static IP is used. Subnet Mask Enter the Subnet Mask when static IP is used for IPv4. Gateway Enter the Default Gateway when static IP is used for IPv4.
proxy server will act as an intermediary to route the packets to the destination. Time Zone Configures the date/time used on the phone according to the specified time zone. This parameter allows the users to define their own time zone. The syntax is: std offset dst [offset], start [/time], end [/time] Default is set to: MTZ+6MDT+5,M4.1.0,M11.1.0 MTZ+6MDT+5 This indicates a time zone with 6 hours offset with 1 hour ahead which is U.S central time.
Time Display Format Disable in-call DTMF Display dd-mm-yyyy: 02-07-2012 Configures the time display in 12-hour or 24-hour format on the LCD. The default setting is in 12-hour format. When it's set to "Yes", the DTMF digits entered during the call will not display. The default setting is "No". Configures to enable or disable the speaker to ring when headset is Always Ring Speaker used on "Toggle Headset/Speaker" mode.
Headset RX gain Handset TX gain Configures the receiving gain of the headset. The default value is 0dB. Configures the transmission gain of the handset. The default value is 0 dB. SETTINGS/ADVANCED SETTINGS PAGE Allows users to change the admin password. The password field is Admin Password purposely hidden after clicking the Update button for security purpose. This field is case sensitive with a maximum length of 30 characters.
This is required for the phone to decrypt the encrypted XML configuration file. HTTP/HTTPS User Name The user name for the HTTP/HTTPS server. HTTP/HTTPS Password The password for the HTTP/HTTPS server. Upgrade Via Firmware Server Path Config Server Path Allows users to choose the firmware upgrade method: TFTP, HTTP or HTTPS. Defines the server path for the firmware server. It could be different from the configuration server for provisioning. Defines the server path for provisioning.
Periodic Inform Enable Periodic Inform Interval Connection Request Username Enables periodic inform. If set to "Yes", device will send inform packets to the ACS. The default setting is "No". Sets up the periodic inform interval to send the inform packets to the ACS. The user name for the ACS to connect to the phone. Connection Request Password The password for the ACS to connect to the phone. Connection Request Port The port for the ACS to connect to the phone.
(&(telephoneNumber=%) (cn=*)) returns all the records with the "telephoneNumber" field starting with the entered prefix and "cn" field set. Configures the filter used for name lookups.
setting is "No". LDAP Lookup Configures to enable LDAP number searching when dialing and receiving calls. Configures the display name when LDAP looks up the name for incoming call or outgoing call. This field must be a subset of the LDAP Lookup Display Name Name Attributes. Example: gn cn sn description Use Phonebook Key for LDAP Search If set to "Yes", the Phonebook Key pressing will bring up LDAP search screen. Configures to enable idle screen XML download.
Send SIP Log NTP Server Allow DHCP Option 42 Override NTP Server ethernet link up (INFO level); SLIC chip exception (WARNING and ERROR levels); memory exception (ERROR level). Configures whether the SIP log will be included in the syslog messages or not. The default setting is "No". Defines the URL or IP address of the NTP server. The phone may obtain the date and time from the server. Defines whether DHCP Option 42 should override NTP server or not.
Disable Call-Waiting Tone Disable Direct IP Calls Disables the call waiting tone when call waiting is on. The default setting is "No". Disables Direct IP Call. The default setting is "No". When set to "Yes", users can dial an IP address under the same LAN/VPN segment by entering the last octet in the IP address. To dial quick IP call, off hook the phone and dial #XXX (X is 0-9 and XXX Use Quick IP-Call mode <=255), phone will make direct IP call to aaa.bbb.ccc.XXX where aaa.bbb.
features on the phone. Do Not Escape # as %23 in Specifies whether to replace # by %23 or not for some special situations. SIP URI The default setting is "No". Disable Telnet Disables Telnet access. The default setting is "No". Configures the PC port mode. The default setting is "Enabled". When set PC Port Mode to "Disabled", the PC port is turned off.
Under Web GUI->Account 1 setting page, fill up the SIP server address for account 1. Click "Update" on the bottom of the page; Under Web GUI->Advanced setting page, set Public Mode option to "Yes". Click "Update" and reboot the phone; When phone boots up, SIP User ID and Password to register to the configured SIP server in account 1 will be required. Enter the correct account information to log in to the phone.
Click to group in select the dropdown menu. Click to Click to input number search in and dial from available phonebook. lines. Click to edit this contact. Click to Click to export Click to import Click to call Click to download add new phonebook in phonebook this contact the contacts. XML format. XML file. from information in .vcf phone.
Figure 4: GXP1160/GXP1165 Click-to-Dial Additionally, users could directly send the command for the phone to dial out by specifying the following URL in PC's web browser, or in the field as required in other call modules. http://ip_address/cgi-bin/api-make_call?phonenumber=1234&account=0&password=admin In the above link, replace the fields with ip_address: Phone's IP Address. phonenumber=1234: The number for the phone to dial out account=0: The account index for the phone to make call.
SAVING THE CONFIGURATION CHANGES After users makes changes to the configuration, press the Update button on the bottom of the Web GUI page. We recommend rebooting or powering cycle the IP phone after saving changes. REBOOTING FROM REMOTE LOCATIONS Press the Reboot button on the bottom of the web GUI page to reboot the phone remotely. The web browser will then display a reboot page with message "The device is rebooting now...". Wait for about 1 minute to log in again. FIRMWARE VERSION 1.0.5.
UPGRADING AND PROVISIONING The GXP1160/GXP1165 can be upgraded via TFTP/HTTP/HTTPS by configuring the URL/IP Address for the TFTP/HTTP/HTTPS server and selecting a download method. Configure a valid URL for TFTP or HTTP; the server name can be FQDN or IP address. Examples of valid URLs: firmware.grandstream.com fw.ipvideotalk.com/gs There are two ways to setup a software upgrade server: The IVR Menu or the Web Configuration Interface.
Firmware upgrades take around 60 seconds in a controlled LAN or 5-10 minutes over the Internet. We recommend completing firmware upgrades in a controlled LAN environment whenever possible. NO LOCAL TFTP/HTTP SERVERS For users that would like to use remote upgrading without a local TFTP/HTTP server, Grandstream offers a NAT-friendly HTTP server. This enables users to download the latest software upgrades for their phone via this server. Please refer to the webpage: http://www.grandstream.
server path for the configuration file. It needs to be set to a valid URL, either in FQDN or IP address format. The "Config Server Path" can be the same or different from the "Firmware Server Path". A configuration parameter is associated with each particular field in the web configuration page. A parameter consists of a Capital letter P and 2 to 3 (Could be extended to 4 in the future) digit numeric numbers. i.e., P2 is associated with the “Admin Password” in the Web GUI->Settings->Advanced Settings.
RESTORE FACTORY DEFAULT SETTINGS Warning: Restoring the Factory Default Settings will delete all configuration information on the phone. Please backup or print all the settings before you restore to the factory default settings. Grandstream is not responsible for restoring lost parameters and cannot connect your device to your VoIP service provider.
EXPERIENCING THE GXP1160/GXP1165 Please visit our website: http://www.grandstream.com to receive the most up- to-date updates on firmware releases, additional features, FAQs, documentation and news on new products. We encourage you to browse our product related documentation, FAQs and User and Developer Forum for answers to your general questions. If you have purchased our products through a Grandstream Certified Partner or Reseller, please contact them directly for immediate support.