Grandstream Networks, Inc. GXV300x Series IP Video Phone GXV300x SeriesUser Manual Firmware Version 1.2.3.7 www.grandstream.com support@grandstream.
TABLE OF CONTENTS GXV300X USER MANUAL WELCOME ..................................................................................................................................................................2 GXV3000X SERIES OVERVIEW ................................................................................................................................2 INSTALLATION ......................................................................................................................................
TABLE OF FIGURES GXV300X USER MANUAL Figure 1: Connecting the GXV300x ............................................................................................. 4 Figure 2: GXV LCD Screen ......................................................................................................... 9 Figure 3: Getting Familiar with Keypad ..................................................................................... 10 Figure 4: Configure Menu Options ....................................................
WELCOME Thank you for purchasing the Grandstream GXV300x IP Video Phone. The GXV300x is a cost effective, easy to use and easy to configure IP video communications solution. The GXV300x supports popular voice codecs and H.264, H.263/H.263+ video codec. It is based on SIP industry standard and interoperable with 3 rd party SIP providers, thus enabling you to fully leverage the benefits of VoIP technology, while visually commuting with anyone, anywhere in world.
INSTALLATION Unpack and check all accessories. Equipment included in the package: The GXV300x IP Video Phone package contains: 1. 2. 3. 4. 5. 6. T One GXV300x Main Case One Handset One Phone Cord One Universal Power Adaptor One Ethernet Cable Two Wall Mount Sustaining Brackets SAFETY COMPLIANCES The GXV300x phone complies with FCC/CE and various safety standards. The GXV300X power adaptor is compliant with UL standard. Only use the universal power adapter provided with the GXV package.
CONNECTING YOUR GXV IP VIDEO PHONE FIGURE 1: CONNECTING THE GXV300X 1 2 3 4 5 6 7 8 TABLE 1: DEFINITIONS OF THE GXV-300X CONNECTORS 1 PC 10/100Mbps RJ-45 port for connecting PC as switch mode 2 LAN 10/100Mbps RJ-45 port for uplink to Ethernet. 3 USB USB Interface for external USB device like flash to store captured snapshot image; USB keyboard and mouse. 4 Video/Audio Jacks RCA Output Interface to external display like TV set 5 Headset Jack 2.
WALL MOUNT GXV300x can be wall mounted. The two (2) wall mount sustaining brackets can be attached to the bottom of the main body: To position the phone on the wall, place two fixed hangers on the wall, hang the back of the phone on the fixed hangers. The two sustaining brackets will balance the bottom of the phone and position the phone on the wall.
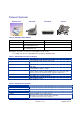
PRODUCT OVERVIEW Desktop View Side View Back View Closed TABLE 2: GXV300X PRODUCT MODELS Model Overview P/N GXV3000 -Three lines xxx-xx001-xxx GXV3005 -Three lines -One LINE(FXO/PSTN) port -Three lines -One PHONE(FXS) port xxx-xx007-xxx GXV3006 xxx-xx010-xxx Note: Digits of P/N which are marked in red indentify the specific model.
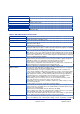
Exterior Black or Silver ABS plastic, 30 buttons (6 of which are LED buttons) Universal Power Supply 100-240V input, 12VDC/1.2A output, US/Euro/UK/Australian style plug available Dimension Weight Operating Temperature Humidity Compliance 6.5cm x 18cm x 16cm 1.
Caller ID (Privacy) Firmware Upgrades Advanced Server Features Security Grandstream Networks, Inc.
USING GXV300X IP VIDEO PHONE GETTING FAMILIAR WITH LCD FIGURE 2: GXV LCD SCREEN The LCD display disappears when the screensaver is on. If you do not want the LCD display, you can turn it off.
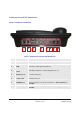
Real-time Clock: Synchronized to Internet time server (Internet required) Time zone configurable via web browser AM/PM indicator Missed Call Icon: Icon appears when you miss a call Number indicates how many missed calls Video Mute: ON when video is disabled Voice/Video Message: ON when there is unheard message Forward: ON when call forwarding is enabled FIGURE 3: GETTING FAMILIAR WITH KEYPAD Line 1-3 keys Mute/Delete Camera Block Message Standard keypad Menu Keys Conference Transfer Phonebook OSD/Came
Table 7: GXV Button Definitions Key Button LINE1-LINE3 Key Button Definitions 3 Line keys with LED, can be configured to different SIP profiles or providers UP ↑ Use button to select next “Menu Item” when phone is in keypad configuration mode; Or increase handset/speakerphone volume when phone is ACTIVE; Or increase ring volume when phone is in IDLE mode DOWN ↓ Use button to select previous “Menu Item” when phone is in keypad configure mode; Or decrease handset/speakerphone volume when phone is ACTIVE;
MULTIPLE SIP ACCOUNTS AND LINES The GXV300x can support up to 3 independent SIP accounts. Each account is capable of independent SIP server, user and NAT settings. Each of the 3 line buttons (LINE1-LINE3) is “virtually” mapped to an individual SIP account. In off-hook state, select an idle line and the name of the account (as configured in the web interface) is displayed on the LCD and a dial tone is heard. Or, press the selected line continuously until the related SIP profile showed up on the LCD.
4. USING THE CALL HISTORY: To call a phone number in the phone’s history When using the call history, the phone will use the same SIP account as was used for the last call/call attempt. Thus, when returning a call made to the third SIP account, the phone will use the third SIP account return the call. • Press the MENU button to bring up the Main Menu.
• Both phones can be connected through a router using public or private IP addresses (with necessary port forwarding or DMZ) To make a direct IP call, please follow these steps: 1. Press MENU button to bring up MAIN MENU. 2. Select “Direct IP Call” using the arrow-keys. 3. Press OK to select. 4. Input the 12-digits target IP address. (Please see example below). 5. Press OK key to initiate call. For example: If the target IP address is 192.168.1.60 and the port is 5062 (e.g. 192.168.1.
MAKING PHONE CALLS Receiving Calls 1. Incoming single call: Phone rings with selected ring-tone. The corresponding account LINE flashes red. Answer call by taking Handset/SPEAKER/Headset off hook or pressing SPEAKER. 2. Incoming multiple calls: Call Waiting tone audible. Next available lines will flash red . 3. Paging/Intercom Enabled: Phone beeps once and automatically establishes the call via SPEAKER. (PBX or Server must support this feature first) Call Waiting/ Call Hold 1.
3. Cancel Conference: If after pressing the “CONF” button, a user decides not to conference anyone, press CONF again will cancel the operation. 4. End Conference: To end a conference, one way is to press HOLD, this breaks the conference and places both parties on hold, user can now speak to individual party by selecting the corresponding blinking LINE. Another way is simply hand up and terminate the call.
Camera Local Loopback Display and OSD ON/OFF Enable/Disable camera local loopback display and OSD (On Screen Display). This key functioning in loop switch when pressed continuously, the camera local loop back, OSD display, PIP, PIP swap will appear or happen on the LCD screen continuously in a loop mode. OSD Display Explanation: • • PCMU/H.264 : Audio / Video codec used in the call, this shows audio is using G.711 µlaw (PCMU) and video is using H.
CALL FEATURES The GXV300x supports traditional and advanced telephony features.
CONFIGURATION GUIDE The GXV300x can be configured in two ways. Firstly, using the Key Pad Configuration Menu on the phone; secondly, through embedded web-configuration menu. CONFIGURE OPERATION WITH KEYPAD • • • • To enter the MENU, press the OK button. Navigate the menu by using the arrow keys: up/down and left/right. Confirm a menu selection by pressing the OK button Delete an entry by moving the cursor before it then pressing the MUTE/DEL button.
FIGURE 5: FLOW CHART OF KEY PAD CONFIGURATION MENU Grandstream Networks, Inc. GXV300x User Manual Firmware 1.2.3.
TABLE 9: KEY PAD CONFIGURATION MENU Config Press Menu button to display the configuration selections: • Network. To enable/disable DHCP. To setup IP-address, Net mask and Gateway address • SIP To change SIP-server settings for primary account. • Audio • Video Codecs • Upgrade In this menu setting regarding the firmware server and config server can be changed. It also enables the user to make the phone attempt to download new firmware. • Factory Reset Key in the physical/MAC address on back of the phone.
• Keypad/LED Diagnostics All LEDs will light up Press any key on the keypad, to display the button name in the LCD. Lift and put back the handset or press Menu button to exit the diagnostic mode. • LCD Diagnostics • Camera/LCD Test Pattern • Video Loopback • Audio Loopback Speak into the handset. If you hear your voice in the handset, your audio works fine. Press Menu button to exit the mode. • PSTN Loopback • Ethernet Loopback Connect a cross Ethernet cable from your “PC” port, and the “LAN” port.
1 The Web-enabled computer has to be connected to the same sub-network as the phone. This can easily be done by connecting the computer to the same hub or switch as the phone is connected to. In absence of a hub/switch (or free ports on the hub/switch), please connect the computer directly to the phone using the PC-port on the phone. 2 If the phone is properly connected to a working Internet connection, the phone will display its IP address. This address has the format: xxx.xxx.xxx.
Registered This field indicates whether the accounts are registered to the related SIP server(s). GXVx3000 can support up to three different SIP profiles. PPPoE Link Up This field shows whether the PPPoE connection is up if connected directly to DSL modem. NAT / NAT Mapped IP This field shows what kind NAT router the GXV300x is connected to. It is based on the resolve result of STUN Server used. STUN will not work if it is Symmetric NAT.
IP Address The GXV300x operates in two modes: • DHCP mode: all the field values for the Static IP mode are not used (even though they are still saved in the Flash memory.) The GXV300x acquires its IP address from the first DHCP server it discovers on its LAN. The DHCP option is reserved for NAT router mode (currently NOT implemented). • To use the PPPoE feature, set the PPPoE account settings. The GXV300x establishes a PPPoE session if any of the PPPoE fields is set.
Disable SIP User Display Default is No. If enabled, SIP User ID will not be shown on the LCD Disable IP Address Display Default is No. If enabled, the IP address of the phone will not be shown on the LCD LCD Screen Saver Start Interval Default value is 60 seconds, 0 means turn off this feature. After 60 seconds the Screen Saver will start. The Screen saver file stored in flash is limited to 20 images or 320kb. Change screen saver in the same way as customized ring tone.
TABLE 12: ADVANCED SETTINGS CONFIGURATION PAGE DEFINITIONS Admin Password Administrator password. Only the administrator can configure the “Advanced Settings” page and “Account x” pages. Password field is purposely blank for security reasons after clicking update and saved. The maximum password length is 25 characters. G723 rate G.723 audio codec encoding rate, either 6.3kbps or 5.3kbps, check with ITSP or Server/Proxy.
Video Frame Skipping Skipping the bad video frame received Default is No. Sharpening Filter Sharpening filter for incoming video. Default value is 5 Brightening Filter Brightening filter for incoming video. Default value is 5 Tone Remapping Filter Default value is 32. It can be used to improve video quality under low light conditions by equalizing (remapping) colors/tones. Tone Remapping Filter can also be adjusted after video conversation is established.
Use Random Port This parameter, when set to “Yes”, will force random generation of both the local SIP and RTP ports. This is usually necessary when multiple GXV300xs are behind the same full cone NAT. Default is No. (This parameter should be set to NO when using Direct -IP Calls) Keep-alive interval This parameter specifies how often the GXV300x sends a blank UDP packet to the SIP server in order to keep the “pin hole” on the NAT router to open. Default is 20 seconds.
Authenticate Conf File Authenticate configuration file before acceptance. Default is No. Screen Saver Download This is the path for screen saver image downloading. It may or may not be the same path as the firmware or configuration server. User can adjust based on own network environment. Phonebook XML Download This is the path for XML based phonebook to be downloaded into the phone. User can use TFTP or HTTP to download the phonebook.
Call Progress Tones Using these settings, users can configure ring or tone frequencies based on parameters from local telecom. By default, they are set to North American standard. Frequencies should be configured with known values to avoid uncomfortable high pitch sounds. Syntax: f1=val,f2=val[,c=on1/off1[-on2/off2[-on3/off3]]]; (Frequencies are in Hz and cadence on and off are in 10ms) ON is the period of ringing (“On time” in ‘ms’) while OFF is the period of silence.
INDIVIDUAL ACCOUNT SETTINGS The GXV300x has 3 line appearances, each with an independent SIP account. Each SIP account requires its own configuration page. Their configurations are identical. TABLE 13: SIP ACCOUNT CONFIGURATION PAGE DEFINITIONS Account Active This field indicates whether the account is active. The default value for the primary account (Account 1) is Yes. The default value for the other two accounts is No. Account Name The name associated with each account - displayed on LCD.
NAT Traversal (STUN) This parameter defines whether the NAT traversal mechanism is activated. If activated (by choosing “Yes”) and a STUN server is also specified, then the GXV300x will behave according to the STUN client specification. Using this mode, the embedded STUN client detects what type of NAT/Firewall router used and displayed the result in Status Page.
Dial Plan Dial Plan Rules: 1. Accept Digits: 1,2,3,4,5,6,7,8,9,0 , *, #, A,a,B,b,C,c,D,d 2. Grammar: x - any digit from 0-9; • xx+ - at least 2 digits number; • xx. – at least 1 digit number.
Callee Request Timer If selecting “Yes”, the phone will use session timer when it receives inbound calls with session timer request. Force Timer If set to “Yes”, the phone will use session timer even if the remote party does not support this feature. If set to “No”, the phone enables the session timer only when the remote party supports this feature. To turn off Session Timer, select “No”.
Jitter Delay Select desired Jitter Buffer Delay. Default is Medium. It is using 100, 200 and 400ms to match the setting of low, medium and high for audio. The video always buffered and played in synchronize with audio. Grandstream recommends “High” for a poor network environment. Enable Video Yes: video is enabled for all calls. This is the default value. No, but allow in-call enabling : Receiving call: There are two ways to pick up incoming video call.
AC Termination Impedance Selects the impedance of the analog line connected to the FXO port on GXV3005 Here is some basic information which may be helpful for initial configuration: 600 Ohm – North America; 270 Ohm + (750 Ohm || 150 nF) -- Most of Europe 220 Ohm + (820 Ohm || 120 nF) – Australia, New Zealand 220 Ohm + (820 Ohm || 115 nF) – Austria, Bulgaria, Germany, Slovakia, South Africa 370 Ohm + (620 Ohm || 310 nF) – UK., India Silence Timeout Terminate call after long silence detected.
Volume Amplification Voice path volume adjustment. • Rx is a gain level for signals transmitted by FXS • Tx is a gain level for signals received by FXS. Default = 0dB for both parameters. Loudest volume: +6dB Lowest volume: -6dB. User can adjust volume of call on either end using the Rx Gain Level parameter and the Tx Gain Level parameter located on the FXS Port Configuration page.
CONFIGURATION THROUGH SECURE CENTRAL PROVISIONING SERVER Grandstream GXV300x can be automatically configured from a central provisioning system. When GXV300x boot up, it will send TFTP or HTTP request to download configuration file, “cfg000b82xxxxxx”, where “000b82xxxxxx” is the LAN MAC address of the GXV300x. The configuration file can be downloaded via TFTP or HTTP/HTTPS from the central server.
SOFTWARE UPGRADE & CUSTOMIZATION Software (or firmware) can be upgraded using either TFTP or HTTP. The corresponding configuration settings are in the ADVANCED SETTINGS configuration page. FIRMWARE UPGRADE THROUGH TFTP/HTTP To upgrade via TFTP or HTTP, select TFTP or HTTP upgrade method. “Firmware Server Path” needs to be set to a valid IP or URL of a HTTP or TFTP server. Server name can be in either FQDN or IP address format. Here are examples of some valid URLs. • • firmware.mycompany.
Alternatively, download and install a free TFTP or HTTP server and perform firmware upgrades. Free Windows version TFTP server is available: http://support.solarwinds.net/updates/New-customerFree.cfm. Or http://tftpd32.jounin.net/. Instructions for firmware upgrade via a Local TFTP Server: 1. Unzip the file and put all of them under the root directory of the TFTP server. 2. The PC running the TFTP server software and the GXV300x should be in the same LAN segment. 3.
NOTE: Make sure to set “Allow DHCP Option 66 to override server” to NO, otherwise, If DHCP option 66 turned ON in LAN, the TFTP server can be redirected. MANAGING FIRMWARE AND CONFIGURATION FILE DOWNLOAD When “Automatic Upgrade” is set to “Yes”, Service Provider can use P193 (Auto Check Interval, in minutes, default and minimum is 60 minutes) to have the device periodically checked for upgrades at prescheduled time intervals.
GXV CUSTOMIZATION XML PHONEBOOK Introduction The Grandstream GXV enables you to easily share and maintain a phonebook through the web. The XMLphonebook must be stored on a web-server. There are also applications where organizations wish to be able to have a centralized directory server and have all phones in the organization to sync up with the server periodically.
XML Syntax XSD file PAGE 47 6000 1 SCREENSAVER IMAGES Customize the screensaver images by using the free “Screensaver Generation Tool” downloadable from http://www.grandstream.com/support/gxv_series_phone/gxv300x/gxv300x_support.html under “Firmware & Downloads” tab Personalize the screensaver by downloading your favorite pictures.
FIGURE 7: SCREENSHOT OF SCREENSAVER UTILITY • • • Remember the limitation of the image.bin file (20 images or 320kb) Put the generated file (image.bin) into the same folders as the firmware files Reboot or Power cycle the phone and wait image.bin file downloaded successfully. CAUTION: Please do not interrupt the power supply during file downloading. You may damage the phone.
CUSTOMIZED RING TONES Download the free Ringtones Generation tool from http://www.grandstream.com/support/downloads.html Please follow the same rules as above Screensaver Images to generate the ringtone files and load them into the phone. HTU UTH Ringtone File Size File requirements for ring tone conversion: 1. Must be either .wav or .mp3 format [recommend .wav format] 2. Converted file size must be less than 64KB other wise it will override next file slot space. 3.
AUXILIARY PORTS USB 2.0 PORT When a USB flash drive is connected to a USB 2.0 port, an icon is displayed in the higher right section of the LCD. Same when USB keyboard or mouse plugged into the ports. CAPTURE PICTURES VIA USB PORT Once a USB flash drive is connected and ready for use (an icon will show up in lower part of the LCD), the user can save a snap shot or capture a picture from camera to the flash drive.
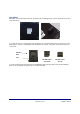
Headset Jack FIGURE 10: HEADSET JACK DIAGRAM The left side of the diagram illustrates the RJ22 (handset plug) pin assignment; the right side illustrates the 2.5mm headset plug. Additional adaptors are necessary to connect the phone to an external speaker or intercom/paging system. (Adaptors can be purchased from an local electronics store).
FIGURE 11: HEADSET CROSS-OVER DIAGRAMS Roll Over Cable (already provided, to connect the handset to phone base) a b c d d c b a One End Another End Cross Over Cable (required for Plantronics Headset) a b c d One End Grandstream Networks, Inc. b a d c Another End GXV300x User Manual Firmware 1.2.3.
VIDEO SURVEILLANCE To use the GXV300x as a video surveillance camera, please configure the GXV300x and the monitor PC in the same LAN environment. Advanced users may manipulate it to work over WAN (configuration not recommended and not covered in this User Manual). For best results, Grandstream recommends using this feature in the same LAN environment or ensure both monitor PC and phone have static public IP address.
FIGURE 12: SCREENSHOT – MONITORING STATION Grandstream Networks, Inc. GXV300x User Manual Firmware 1.2.3.
Grandstream Networks, Inc. GXV300x User Manual Firmware 1.2.3.
RESTORE FACTORY DEFAULT SETTING WARNING: Restoring the Factory Default Setting will delete all configuration information of the phone. Please backup or print all the settings before you restoring factory default settings. Grandstream is not responsible for restoring lost parameters and cannot connect your device to your VoIP service provider.