Grandstream Networks, Inc. GXV3140 IP Multimedia Phone GXV3140 USER’S MANUAL SOFTWARE VERSION 1.0.0.44 www.grandstream.com support@grandstream.
GXV3140 User Manual Index WELCOME .................................................................................................. 5 GXV3140 Overview ........................................................................................................................ 5 INSTALLATION ........................................................................................... 6 EQUIPMENT PACKAGING .............................................................................................................
DEVICE MANAGER PAGE DEFINITIONS .................................................................................. 39 SAVING THE CONFIGURATION CHANGES...................................................................................... 40 REBOOTING FROM REMOTE ........................................................................................................... 40 CONFIGURATION THROUGH A CENTRAL SERVER ....................................................................... 40 LCD MENU AND FEATURES ..
Figure 1: Connecting GXV3140 .................................................................................................................... 7 Figure 2: Wall Mount for GXV3140 ............................................................................................................... 7 Figure 3: Phone Stand for GXV3140 ............................................................................................................ 8 Figure 4: Front, Side and Back View of GXV3140..........................
WELCOME Thank you for purchasing the Grandstream GXV3140 IP Multimedia Phone. The GXV3140 is designed for the high-end enterprise market and is easy to use and configure. It supports a broad range of audio codecs and H.264,H.263/H.263+ video codecs. Based on the SIP standard, it is interoperable with 3rd party SIP platforms. The GXV3140 takes full advantage of VoIP technology to allow plug and play communication anywhere in the world.
INSTALLATION EQUIPMENT PACKAGING The GXV3140 package should include: 1. One GXV3140 Phone Main Case 2. One Handset 3. One Phone Cord 4. One Universal Power Supply 5. One Ethernet Cable 6. One Phone Stand 7. One Headset Dongle 8. One Quick Start Guide SAFETY COMPLIANCES The GXV3140 phone complies with FCC/CE and various safety standards. The GXV power adapter is compliant with the UL standard. Only use the universal power adapter provided with the GXV package.
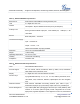
CONNECTING THE GXV3140 IP MULTIMEDIA PHONE Figure 1: Connecting GXV3140 Table 1:GXV3140 Connectors 1 SD Card Slot SD Card Slot 2 USB Port USB devices may be connected via the USB port. For example, you can connect a USB flash drive to save captured pictures or use a USB keyboard or mouse for the built-in web browser. 3 Headset Jack 3.5mm headset connector port 4 RCA Voice/video output port which can be connected to external peripherals (e.g. Video/Audio Jacks TV).
The phone can be mounted on the wall via the two slots on the back of the phone. PHONE STAND The GXV3140 can also be placed on the table via the phone stand. The GXV3140 has two positions for the stand on the back of the phone; each position supports a different angle. Figure 3: Phone Stand for GXV3140 GXV3140 USER MANUAL SOFTWARE VERSION 1.0.0.44 www.grandstream.com support@grandstream.
PRODUCT OVERVIEW Figure 4: Front, Side and Back View of GXV3140 Table 2: GXV Key features at a glance Open Standards record and SRV), DHCP, PPPoE, TFTP, NTP Compatible Interfaces Extraordinary 2 10/100Mbps Ethernet Ports,1 USB(2.0)port,3.5mm headset port. Audio Quality Extraordinary Video Quality Advanced Features SIP 2.0, TCP/IP/UDP, RTP/RTCP, HTTP/HTTPS, ARP/RARP, ICMP, DNS (A Advanced DSP for audio,Silence Suppression,VAD,CNG,AEC,AGC Supports real-time video H.263/H.263+ and H.
Advanced Functionality Support for multiple lines, conferencing, headset, Intercom, AES encryption. Table 3:GXV3140 Hardware Specification Ethernet Port Dual switched 10M/100M auto-sensing Ethernet ports LCD 4.3” digital TFT color LCD Camera Auxiliary Ports Tilt Capable 1.3M pixel CMOS camera with privacy shutter(VGA) RCA Type Stereo & Media output port,3.5m headset port,1 USB port,1 SD card reader Exterior Universal Power Supply Black ABS plastic,30 buttons Input:100-240V AC Output:12V DC,1.
provisioning system, GUI interface, phone book, remote software (TFTP/HTTP) upgrade for deployed devices including those behind a NAT/firewall. Provisioning Support for automatic NAT/firewall traversal & remote automatic software upgrade and security, providing end-users with “zero configuration” and true “plug-and-play” functionality. Support for remote configuration monitoring and syslog. Configuration through LCD, web browser or an external configuration file.
waiting indicator, downloadable custom ring tone. Caller ID(Privacy) Firmware Upgrade Private header support for anonymous calls. Configuration file authentication (before accepting changes); TFTP/HTTP upgrade support, allows users to specify different URLs for the server to download from. Advanced Features Security Server DNS SRV support, SIP server failure transfer, message waiting indicator and custom screensaver.
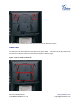
USING THE GXV3140 IP MULTIMEDIA PHONE LCD When the phone is idle, the LCD screen will look similar to the figure below (The extension number may be different from case to case, depending on the network environment and the settings): Figure 5:GXV3140 LCD Idle Screen Press the F2 button underneath “Switch Screen” to switch to another display screen. (Shown in figure below): Figure 6: LCD IDLE screen displaying RSS News feed and Stock GXV3140 USER MANUAL SOFTWARE VERSION 1.0.0.38 www.grandstream.
Press F2 again to switch to a display screen that displays the calendar and weather forecast. Figure 7: LCD IDLE screen displaying Calendar and Weather forecast Table 5:LCD Icon Definition Type Icon Network Definition Note Connected to the network Failed to connect to the network, the icon will flicker between yellow and gray. Line 1 Status GXV3140 USER MANUAL SOFTWARE VERSION 1.0.0.44 Line 1 is registered www.grandstream.com support@grandstream.
Line 1 is not registered The Account and line status Line are status separate. will only show busy or idle.
Phone Status Camera disabled. Do-Not-Disturb (DND) Missed Call. If there is a new missed call, the icon will flicker. Mute Screen Layout Icon The Small layout can be First Desktop(Small Layout) selected in the Personalize/Screen Second Desktop(Small Layout) Layout menu. First Desktop(Big Layout) The Big layout can be selected Second Desktop(Big Layout) in the Personalize/Screen Layout menu. Third Desktop(Big Layout) Audio Output The headset is in use and is off hook.
Alarm clock Media(music/video)Player The icon is displayed at the right hand-side of the status bar. Internet radio The icon is displayed at the right hand-side of the status bar. Web browser The icon is displayed at the right hand-side of the status bar. External devices SD card USB flash drive. USB keyboard USB mouse Figure 8:GXV3140 Keypad Table 6:GXV3140 Keypad definition Key Definition GXV3140 USER MANUAL SOFTWARE VERSION 1.0.0.44 www.grandstream.com support@grandstream.
4 function/soft keys that correspond to the functions displayed on the LCD. Line/Account selection. Three independent SIP accounts may be configured, and the Line button can be used to choose the line/account to be used. Retrieve video/voicemail message or other messages. Phonebook Standard telephone keypad. The # key can act as a send key. In the input mode, if an English alphabet needs to be entered, press the corresponding numerical key multiple times.
Camera Loopback button. This button Enables or Disables the camera display on the local LCD. Call Transfer: Allows the user to transfer a call to another extension or number. Places the call on hold Conference button - connects the caller/callee to the conference Sends a new number or redials the last number dialed. Turns the Speaker ON or OFF. Navigation Buttons: These arrows keys serve as up/down/left/right button when used in the GXV3140’s menus. The middle button is used as the submit/select button.
HANDSET, SPEAKER AND HEADSET MODE The GXV3140 allows users to switch from the handset to speaker or headset by pressing the Hook Flash, the Headset FUNCTION button or the SPEAKER Button. MAKING A CALL There are several ways to make a call: 1. Enter the number: • Take the handset off hook or use the speaker/headset,press the LINE button and select the desired account/line by pressing the corresponding FUNCTION button. • A dial tone is given, adjust account if necessary. • Enter the number • Press SEND 2.
5. By Messages: Enter the Menu by pressing F1, and then select “Messages”. The LCD screen will display the Message Inbox, Sent messages and Draft messages. Select the message and press F3 for “Options”, and then select “Dial” to dial out to the number. 6. On-hook Dialing: Without lifting the handset off the hook, simply dial the number and press F3 to SEND. This phone will dial the number and the audio will be output via speakerphone. The phone will use the primary account to dial out.
2. Attended Transfer:Press the “LINE” button to select an idle line to use for attended transfer; this will place the other party on hold immediately. Dial the number that you wish to transfer to and after confirmation from the party, press the “CALL TRANSFER” button. The phone will display the following message: “Dial Number (Blind) OR Select Line (Attended)”. Press the “LINE” button and select the line on hold.
MUTE 1. During a call, the LCD screen will display “Mute”. Press the corresponding FUNCTION button to mute. 2. After the “Mute” button is pressed, the LCD screen will display “Unmute”, when this button is pressed, the mute feature is cancelled. GXV3140 USER MANUAL SOFTWARE VERSION 1.0.0.44 www.grandstream.com support@grandstream.
CALL FEATURES These are the feature codes for call features. To use the code, select the line you wish to use by pressing the LINE button and enter these feature codes. Table 7: Call Features Code Feature *30 Block Caller ID (for all subsequent calls) *31 Send Caller ID (for all subsequent calls) *50 Disable Call waiting (for all subsequent calls) *51 Enable Call Waiting (for all subsequent calls) *67 Block Caller ID (per call): Dial *67 + Phone/Ext. Number (no dial-tone in between).
GXV3140 WEB CONFIGURATION INTERFACE The GXV-3140’s embedded Web server responds to HTTP/HTTPS GET/POST requests. Embedded HTML pages allows users to configure the IP Multimedia Phone through a Web browser such as Microsoft’s IE or Mozilla Firefox (Java Script must be enabled).
• Open a Web-browser on your computer. • Enter the phone’s IP-address in the address bar of the browser. • Enter the administrator’s login and password to access the Web Configuration Menu. 1. The Web-enabled computer has to be connected to the same sub-network as the phone. This can easily be done by connecting the computer to the same hub or switch as the phone is connected to.
• Boot: Booting code version number • DSP: DSP code version number • Base: Base code version number • Core: Core code version number • GUI-A, GUI-B: GUI interface version number System Up Time This field shows system up time since the last reboot. Status/Network Status MAC Address The device ID, in HEX format. This is a very important ID for ISP troubleshooting. Address Type This field shows the type of address configured: DHCP, Static IP or PPPoE.
When set to YES, this parameter will force random generation of both the local Use Random Port SIP and RTP ports. This is usually necessary when multiple GXV-3140s are behind the same full cone NAT. The Default setting is YES. (This parameter must be set to NO before Direct IP Calling will work) Keep-alive Intervals (s) This parameter specifies how often the GXV-3140 sends a blank UDP packet to the SIP server in order to keep the “pin hole” on the NAT router to open. The Default setting is 20 seconds.
high pitch sounds. Syntax: f1=val,f2=val[,c=on1/off1[-on2/off2[-on3/off3]]]; (Frequencies are in Hz and cadence on and off are in 10ms) ON is the period of ringing (“On time” in ‘ms’) while OFF is the period of silence. In order to set a continuous ring, OFF should be zero. Otherwise it will ring ON ms and a pause of OFF ms and then repeat the pattern. Up to three cadences are supported. Ring Cadence This defines the ring cadence for the phone.
Video Frame Skipping Skips bad video frames as they are received The Default setting is NO. Advanced Settings/Network Resources Weather Update This allows the user to set their preferred location for the weather forecast. City (Zip Code): Enter the zip code of the city the user wishes to receive weather updates. Refresh Interval (m): Set the interval for weather updates. Degree Units: Lets you specify the temperature to be measured in Fahrenheit or Celsius.
Server. Preferred DNS Server This field sets the preferred DNS server for the user. Layer 3 Qos This field defines the layer 3 QoS parameter. It is the value used for IP Precedence, Diff-Serv or MPLS. The Default value is 0. Layer 2 QoS This field contains the value used for layer 2 VLAN tagging. The Default value 802.1Q/VLAN Tag is 0. Layer 2 Qos 802.1p This assigns the priority value of the Layer2 QoS packets. The Default value is 0.
Config File Postfix This field enables your ITSP to lock configuration updates. If configured, only the configuration file with the matching encrypted postfix will be downloaded and flashed into the phone. DHCP Option 66 override Server The Default setting is YES. If DHCP option 66 is enabled on the LAN side, the TFTP server can be redirected. Please be very careful when configuring this as the redirection could break the phone if this happens during the firmware upgrade.
SIP ACCOUNT CONFIGURATION PAGE DEFINITIONS The GXV3140 has three lines that can configure independent SIP accounts. Every SIP account has an individual configuration page. Account/Generic Settings Account Active Select YES to enable and use the Line. Account Name The Account name for the user that is displayed on the LCD screen. SIP Server The IP address of the SIP server or the given domain name of the VoIP service provider.
In this mode, the STUN client embedded in the phone will communicate with the appointed STUN server to examine which type of Firewall/NAT setting is employed. If the type of NAT detected is Full Cone, Restricted Cone or Port-Restricted cone, the phone will try to use public IP addresses and port in all the SIP and SDP messages.
Enable 100rel Obtains a SIP temporary response (1xx) using PRACK method in order to support the PSTN network. Request for a reliable temporary response with 100rel tag added to the first message request header. Caller Request Timer The default setting is Yes. If Yes is selected, the phone will use the session timer when it makes outbound calls if remote party supports session timer.
vocoders are chosen, there could be an audio transmission error. Preferred Video Coder Selects the preferred video codec between H.264,H.263 or H.263+. It is recommended to use H.264 H.264Payload type Selects the dynamic H.264 codec payload type (ranges from 96-127). The default setting is 99 H.263+ Payload type Selects the H.263+ codec payload type (ranges from 96-127). The default setting is 103 SRTP Mode Select to Enable SRTP mode. The default is set to Disable.
Jitter Buffer Length User can select Low, Medium, or High based on network conditions. The default is Medium. Account/Call Settings Dialing Prefix Sets the prefix added to each dialed number. Dialing Plan Dial Plan Rules: 1. Accepted Digits: 1,2,3,4,5,6,7,8,9,0 , *, #, A,a,B,b,C,c,D,d 2. Grammar: x - any digit from 0-9; a) xx+ - at least 2 digit numbers b) xx.
activate voice mail or other applications provided by their service provider, the * should be predefined inside the dial plan feature. An example dial plan will be: { *x+ } which allows the user to dial * followed by any length of numbers. Early Dial The default setting is NO. Only use this if the proxy supports the 484 response. Refer to Use Target The default is NO. If set to YES, then for Attended Transfer, the “Refer-To” Contact header uses the transferred target’s contact header information.
DEVICE MANAGER PAGE DEFINITIONS Device Manager/ LCD Screen Saver Timeout This sets the lapsed idle time needed for the screen saver to appear. The default (m) setting is 5 minutes. Screen Saver Interval The screen saver is a picture slide show. This defines the frequency to change the picture on the screen for the screen saver. (s) The default setting is 10 seconds. LCD Auto Power Off This defines the lapsed idle time needed for the LCD to power off automatically Time (m) in order to save power.
SAVING THE CONFIGURATION CHANGES After users makes changes to the configuration, press the “Save” button in the Configuration Menu. The web browser will then display a message window to confirm the saved changes. Reboot the phone for the new settings to take effect. REMOTE REBOOT Press the “Reboot” button at the top right-hand corner of the configuration menu to reboot the phone remotely. The web browser will then display a message window to confirm with the user if they wish to reboot the phone or not.
LCD MENU AND FEATURES The GXV3140 has a user-friendly LCD Menu and multiple features that provide the users with convenient tools/applications for both work and personal entertainment. In other words, the GXV3140 acts as your personal assistant in many different ways. The LCD MENU and Features will be explored in more detail below. PHONE BOOK FEATURES Users can manage their contacts through the phone book.
As shown in the figure above, every contact contains an Extension number, Phone number, Mobile number, Fax number and the group it belongs to. On the lower right hand corner, it shows that the total capacity of the phone book is 500 contacts, as well as the number of used contacts. The user may dial the contact by pressing F1, and can search for a contact by pressing F2. When searching, the user needs to enter the user name to search and press OK to confirm.
In “Options”, select “Delete” to delete the contact, select “Delete All” to delete all of the contacts in the phone book; Select “Download” and the screen will display the following: In order to complete the download of a phonebook from a server, users should configure the Download mode and the URL/IP address of the Download server. After it is configured, select the “Download” button next to “Download now” to start downloading.
to view and manage all calls (Dialed, Received, and Missed). Access the MENU by selecting F1 and select Call History, as shown in the figure below: Press F1 to Select the Call History, and you will enter a screen similar to the one below: As shown in the figure above, each user can choose to Dial, Save or Delete a Call Record. The Dial option will allow you to perform a re-dial or dial out to the number. The Save option will save the number to the phone book.
Menu and then select Messages (as shown in the figure below): Press F1 to Select Messages. The screen should look similar to the one below: As shown in the figure above, users can create, view and manage their messages. When the user presses F3 to select “Options”, the user can dial the number of the sender, save the number of the sender, or delete the message(s). When the user receives a message, the following notification will show up on the LCD screen: GXV3140 USER MANUAL SOFTWARE VERSION 1.0.0.
Press F3 to Select OK. This will open the message for the user to view. As shown in the figure above, the users can choose to “Reply”, “Forward” or “Delete” the message. CALL FEATURES The Call Features menu allows the user to configure Call Forwarding methods (Forward unconditionally, Forward when busy, Forward on no answer) and other features such as Auto-Answer, Call Waiting and DND. Users can configure the three accounts to different call forwarding schemes.
Press F1 to Select Call Features and the following screen will be displayed: Other features include configuration for Auto Answer, Do Not Disturb, Call Waiting, Call Waiting Tone, and Direct IP Call (as shown in the figure below): GXV3140 USER MANUAL SOFTWARE VERSION 1.0.0.44 www.grandstream.com support@grandstream.
After the settings are configured, select “Save” to save and activate the settings. WEB BROWSER The GXV3140 provides users with a full HTML Web Browser for internet browsing. This is accessible by pressing the F1 button to load the MENU, and then select Web Browser (as shown in the figure below): After selecting OK, it may take several seconds to load the web browser. The LCD screen should look like the figure below when the web browser is loading: GXV3140 USER MANUAL SOFTWARE VERSION 1.0.0.44 www.
When the web browser has finished loading, a default page displaying “Hello, welcome to GXV3140” shows up on the screen. Users can then press F4, corresponding to the “Options”, to move “Forward” and “Backward” on web pages. By selecting “URL” under “Options”, the user can enter the URL of a website. The user can press the F3 button which corresponds to the Tab option to toggle the curser. Similarly, users can choose “Zoom“ under “Options” to zoom in and zoom out of a webpage.
MULTIMEDIA The GXV3140 provides Multimedia applications such as Internet Radio, Media player, Photo viewer, Photo album, Gstris and Online Music. Press F1 to select the MENU and scroll to Multimedia (as shown in the figure below): Select Multimedia by pressing the OK button or “Select”. The multimedia features are shown in the figure below: GXV3140 USER MANUAL SOFTWARE VERSION 1.0.0.44 www.grandstream.com support@grandstream.
z INTERNET RADIO As shown in the figure above, select F1 or OK to load the Internet Radio application. The channels are divided into the following categories: My Favorites, Talk Channels, Music Channels, Sports Channels, Ethnic Channels and Local Radio. The users may select the channels according to their preferences. The screen will look like the figure below: As shown in the figure above, users can then press the F1 button to adjust the volume.
In addition, users may configure “My Favorites” by pressing F2 button for “Control”. This would bring out a toolbar, where users can add/delete/modify and navigate through the “My Favorites” playlist (As shown in the figure below). z MEDIA PLAYER The GXV3140 Media Player allows users to play music files through the GXV3140. To access the Media Player, select MENU->Multimedia-> Media Player. (As shown in the figure below): Press the OK button or F1 to select the Media Player.
As shown in the figure above, press F1 to adjust the volume of the media player (Navigate by using the Up and Down buttons). Press F2 to enable the “Tab” option, this allows the user to move the cursor between the four buttons: “Previous”, “Play”, “Stop” and “Next”. Press F3 for “Options”. Users can perform the following operations on the playlist: Add, Remove, Up, Down, Delete and Save. Users can also select the channel for output: Headset, Speaker and Stereo.
Press the OK button or F1 to Select the Photo Viewer. After the application loads, the user may select to view pictures from different folders: The screen will look similar to the figure below when the user loads any picture from a folder (For example, open the first picture from the “screenshot” folder). Users can choose F1 or F2 to select the “Previous” or the “Next” picture.
accessed by selecting MENU->Multimedia->Photo Album (as shown in the figure below): Press F1 to “Select” Photo Album. After the Photo Album is loaded, the following screen will appear; the user can choose which online photo album to use and press Start to begin activating it. Users must register for an account with a photo album service provider (i.e. Photobucket, Flickr, Phanfare) or use an existing account.
z GSTRIS The GXV3140 provides interactive games for your entertainment. Under Menu->Multimedia, choose Gstris (As shown in the figure below). Access the Gstris application by pressing F1 (corresponding to Select) or the OK button. Press the F1 and F2 to start/stop or pause the game (as shown in the figure below). GXV3140 USER MANUAL SOFTWARE VERSION 1.0.0.44 www.grandstream.com support@grandstream.
z ONLINE MUSIC The GXV3140 also provides an Online Music streaming application. Users must have a pre-existing account with LastFm before listening to online music through the GXV3140. Users can also select their preferred music genre and listen to it online. To access the Online Music, select MENU->Multimedia-> Online Music (as shown in the figure below): Press F1 to “Select” Online Music.
Press F1 to adjust the volume (see the figure above) and press F3 for “Options”. In “Options”, there are several settings: the Play/Stop option will control the music, the Next option will skip the current song and play the next one, the Output option allows you to choose the output channel (Headset, Speaker, Stereo), Mute and Minimize. OFFICE TOOLS The GXV3140 provides a collection of useful office tools for users and can be accessed via MENU.
z CALENDAR This feature includes adding an event to the calendar, and can be accessed by pressing the F1 button corresponding to the “Add an event” option on the LCD (as shown in the figure below). As seen in the figure above, users can press F1 to “Add New Event”, where events such as birthdays may be added to the calendar. Press F2 for “Tab”, this allows the curser to move from year/month/date on the calendar, so that the date can be adjusted accordingly.
z CALCULATOR The GXV3140 also includes a Calculator application. To operate the calculator, press the corresponding number on the keypad. The arithmetic operations (e.g. add, subtract, multiply, divide) are defined by the corresponding arrow buttons. z WEATHER UPDATE The GXV3140 also includes a weather updates application that provides users with the most up to date information on the weather forecast. Users may set the City (Zip code) to display the weather update for that particular city.
(in minutes) and the preferred temperature units. z RSS NEWS The GXV3140 allows users to subscribe to different RSS feeds. The GXV3140 supports up to 3 customized feeds (as shown in the figure below). The user is able to subscribe to news that is relevant to the topic of interest. You can also configure the refresh time of the RSS feeds: z DIRECT IP CALL Another key feature supported on the GXV3140 is Direct IP Calling.
the LCD as shown in the next figure: z IM The GXV3140 provides support for the following Instant Messaging services: Google Talk, MSN, QQ and Yahoo. Users must have a pre-existing account in order to start using the Instant Messaging feature. Users may manage their accounts by going to Options->Accounts->Manage Accounts (as shown in the figure below). Users will be prompted for login information for the Instant Messaging service of their choice as seen in the figure below.
z FILE MANAGER The GXV3140 provides a file manager as a tool to manage files such as music, pictures and documents. Users can manage their documents efficiently through the File Manager. As shown in the figure below, users can access different folders to manage their files. Ringtones and screenshots are stored in separate folders. If a USB device is connected, its contents will also be displayed in the File Manager.
The GXV3140 includes a Stock Market monitoring application that conveniently retrieves current information regarding the stock market. As shown in the figure above, the users can use the “Add Stock” option by pressing F1. This adds a new stock to the list after you enter the stock symbol. Users can refresh the contents by pressing F2 for ‘Refresh” and press F3 for “Options” to delete or delete all stocks.
SETTINGS The System Settings allow users to configure settings for Accounts, Network, Time, Display, Maintenance and the Camera. To access the system settings, press F1 to open the MENU and select Settings. z ACCOUNTS SETTINGS This menu lets users configure the three SIP accounts; the same configurations may be completed by accessing the web configuration interface.
In the “Other” page, users may choose to set the Preferred DNS server, Layer 3 QoS, Layer 2 QoS 802.1Q/VLAN tag and Layer 2 QoS 802.1 priority value. z TIME SETTINGS The GXV3140 allows the time to be updated automatically through an NTP Server. Users must define the Time Zone or use a Self-defined Time Zone. You can also specify the display format for the time and date. z DISPLAY SETTINGS GXV3140 USER MANUAL SOFTWARE VERSION 1.0.0.44 www.grandstream.com support@grandstream.
This screen allows the user to adjust the LCD Backlight brightness, LCD Contrast, and LCD Saturation. In addition, users may configure the TV OUT mode (NTSC or PAL) here. Note: After setting TV out to an external source, the phone LCD screen will black out. Please make sure that you have plugged in the external output source before selecting this option. To return the display to the LCD menu, log into the web browser interface and disable TV Out in “Device Manager” -> “TV Output”.
The Factory Functions page provides some testing diagnostics for the LCD, camera and audio on the GXV3140. (As shown in the figure below) The Debug page (as shown in the figure below) contains the built-in debug tools for the GXV3140. The debug tools make it more convenient to obtain corresponding information and traces when the system encounters problems. To start capturing traces, users need to Enable Application Debug and press the Start button next to the Capture Packets option.
z CAMERA This screen allows the user to modify the camera settings for the GXV3140. Settings such as Color Mode, White Balance, Flicker Control and Lens Correction can be configured. (As shown in the figure below) PERSONALIZE Users may personalize the phone by selecting their preferred screen layout, soft key function, screen display and language settings. To access Personalize, press F1 for MENU, toggle to Personalize and press the OK button to select it. GXV3140 USER MANUAL SOFTWARE VERSION 1.0.0.
z SCREEN LAYOUT Users can choose between Small Layout, Big Layout, or Custom Layout (by uploading an XML file) by toggling between the Left and Right buttons. z SOFTKEY Users can define the soft/function key functions of the Main Screen and Call Screen. There are several soft key functions that the user can select for the 4 function keys. Note: Selecting the “Snapshot” option for one of the softkey functions for the Call Screen lets you capture a snapshot of the remote party during the call.
The interval and the timeout period can also be specified here. z LANGUAGE This screen allows users to select the preferred language. Users can download the corresponding Language File from the TFTP/HTTP server to expand to the language selection menu. z MY PROFILE This screen allows users to configure the login username and password for the phone. GXV3140 USER MANUAL SOFTWARE VERSION 1.0.0.44 www.grandstream.com support@grandstream.
z TONES This screen allows users to configure the alarm tone and the event alert tone for the GXV3140. INFO This screen displays the System, Network and Account information. GXV3140 USER MANUAL SOFTWARE VERSION 1.0.0.44 www.grandstream.com support@grandstream.
System information such as Product Model, Hardware Version, Part Number, System Up Time and Software Version are displayed here. As shown in the figure above, users can view the Network Information: MAC address, Address Type, IP address, Subnet Mask, Gateway, DNS Server and NAT Type. GXV3140 USER MANUAL SOFTWARE VERSION 1.0.0.44 www.grandstream.com support@grandstream.
The number and the status of the three SIP accounts can be viewed here. GXV3140 USER MANUAL SOFTWARE VERSION 1.0.0.44 www.grandstream.com support@grandstream.
SOFTWARE VERSION UPGRADE The GXV3140 can be upgraded via TFTP/HTTP/HTTPS by configuring the URL/IP Address for the TFTP/HTTP/HTTPS server and selecting a download method. Configure a valid URL for TFTP or HTTP, the server name can be the FQDN or IP address format. Examples of valid URLs: 1. firmware.mycompany.com:6688/Grandstream/ 2. 168.75.215.189 There are two ways to setup a software upgrade server: The Keypad Menu or the Web Configuration Interface.
Instructions for downloading and using a free TFTP Server: 1. Unzip the firmware files and put all of them in the root directory of the TFTP server. 2. Connect the PC running the TFTP server and the GXV3140 device to the same LAN segment. 3. Launch the TFTP server and go to the File menu -> Configure -> Security to change the TFTP server's default setting from "Receive Only" to "Transmit Only" for the firmware upgrade. 4.
RESTORE FACTORY DEFAULT SETTINGS WARNING: Restoring the Factory Default Settings will delete all configuration information on the phone. Please backup or print all the settings before you restore to the factory default settings. Grandstream is not responsible for restoring lost parameters and cannot connect your device to your VoIP service provider. There are two methods to restore the GXV3140 to the factory default settings.
Step 3: Press “Select” (F1 or the OK button) to access the Maintenance page. In the Upgrade tab, press the Down arrow twice to select the Factory Reset option. (Shown in the figure below) Step 4: Press the OK button, the phone will display a warning message. (Shown in the figure below) GXV3140 USER MANUAL SOFTWARE VERSION 1.0.0.44 www.grandstream.com support@grandstream.
Step 5: Press the OK button again to select “OK”. The phone will reboot and perform a factory reset. RESTORE TO FACTORY DEFAULT SETTINGS VIA THE WEB INTERFACE Step 1: Login to the system configuration page through a web browser and select “Maintenance”. From the menu on the left, select “Upgrade and Provisioning”. This will bring up the upgrade and provisioning page as shown in the figure below. GXV3140 USER MANUAL SOFTWARE VERSION 1.0.0.44 www.grandstream.com support@grandstream.
Step 2: At the bottom of the page, click on the “Reset” button for Factory reset. A dialog box will pop up (as shown in figure below) Click on OK to restore the phone to factory settings. GXV3140 USER MANUAL SOFTWARE VERSION 1.0.0.44 www.grandstream.com support@grandstream.
EXPERIENCING THE GXV3140 MULTIMEDIA PHONE When the user boots the phone for the first time, Account 1 will be registered to the IP Video Talk server with a provisioned extension of 810xxxx. If the user has purchased two or more GXV3140 IP Multimedia phone, the phones are able to establish video calls between each other and the user can immediately experience the plug and play nature of the GXV3140.