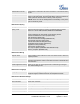
Authenticate Conf File Authenticate configuration file before acceptance. The Default setting is NO. Factory Reset Restore to factory default settings. Users can choose from: Full Reset, VoIP Data Reset, and User Data Reset. After the selection is made, press the “Reset” button to factory reset the phone. NOTE: Users can use the backup/restore functionality of the phone prior to the factory reset. Maintenance/Syslog Syslog Server The URL/IP address for the syslog server.
Username Connection Password Request Enter connection request password Maintenance/OpenVPN Settings This enables/disables OpenVPN functionality. The default setting is No. To use OpenVPN functionality, it requires user to have access to an OpenVPN server. OpenVPN Enable OpenVPN Address Server The URL/IP address for the OpenVPN server. OpenVPN Server Port The network port for the OpenVPN server. By default, it is set to 1194. OpenVPN CA OpenVPN CA file (ca.
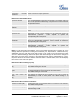
Maintenance/Device Manager (Camera) Select the desired camera zoom mode (Tele, optical, digital). Can Zoom mode adjust local video zoom either in mirror mode or during the call (on the fly) by pressing the Left or Right Arrow Key. Exposure Setting Select the desired Camera Exposure mode based on the surroundings. The default setting is set to Auto. The default setting is 8. Color Mode Select the desired Camera Color Mode (Color or Monochromatic). The default setting is set to Color.
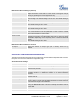
Tel URI The default setting is “Disable”. If the Video phone has an assigned PSTN number, this field should be set to “Enable”. If “User=Phone” is set, a “User=Phone” parameter will be attached to the “From header” in the SIP request to indicate the E.164 number. Account/Network Settings Outbound Proxy IP address or Domain name of the Outbound Proxy, or Media Gateway, or Session Border Controller. Used by the GXV3175 for firewall or NAT penetration in different network environments.
Force INVITE Caller Request Timer Callee Request Timer Force Timer Enable 100rel SIP Transport Symmetric RTP Support SIP Instance ID Validate Incoming Messages SIP T1 Timeout SIP T2 Interval Remove OBP from route refresher, or select UAS to use the phone as the refresher. The Session Timer can be refreshed using the INVITE or UPDATE methods. Select “Yes” to use the INVITE method to refresh the session timer The default setting is Yes.
Preferred Video Codec H.264Payload type H.263+ Payload type L16-256 Payload type H.263 Encoder Resolution Silence Suppression Voice Frame per TX with the up and down buttons. It is recommended to use the default setting “PCMU”; if other vocoders are chosen, there could be an audio transmission error. Selects the preferred video codec from the available list. It is recommended to use H.264. Selects the dynamic H.264 codec payload type (ranges from 96-127). The default setting is 99. Selects the H.
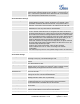
1. Accepted Digits: 1,2,3,4,5,6,7,8,9,0 , *, #, A,a,B,b,C,c,D,d 2. Grammar: x - any digit from 0-9; a) xx+ - at least 2 digit numbers b) xx.
Anonymous Rejection Call Special Feature Enable Call Features Call Forward Unconditional Call Forward When Busy Call Forward When No Answer Delayed Call Forward Wait Time (s) No Key Entry Timeout (s) Ring Timeout (s) Transfer on Conference Hangup Use # as Dial Key Account ring tone Ring Tone be set to anonymous to block the caller ID from displaying. The default setting is NO.
LCD MENU AND FEATURES The GXV3175’s user-friendly LCD MENU provides easy access to a host of features and convenient tools to help simplify the users’ business and personal life. Essentially, the GXV3175 can act like a personal assistant in many ways. In this section, we’ll explore the LCD MENU and Features and explain how users can take full advantage of the GXV3175’s capabilities. CONTACTS Users can easily manage all the contacts through CONTACTS.
Figure 35: Adding a new contact To import/export contacts, in the screen shown as Figue 34, select “Options”->“Import/Export”. Then in the screen shown as Figure 36, select “Import” or “Export” in “Operation Mode”. There are three types of File to be selected: “XML”, “CSV” and “VCard”. For “Import”, users could select to “Clear The Old List” and “Replace Duplicate Items” in the imported files.
immediate download or press “OK” to finish the operation. Figure 37: Download phonebook.xml To delete all the contacts, users could select “Options”->“Delete All” in Figure 34. CALL HISTORY GXV3175 supports call record up to 100 dialed calls, 100 received calls and 100 missed calls. Users may access the phone’s call records through “MENU” -> “Call History”. See Figure 38.
Messages is a text message feature in GXV3175. If two GXV3175s are registered on the same SIP server, text messages can be sent/received between two parties. Similarly, if other IP products support this feature, the text message feature can also be used to send/receive messages between the device and the GXV3175. This application is accessible by selecting “MENU”-> “Messages”.
choose the account from which the message will be sent out. After that, enter the phone number by tapping on the blank area in “Phone Number” field then press the activated “Add” button. Or simply press “Find in Contacts” button to add the number from contact list. Figure 41: Add receiver’s number After pressing “Find in Contacts” button, users will see the screen as Figure 42 shows. The primary number for the contact will show in the list by default.
Figure 43: Send out message The “Send” button will be activated after the message text and receiver are added successfully. Press “Send” to send the message out. To view and reply message, select “Inbox” or press “View” in the incoming message alert window. (See Figure 44) Figure 44: New message alert To reply or forward the received message, press “Reply” or “Forward” in the Figure below. Grandstream Networks, Inc. GXV3175 USER MANUAL FIRMWARE VERSION 1.0.0.
Figure 41: Incoming message To delete all the messages, press “Empty” button in Figure 39. SOCIAL NETWORKS • Google Voice The GXV3175 IP Multimedia Phone supports Google Voice to enable the user to enjoy the social connections. Google Voice application in GXV3175 enables the users to make calls, send messages, manage contacts and account after logging in Google Voice account.
Figure 43: Login Google Voice Account Figure 44: Using Google Voice in GXV3175 After logging in, users could tap on the number of the keypad shown in Figure 44. Then press “Dial” to make a call. Press “SMS” to send messages. To view the call history, press “Call Logs” in the menu on the left of the screen and press the . See Figure 45. Users will be able to dial out or send message to the refresh icon contact in Call Logs by tapping on the selected entry in the displayed list. Grandstream Networks, Inc.
Figure 45: Google Voice-> Call Logs . See Figure 46. Select and To view messages, press “Message” and the refresh icon press on one of the messages to reply the message or dial out. The maximum letters allowed in the message is 160. Figure 46: Google Voice-> Messages To view the contacts set in google voice account, press “Contacts” and a list of contacts will show up in the screen. Users could also call or send messages to selected contact here by choosing one entry and tapping on it. See Figure 47.
Figure 47: Google Voice-> Contacts To setup Callback Number for the account, press “Account” and tap on the “Down” arrow to select the number from the dropdown list. See Figure 48. Figure 48: Google Voice Account Settings To logout Google Voice accout, press “Logout” and select “Yes” in the popping out message “Are you sure to logout?” Users could also minimize Google Voice and use other applications on GXV3175 at the same time without logging out by pressing icon . Press icon to exit Google Voice.
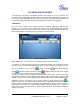
Figure 49: GXV3175 Web Browser Users can view the web page by holding the finger and dragging in the touchscreen. Press icon to move backward and to move forward. Figure 50 shows the screen of the web browser while visiting Grandstream website. Figure 50: Using the GXV3175 Web Browser While browsing the website, users can press icon browser, press to refresh the webpage. To exit web . MUSIC To utilize the GXV3175’s Online Music streaming application, users could access Internet Radio and Last.
Sports and World. Figure 51: Menu->Music->Internet Radio As shown in Figure 51, users can select one of the channels according to their preference. Then toggle through the channel list using scroll bar and select one channel. Press or to play or stop the selected program. Scroll the volume bar to adjust the volume. To change the audio output, press “Options” button down in the left corner. Then press “Output” and select “Speaker”, “Headset” or “Stereo”.
• Last.fm Last.fm is a social platform for users to select preferred music genre, share and listen to it online. Users must have a pre-existing account with Last.fm before listening to online music. Users could login the Last.fm account after registration via www.last.fm or on the phone following the instructions. After the application loads, the username and password for Last.fm will be prompted. See Figure 53. If the users haven’t registered a Last.fm account yet, press “Sigh up for a Last.
blank field above the playlist on the left. Press to play the music in search result as shown in Figure 55. Users could select audio output among “Speaker”, “Headset” or “Stereo” by pressing “Output” button. Figure 55: Last.fm->Play music In Figure 55, users could press to play the song and press changing to the next song. Tap on the volume bar to adjust the volume. To add the song in “My Love Tracks”, press then the song will be added the list under “My Love Tracks”. If not be played again.
Figure 56: Youtube Application Users can also upload their own videos to YouTube via GXV3175. To upload a video to You Tube, the user has to login with an existing YouTube account or register for a YouTube account first via Options->Login. See Figure 57. Figure 56: Youtube Account Login After login is successful, select “Option”-> “Upload”.
Figure 57: Upload Videos to Youtube Account Besides viewing videos from the built-in video feed, users can also search for videos according to keyword and preferences. This is done by pressing “Option”->“Search”. Then enter the keyword in “Search Word” and press “Search” button. (See figure 58) Figure 58: Search Online Videos To add the video to “Favorite”, users need to login Youtube account. Then after select a video, press “Favorite” button (See Figure 59).
Figure 59: Add video to Favorite Grandstream Networks, Inc. GXV3175 USER MANUAL FIRMWARE VERSION 1.0.0.
SOFTWARE UPGRADE The GXV3175 can be upgraded via TFTP/HTTP/HTTPS by configuring the URL/IP Address for the TFTP/HTTP/HTTPS server and selecting a download method. To configure a valid URL for TFTP or HTTP, the server name can be the FQDN or IP address format. Examples of valid URLs: 1. fw.ipvideotalk.com/gs 2. 72.172.83.110 There are two ways to setup a software upgrade server: Via Menu or the Web Configuration Interface.
6. Update the changes and reboot the GXV3175. End users can also choose to download a free HTTP server from http://httpd.apache.org/ or use Microsoft IIS web server. Grandstream Networks, Inc. GXV3175 USER MANUAL FIRMWARE VERSION 1.0.0.
RESTORE FACTORY DEFAULT SETTINGS WARNING: Restoring the Factory Default Settings will delete all configuration information on the phone. Please backup or print all the settings before you restore to the factory default settings. Grandstream is not responsible for restoring lost parameters and cannot connect your device to your VoIP service provider. There are two methods to restore the GXV3175 to the factory default settings.
EXPERIENCING THE GXV3175 MULTIMEDIA PHONE Please visit our website: http://www.grandstream.com to receive the most up- to-date updates on firmware releases, additional features, FAQs, documentation and news on new products. We encourage you to browse our product related documentation, FAQs and User and Developer Forum for answers to your general questions. If you have purchased our products through a Grandstream Certified Partner or Reseller, please contact them directly for immediate support.
FCC Certification Mark Warning This device complies with Part 15 FCC specifications, and operation complies with the following conditions :(1) The device may not cause harmful interference, and (2) The device must tolerate any interference, including interference could lead to misuse; Any change on equipment by users without the permission will result in the losing the right to use the equipment; For a Class B digital device or peripheral, the instructions furnished the user shall include the following or