
User's Manual


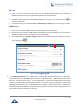
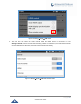
Table Of Contents
- DOCUMENT PURPOSE
- CHANGE LOG
- Firmware Version 1.0.3.180
- Firmware Version 1.0.3.177
- Firmware Version 1.0.3.171
- Firmware Version 1.0.3.162
- Firmware Version 1.0.3.158
- Firmware Version 1.0.3.144
- Firmware Version 1.0.3.131
- Firmware Version 1.0.3.92
- Firmware Version 1.0.3.75
- Firmware Version 1.0.3.62
- Firmware Version 1.0.3.55
- Firmware Version 1.0.3.46
- Firmware Version 1.0.3.37
- Firmware Version 1.0.3.30
- Firmware Version 1.0.3.22
- Firmware Version 1.0.3.6
- Firmware Version 1.0.1.54
- Firmware Version 1.0.1.39
- Firmware Version 1.0.1.29
- WELCOME
- PRODUCT OVERVIEW
- GETTING STARTED
- GETTING TO KNOW GXV3240
- MAKE PHONE CALLS
- Register SIP Accounts
- Dial a Number Directly
- Redial
- Dial a Number via Contacts
- Dial a Number via Call History
- Direct IP Call
- Answer a Call
- Call Hold
- Call Recording
- Mute
- Turn on Video during Audio Call
- Call Details during Call
- Switch Audio Channel during Call
- Call Transfer
- 6-Way Conference
- Missed Call
- DND (Do Not Disturb)
- Voicemail/Message Waiting Indication
- Call Forward
- Multi-Purpose Keys
- Shared Call Appearance (SCA)
- Call Features
- CONTACTS
- LDAP PHONEBOOK
- BROADWORKS XSI CONTACTS
- BLACKLIST
- CALL HISTORY
- SMS
- CALENDAR
- GS MARKET
- TOOLS
- FTP SERVER
- RECORDER
- CAMERA
- CONNECTING GXV3240 TO GDS3710 DOOR SYSTEM
- MULTIMEDIA
- BROSWER
- RSS NEWS
- BS-IM&P
- ACTIONURL
- PNP
- CONNECT TO NETWORK AND DEVICES
- EXPERIENCING THE GXV3240 APPLICATION PHONE

P a g e | 142
GXV3240 User Guide
CONNECT TO NETWORK AND DEVICES
The GXV3240 supports a variety of network connections (Ethernet, Wi-Fi) and device connections,
including EHS headset (Plantronics), USB, SD card and Bluetooth device. Users can connect the GXV3240
to transfer files from/to the GXV3240 using a USB connection, SD card or Bluetooth.
Ethernet
Ethernet connection is turned on as DHCP by default. If you would like to use Ethernet connection for
network access, please make sure the Ethernet cable is plugged in to the LAN port on the back of the
GXV3240. To configure Ethernet settings on GXV3240 LCD:
1. Go to GXV3240's Settings applicationWireless & NetworkEthernet Settings.
2. Touch IPv4 settings.
3. Tap on "Address Type" to select DHCP, Static IP or PPPoE as the address type.
For DHCP, save the setting and the GXV3240 should be able to get IP address from the DHCP
server in the network.
For static IP, enter IP Address, Subnet Mask, Default Gateway, DNS Server and Alternative DNS
server for the GXV3240 to correctly connect to network.
For PPPoE, enter PPPoE account ID and password so the GXV3240 can get IP address from the
PPPoE server.
Wi-Fi
WI-FI is supported and built-in on the GXV3240. GXV3240 can be connected to network if Wi-Fi is available
within the area.
Turn On/Off Wi-Fi
1. Go to GXV3240's Settings.
2. Tap on Wireless & Network.
3. Check or uncheck the option for Wi-Fi.
4. Or, users could open the top status barSystem Settings and tap on WI-FI icon to turn it on/off.
Add Wi-Fi Networks
1. Once Wi-Fi is turned on, GXV3240 will automatically start the scanning within the range.
2. Go to GXV3240's Settings.
3. Tap on Wireless & Network.
4. Tap on Wi-Fi Settings.
5. A list of Wi-Fi networks will be displayed as scanning result. Tap on the SSID and enter the correct
password information to connect to the selected Wi-Fi network.
6. The phone will start connecting to the Wi-Fi. The status bar will show Wi-Fi signal strength.