
User's Manual


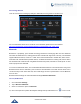

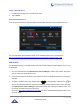
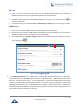
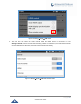
Table Of Contents
- DOCUMENT PURPOSE
- CHANGE LOG
- Firmware Version 1.0.3.180
- Firmware Version 1.0.3.177
- Firmware Version 1.0.3.171
- Firmware Version 1.0.3.162
- Firmware Version 1.0.3.158
- Firmware Version 1.0.3.144
- Firmware Version 1.0.3.131
- Firmware Version 1.0.3.92
- Firmware Version 1.0.3.75
- Firmware Version 1.0.3.62
- Firmware Version 1.0.3.55
- Firmware Version 1.0.3.46
- Firmware Version 1.0.3.37
- Firmware Version 1.0.3.30
- Firmware Version 1.0.3.22
- Firmware Version 1.0.3.6
- Firmware Version 1.0.1.54
- Firmware Version 1.0.1.39
- Firmware Version 1.0.1.29
- WELCOME
- PRODUCT OVERVIEW
- GETTING STARTED
- GETTING TO KNOW GXV3240
- MAKE PHONE CALLS
- Register SIP Accounts
- Dial a Number Directly
- Redial
- Dial a Number via Contacts
- Dial a Number via Call History
- Direct IP Call
- Answer a Call
- Call Hold
- Call Recording
- Mute
- Turn on Video during Audio Call
- Call Details during Call
- Switch Audio Channel during Call
- Call Transfer
- 6-Way Conference
- Missed Call
- DND (Do Not Disturb)
- Voicemail/Message Waiting Indication
- Call Forward
- Multi-Purpose Keys
- Shared Call Appearance (SCA)
- Call Features
- CONTACTS
- LDAP PHONEBOOK
- BROADWORKS XSI CONTACTS
- BLACKLIST
- CALL HISTORY
- SMS
- CALENDAR
- GS MARKET
- TOOLS
- FTP SERVER
- RECORDER
- CAMERA
- CONNECTING GXV3240 TO GDS3710 DOOR SYSTEM
- MULTIMEDIA
- BROSWER
- RSS NEWS
- BS-IM&P
- ACTIONURL
- PNP
- CONNECT TO NETWORK AND DEVICES
- EXPERIENCING THE GXV3240 APPLICATION PHONE

P a g e | 148
GXV3240 User Guide
SD Card
1. Insert your SD card into SD Card slot at the back of GXV3240. Please make sure the SD Card is
inserted with right direction on the GXV3240 as indicated on the SD card slot.
2. It will take a few seconds for the GXV3240 to prepare the connection. Then the SD Card icon will
show on the status bar.
3. To access SD Card, go to GXV3240 MENUFile Managersdcard. Tap on it to manage your data.
HDMI Device
1. Plug one end of the mini HDMI cable into the mini HDMI port on the GXV3240.
2. Plug the other end of the mini HDMI cable into the HDMI port on the LCD display or TV. User needs to
adjust the resolution on the LCD display or TV for proper display.
3. On the GXV3240, go to SettingsDisplay. Make sure the HDMI is turned on. A HDMI icon will show
on the top status bar .
Figure 172: SettingsDisplayHDMI
4. In LCD SettingsDisplay, tap on “HDMI control”, a window with selections will be shown on the screen.
It allows end users to set the HDMI output mode from “Close HDMI output”, “HDMI display synchronization
with LCD”, “and Show remote screen”. If “Close HDMI output” is selected, the HDMI output feature will be
turned off. If “HDMI display synchronization with LCD” is selected, the pictures displayed on the remote
HDMI device will always be same as the GXV3240’s LCD display. If “Show remote screen” is selected, the
remote HDMI device will display the same picture with the phone’s LCD screen unless displaying the remote
side’s video in full size mode during a video call.