
User's Manual


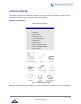
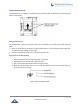

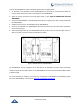
Table Of Contents
- DOCUMENT PURPOSE
- CHANGE LOG
- Firmware Version 1.0.3.180
- Firmware Version 1.0.3.177
- Firmware Version 1.0.3.171
- Firmware Version 1.0.3.162
- Firmware Version 1.0.3.158
- Firmware Version 1.0.3.144
- Firmware Version 1.0.3.131
- Firmware Version 1.0.3.92
- Firmware Version 1.0.3.75
- Firmware Version 1.0.3.62
- Firmware Version 1.0.3.55
- Firmware Version 1.0.3.46
- Firmware Version 1.0.3.37
- Firmware Version 1.0.3.30
- Firmware Version 1.0.3.22
- Firmware Version 1.0.3.6
- Firmware Version 1.0.1.54
- Firmware Version 1.0.1.39
- Firmware Version 1.0.1.29
- WELCOME
- PRODUCT OVERVIEW
- GETTING STARTED
- GETTING TO KNOW GXV3240
- MAKE PHONE CALLS
- Register SIP Accounts
- Dial a Number Directly
- Redial
- Dial a Number via Contacts
- Dial a Number via Call History
- Direct IP Call
- Answer a Call
- Call Hold
- Call Recording
- Mute
- Turn on Video during Audio Call
- Call Details during Call
- Switch Audio Channel during Call
- Call Transfer
- 6-Way Conference
- Missed Call
- DND (Do Not Disturb)
- Voicemail/Message Waiting Indication
- Call Forward
- Multi-Purpose Keys
- Shared Call Appearance (SCA)
- Call Features
- CONTACTS
- LDAP PHONEBOOK
- BROADWORKS XSI CONTACTS
- BLACKLIST
- CALL HISTORY
- SMS
- CALENDAR
- GS MARKET
- TOOLS
- FTP SERVER
- RECORDER
- CAMERA
- CONNECTING GXV3240 TO GDS3710 DOOR SYSTEM
- MULTIMEDIA
- BROSWER
- RSS NEWS
- BS-IM&P
- ACTIONURL
- PNP
- CONNECT TO NETWORK AND DEVICES
- EXPERIENCING THE GXV3240 APPLICATION PHONE

P a g e | 25
GXV3240 User Guide
GXV3240 Phone Setup
The GXV3240 can be installed on the desktop using the built-in stand or attached on the wall using the
slots for wall mounting.
Figure 2: Slots For The Wall Mount And Phone Stand On The GXV3240.
Using the Phone Stand
The GXV3240 has a built-in phone stand. To set up the GXV3240 as your desk phone, follow the steps
below:
1. Attach the phone stand to the back of the phone where there is a slot for the phone stand. Upper part
and bottom part are available for two angles;
2. Connect the handset and main phone case with the phone cord;
Using the Slots for Wall Mounting
1. Attach the wall mount to the slots on the back of the phone;
2. Attach the phone to the wall via the wall mount hole;
3. Pull out the tab from the handset cradle (see figure below);
4. Rotate the tab and plug it back into the slot with the extension up to hold the handset while the
phone is mounted on the wall.
Figure 3: Tab On The Handset Cradle.