Grandstream Networks, Inc. GXV3672_HD/GXV3672_FHD Outdoor Day/Night IP Camera GXV3672_HD/FHD User Manual Firmware Version 1.0.2.12 www.grandstream.com http://esupport.grandstream.
TABLE OF CONTENTS GXV3672_HD/FHD User Manual WELCOME.................................................................................................................................................... 4 SAFETY COMPLIANCES................................................................................................................................. 5 W ARRANTY..................................................................................................................................................
TABLE OF FIGURES GXV3672_HD/FHD USER MANUAL FIGURE 1: HOME PAGE OF GXV3672_HD/FHD ........................................................................................................... 14 FIGURE 2: WEB LANGUAGE SWITCH ............................................................................................................................. 15 FIGURE 3: SYSTEM SETTINGS PAGE ...............................................................................................................................
WELCOME Thank you for purchasing Grandstream’s GXV3672_HD/FHD Outdoor Day/Night High Definition IP Camera, an innovative powerful weatherproof infrared next generation network camera. Its advanced ISP (Image Sensor Processor) powered with state-of-the-art auto-exposure/auto-white-balance algorithm and a high quality lens, ensures high fidelity video quality that matches digital still camera color grade in a wide range of light environments. It features cutting edge H.
Safety Compliances These instructions are intended to assist users with the operation of the GXV3672_HD/FHD and to instruct on how to avoid dangerous situations or damage to the device. Warnings: Cautions: Serious injury or death may be caused if any of the warnings below are neglected. Injury or damage to the equipment may occur if any of the following caution messages are neglected. Grandstream Networks, Inc. GXV3672_HD/FHD User Manual Firmware Version 1.0.2.
Warranty If you purchased your GXV3672_HD/FHD from a reseller, please contact the company where you purchased the device for replacement, repair or refund. If you purchased the product directly from Grandstream, please contact your Grandstream Sales and Service Representative for a RMA (Return Materials Authorization) number before you return the product. Grandstream reserves the right to remedy warranty policy without prior notification.
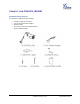
CONNECT YOUR GXV3672_HD/FHD Equipment Package Contents The GXV3672_HD/FHD package contains: • • • • • GXV3672_HD/FHD IP Camera 12V DC Universal Power Adaptor Ethernet Cable Hex Key and 3 Screws and Wall Anchors Quick Installation Guide Grandstream Networks, Inc. GXV3672_HD/FHD User Manual Firmware Version 1.0.2.
Connecting the GXV3672_HD/FHD Using the Power Adapter as power supply Connect the RJ-45 Ethernet cable to the NETWORK port of the GXV3672_HD/FHD Connect the other end of the RJ-45 cable to your network (switch or router or PC) Connect the power supply to the DC 12V power jack on the back of the GXV3672_HD/FHD Using PoE as power supply Connect the RJ-45 Ethernet cable to the NETWORK port of GXV3672_HD/FHD Connect the other end of the RJ-45 cable to your PoE switch.
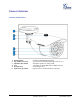
PRODUCT OVERVIEW GXV3672_HD/FHD Camera 1. 2. 3. 4. 5. 6. Mounting Plate Top Shield Cover/Screw Adjustable Wire Shield Lens IR Light Array Light Sensor for IR-Cut Grandstream Networks, Inc. GXV3672_HD/FHD Mounting Plate Top metal cover (shielding direct light and rain, etc.) Adjustable cylinder for wiring shield 1/3”CMOS (1.2M for HD/3.1M for FHD) and Lens Infrared Light Array Light Sensor for mechanical IR-Cut switching GXV3672_HD/FHD User Manual Firmware Version 1.0.2.
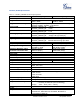
GXV3672_HD/FHD Specifications Table 1: GXV3672_HD/FHD Technical Specifications Model Video Compression Image Sensor Resolution Image Sensor Sensitivity Focal Length Aperture Field Angle (FOV) IR Cut Filter Day & Night Mode Minimum Illumination Responsivity Pixel Dynamic Range Supported Maximum Video Resolution and Frame Rate Video Bit Rate Audio Input Audio Output Audio Compression Embedded Analytics Pre-/post-alarm Buffer Snapshots Network Protocol SIP/VoIP Support Power over Ethernet (PoE) External Cabl
INSTALLATION GUIDE Minimum Recommended Computer System Requirement To install GXV3672_HD/FHD, you have to have a computer, PC recommend. The minimum recommended PC system requirement listed below: • Windows 2000, XP, Windows Vista, Windows 7 (32bit or 64bit) • CPU: Intel Pentium 4 or higher, 2 GHz • RAM: 1 GB (4 GB recommended for larger systems) • Support for DirectX 8.0 and above.
Connect the Camera to network with DHCP server (Recommended) The GXV3672_HD/FHD by default enabled as DHCP client, it will automatically get IP address from the network with DHCP server running. User can know the IP address assigned to the camera from DHCP server log or using “SearchTool” from Grandstream GSurf_Pro free VMS software. 1. Download and install the GSurf_Pro software from Grandstream website: http://www.grandstream.com/products/tools/surveillance/gsurf_pro.zip 2.
Connect to the Camera using Static IP If no DHCP server in the network, or the camera does not get IP from DHCP server, user can connect the camera to a computer directly, using static IP to configure the camera. The default IP, if no DHCP server; or DHCP offer time out (3 minutes), is 192.168.1.168 1. Connect the computer RJ-45 via an Ethernet cable directly to the IP camera GXV3672_HD/FHD. 2. Configure the computer using Static IP: 192.168.1.
GXV3672_HD/FHD Home Web Page The Home Page of GXV3672_HD/FHD shown as Figure 1: Figure 1: Home Page of GXV3672_HD/FHD 1. 2. 3. 4. Control Console: ZOOM: FOCUS: PTZ SPEED/Default Button: “D” 5. 6. 7. 8. BRIGHTNESS: CONTRAST: SATURATION: View Size: 9. Configuration 10. Language: 11. Play/Stop: 12. Snapshot: 13. Record: 14. Playback: 15. Path of File Saved: 16. Motion Detection Alarm Indicator: Grandstream Networks, Inc. PTZ Console controller for ePTZ function.
GXV3672_HD/FHD Configuration & Language Page • When click the “Configuration” tab, web page will link to page to configure the related parameters of the GXV3672_HD/FHD. • There are two big categories of settings: Basic Settings and Advanced Settings. Details will be illustrated in the later Chapter. • When click the “Language” tab, supported languages will be displayed in Figure 2. Click to select the related webpage display language.
BASIC SETTINGS EXPLANATION System Settings Page This page allow user to configure the system settings of GXV3672_HD/FHD. Figure 3: System Settings Page • • Current System Time: Set the System Time: o Time Zone: o Self-Defined Time Zone: o Update via NTP Server: Synchronize with Local Computer: o Set the Time Manually: o Keep Current D/T: OSD Date Format: o Device Name: Display time current system is running at Configure the time system is running.
Video & Audio Setting Page This page allows user to configure the video and audio related settings. Figure 4-1: Video & Audio Settings Page • On Screen Display (OSD): Display time stamp and text on the video screen. o OSD Text: Inputted text (to identify the camera) shown on the screen. o OSD Position: Show the OSD in either top or bottom position on screen. o Display Time: When checked, time stamp will display on video screen o Display Text: When checked, inputted text will display on video screen.
Figure 4-2: Video & Audio Settings Page • • Primary Stream Settings: o Preferred Video Codec: o Resolution: o Bit Rate: o Maximum Frame Rate: o Bit Rate Control: o Image Quality: o I-frame Interval: MJPEG and H.264 supported, H.264 recommended. The video resolution in pixels used in video of camera video bit rate used Maximum frame rate used.
CMOS Settings Page This page allows user to adjust the CMOS parameters: Figure 5: CMOS Settings Page • • • • • Flip: Shutter Speed: Check this will allow video flip 180° vertically in horizontal axis. Camera Shutter Speed.
Networking Setting Page This page allows user to configure network related parameters: Figure 6: Networking Setting Page • • • IP Address Configuration: Camera IP address configuration o Dynamically Associated via DHCP: Default setting, DHCP server assign IP to camera. o Statically Configured as: Static IP address configuration DNS Configuration: DNS server IP, must be configured correctly if using static IP. HTTP: Web access TCP port, default 80.
DDNS Settings Page This page allows user to configure dynamic DNS related parameters: Figure 7: DDNS Setting Page • DDNS Active: Enable DDNS by check this field. • DDNS ISP Type: Select the DDSN service provider from the pull-down menu list • Self-Define DDNS Address: Input the self-defined DDNS address • Site Name: DDNS site name • DDNS Account: DDNS account name • DDNS Password: DDNS password • STUN Server: Stun server FQDN or IP.
SIP Setting Page This page allows user to configure SIP related parameters. GXV3672_HD/FHD can be configured as SIP endpoint to call out when alarm trigged; or allow permitted number to call in to check the video if Grandstream video IP phone is used. Figure 8-1: SIP Setting Page • • Registered: Unregistered on Reboot: • • • • • Account Name: SIP Server: Outbound Proxy: SIP User ID: Authenticate ID: Grandstream Networks, Inc. SIP registration status. Display “Online” in Green, “Offline” in Red.
• • • • • • • • • • • Authenticate Password: STUN Server: Steam: Preferred Vocoder: Registration Expiration: Local SIP Port: Local RTP Port: Auto on hook Timer: Disable Audio in SIP Call: Enable Keep Alive: Accept Direct IP Call: Authenticate password used by SIP proxy STUN server used to resolve NAT if have Which stream used for SIP call.
Status Page This page shows the GXV3672_HD/FHD operation status: Figure 9: Status Page NOTE: When SIP account registered, the status will display “Online” in Green. When SIP account unregistered, the status will display “Offline” in Red, as below. Grandstream Networks, Inc. GXV3672_HD/FHD User Manual Firmware Version 1.0.2.
ADVANCED SETTINGS EXPLANATION The supports all the traditional and advanced telephony features. User Management Page This page allows user to do user management: Figure 10: User Management Page • • • • • • Existing User Name: User Name: User Password: Confirm User Password: Privilege: Allow Anonymous Viewing: Grandstream Networks, Inc.
Maintenance Page This page allows user to maintain the camera: Figure 11: Maintenance Page • • Restart: Restore: When clicked, the camera will reboot or restart When clicked, the camera will be reset to factory default, wiping out all the configurations (except IP address) Firmware Upgrade and Provisioning: • Upgrade via: Upgrade firmware via TFTP, HTTP or HTTPS • Firmware Server Path: Server path holding the firmware • Config Server Path: Server path holding the configuration file (auto provisioning)
SMTP Setting Page (Email Alarm) This page allows user to configure email client to send out email when alarm trigged: Figure 12: SMTP Setting Page • • • • • • • • Enable SMTP: SMTP Server: SMTP Server Port: From Email address: To E-Mail address: User Name: Password: SSL: When checked, email client is enabled.
FTP Settings Page (Upload Alarm) This page allows user to configure FTP parameters to upload the alarm or video recording:: Figure 13: FTP Setting Page • • • • • • Enable FTP: FTP Server: FTP Server Port: User Name: Password: Path: When checked, built-in FTP client is enabled. IP or Domain name of FTP site or server TCP port for FTP server, default port number 21 FTP server User ID FTP server user password Path in the server where upload files are stored.
Alarm Server Settings Page (Upload Alarm to supported VMS or HTTP Server) This page allows user to configure alarm HTTP server to upload alarms: Figure 14: Alarm HTTP Server Setting Page • • • • Server Name: URL: User Name: Password: The name of HTTP server or VMS system URL of the Server User ID from that Server Password for that User ID NOTE: Grandstream provide HTTP API to help 3rd party company by using HTTP server or VMS to develop further solutions for its customers.
Motion Detection Configuration Page (Set Alarm) This page allows user to configure motion detection to trigger alarms: Figure 15-1: Motion Detection Configuration Page • • Enable Motion Detection: Show Motion Detection Regions: • Select a Region: • Sensitivity: Grandstream Networks, Inc. When checked, Motion Detection enabled.
Alarm Action: • Record Video From….. • Voice Alarm to SIP Phone: • Upload to Alarm Center: • Upload to Alarm HTTP Server Allow user to select how long pre/after Alarm trigger moment, the video be captured. When checked, a SIP alarm phone call will be made to preconfigured number. When checked, the alarm video will be transferred to Alarm Center, like Grandstream free GSurf _Pro VMS software. When checked, the alarm will be sent to Alarm HTT Server.
Syslog Settings Page (Troubleshooting) This page allows user to enable the Syslog to help troubleshooting problems: Figure 16: Alarm Server Setting Page • Syslog Server: Syslog server IP or Domain Name • Syslog Lever: Lever of syslog message sent to the syslog server: None, Debug, Info, Warning, Error. Grandstream Networks, Inc. GXV3672_HD/FHD User Manual Firmware Version 1.0.2.
Software Upgrade Software upgrade can be done via either TFTP, HTTP or HTTPS. The corresponding configuration settings are in the ADVANCED SETTINGS configuration page. Software Upgrade via TTFP, HTTP or HTTPS This page allows user to configure firmware upgrade: Figure 17: Firmware Upgrade and Provisioning NOTES: Grandstream recommends end-user use the Grandstream HTTP server. Its address can be found at http://www.grandstream.com/support/firmware . Currently the HTTP firmware server is firmware.
Instructions for local firmware upgrade using TFTP server: 1. Unzip the file and put all of them under the root directory of the TFTP server. 2. Put the PC running the TFTP server and the device in the same LAN segment. 3. Please go to File -> Configure -> Security to change the TFTP server's default setting from "Receive Only" to "Transmit Only" for the firmware upgrade. 4. Start the TFTP server, in the phone’s web configuration page 5. Configure the Firmware Server Path with the IP address of the PC 6.
RESTORE FACTORY DEFAULT SETTING WARNING! Restoring the Factory Default Setting will DELETE all configuration information of the camera. Please BACKUP or PRINT out all the settings before approach to following steps. Grandstream will not take any responsibility if you lose all the parameters of setting or cannot connect to your VoIP service provider.
IP SURVEILLANCE FAQ 1. What is the default IP address of the GXV3672HD_FHD? The default IP configuration is DHCP. 2. Why can I not view the live video stream in Microsoft Internet Explorer? Please double check whether the IE add-on was installed correctly. Once you log into the GXV 3672HD_FHD web interface, Internet Explorer will indicate that this website wants to install to following add-on: GSViewer. cab‘ from Grandstream Networks, Inc. Please install this add-on when prompted by IE. 3.
6. Why does IE indicate to install Grandstream Video Viewer add-on after a firmware upgrade? The add-on was properly installed before the firmware upgrade process. New firmware will often upgrade the add-on as well. To watch the live video stream, you must install the newest version of the add-on. 7. How do you watch secondary video stream? Login to the home page of the GXV3672HD_FHD web GUI, click Play to watch the video stream.
13. How to use a cell phone to watch the GXV3672HD_FHD video stream? You must set the video resolution to QCIF to watch the GXV3672HD_FHD video stream from a cell phone. Make sure to set the bit rate to 64kbps to ensure the best video quality. 14. Why the IP address of the device NOT reset when clicking the “Restore” button? The GXV3672HD_FHD could be installed in areas that are not easy to access. For example, it could be installed on the roof of a building or the ceiling of an office.
17. Tested PC display adapters. Display Adapter SiS 650/651/740/661 FX/741/760 Series Intel® 82945R Express Chipset Family Test Result Works normally Works normally VIA/S3G UniChrome Pro IGP Works normally NIVDIA Geforce 7300GS SiS 661FX Works normally Works normally SiS Mirage Graphics SiS 661 Series Works normally Works normally Intel® G33/G31 Express SiS Mirage3 Graphics SiS 661FX/GX Mirage Graphics S3 Graphics ProSavageDDR(Microsoft Corporation) XGI Velari Z7/Z9/Z9S V1.08.