
Quick Installation Guide


~3~
~4~
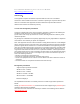
1. Use a measuring tape to measure the distance between the two wall
mount slotes on the back of the GWN7602 access point and use a
pencil to mark the mounting screw holes on the wall.
2. Drill the holes in the spots that you have marked and slide the an-
chors into the wall. Attach the GWN7602 access point to the wall via
the wall mount slots.
Wall Mount
Wall
Wall Mount
Slots
1
2
Refer to online documents and FAQ for more detailed information:
http://www.grandstream.com/our-products
HARDWARE INSTALLATION
GWN7602 can be mounted on the wall. Please refer to the following
steps for the appropriate installation.
The GNU GPL license terms are incorporated into the device rmware and can
be accessed via the Web user interface of the device at my_device_ip/gpl_li-
cense. It can also be accessed here:
http://www.grandstream.com/legal/open-source-software
To obtain a CD with GPL source code information please submit a written re-
quest to info@grandstream.com
The GWN7602 access point cannot act as a master and can only be
managed by GWN series APs with embedded controller or GWN.Cloud
Management System.
After powering the GWN7602 and connecting it to the network, GWN7602
will broadcast a default SSID based on its MAC address GWN[MAC’s
last 6 digits] and a random password.
Notes:
• GWN7602 default SSID and password information are printed on the
sticker at the back of the unit.
• It is customer’s responsibility to ensure compliance with local regula-
tions for frequency bands, transmit power and others.
• To manage GWN7602 over cloud, please refer to https://www.gwn.
cloud.
CONNECT TO GWN7602 DEFAULT Wi-Fi NETWORK