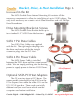
O w n e r ’s M a n u a l Add 2 SATA drives to the G5 G 5 S ATA D o u b l e D r i v e Internal Mounting Kit Apple Macintosh G5 SATA (Serial ATA) 2 Internal Drive System
Table of Contents Page User Guide How SATA (Serial ATA) Works Difference between PCI and PCI-e 3 4 Bracket, Drive, and Host Installation Connecting SATA Drives 5 Included in the Kit 6 Removing the DVD Drive & Fan Assy. 7-8 Installing the SATA Data Cables 9 Installing the SATA Power Cable 10 Installing the Drives & Bracket 11-12 Installing the PCI or PCI-e Host 13-14 Formatting and Partitioning 15-17 Warranty & Service 18 Granite Digital • 3101 Whipple Rd. • Union City, Ca. 94587 www.granitedigital.
Page 3 USER GUIDE How SATA Works SATA II (Serial ATA) is a High Performance Serial Bus designed to transfer data at up to 300MBytes per second. This ultra-fast data transfer rate is perfect for storage applications where speed is a critical issue. The low cost of the SATA drives also provide affordable backup and archiving solutions. Granite offers a variety of host adapters that support the Hot-Swap capabilities of SATA. These PCI cards and PCMCIA adapters support multiple drives.
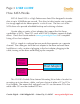
USER GUIDE Page 4 How SATA Works Older G5 models used the PCI and PCI-X bus system. These cards are longer than the newer PCI-E style bus used in the newer G5 dual and quad core models. The pictures below show the difference in the Host Adapters and the connectors. PCI Older G5 models use the PCI type bus. The connector is longer because this type of bus is known as a parallel type, needing a larger number of contacts. PCI-e (Express) Newer (late 2005) G5 models use the PCI-E type bus.
Page 5 Bracket, Drive, & Host Installation Connecting SATA Drives SATA Drives use a 7 Pin Cable that connects the drive mechanism directly to the PCI Host Adapter... one drive mechanism per channel. The connector has an “L” shape and can only be plugged in one way. Care should be taken when inserting the cable as the connector is a little delicate and can be broken if the cable is inserted incorrectly. The power to a SATA Drive can be from either the Legacy connector or the SATA Power Connector.
Bracket, Drive, & Host Installation Page 6 Included in the Kit The SATA Double Drive Internal Mounting Kit contains all the necessary components to allow for installation of up to 2 SATA drives. The only tools necessary are a metric set of Allen Wrenches and a #2 Phillips Head Screwdriver. Drive Mounting Bracket & Screws The SATA Double Drive Bracket holds up to two standard 3.5” SATA Drive Mechanisms. SATA 7 Pin Data Cables Two SATA Data Cables are supplied with the kit.
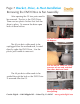
Page 7 Bracket, Drive, & Host Installation Removing the DVD Drive & Fan Assembly After opening the G5 two parts need to be removed. The first is the DVD Drive. There are two plastic latches that lock the drive in place. To remove the drive open both of these latches. Pull the latches straight out 90 degrees. The 40 pin data cable needs to be unplugged from the motherboard, located directly under the DVD Drive. Use the plastic pull handle to remove it.
Bracket, Drive, & Host Installation Page 8 Removing the DVD Drive & Fan Assembly Use the data cables cut-out hole to dislodge the DVD from it’s guides. The DVD needs to be broken loose from it’s locating pads. A little pressure on the DVD’s rear quarter and the drive will pop free. Once the DVD has been dislodged simply slide it out of the computer. The 4 pin power cable will need to be disconnected before the DVD can be totally removed.
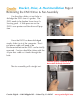
Page 9 DRIVE INSTALLATION Installing the Data Cables When the DVD Drive and the Fan Assembly have been removed the first things to install are the two 7 Pin SATA Data Cables. The SATA Data Cables have both a right angle which attaches to the drives and a straight connector which attaches to the PCI Host Adapter. Push the straight connector through the hole. On newer G5’s the small clip needs to be bent out of the way so the cables can pass through.
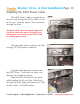
Bracket, Drive, & Host Installation Page 10 Installing the SATA Power Cable The SATA Power Cable is routed above the fans and through the DVD Cable cut-out in the rear. Push the white 4 Pin connectors through the hole. The black SATA Power Connectors plug into the drives while the white 4 Pin patch connector goes in-line with the DVD Drive and its existing power cable. Plug the white male connector into the existing G5 DVD power connector. Plug the white female connector into the DVD Drive.
Page 11 Bracket, Drive, & Host Installation Installing the Drives & Bracket Attach the two SATA Drive Mechanisms to the mounting plate using the supplied 6/32” flat head screws. Position the drive assembly so that you have room to plug in the data and power connectors. Plug the two SATA Data Cables and the SATA Power Cable into the drive mechanisms. Note that the connectors only plug in one way. Granite Digital • 3101 Whipple Rd. • Union City, Ca. 94587 www.granitedigital.
Bracket, Drive, & Host Installation Page 12 Installing the Drives & Bracket Slide the drive assembly into the G5 and center it. Align the 4 mounting holes. Use the provided 3MM Allen Head Screws and wrench to secure the assembly. Pull any excess SATA Data Cabling through the hole. Reinstall the fan assembly. Granite Digital • 3101 Whipple Rd. • Union City, Ca. 94587 www.granitedigital.
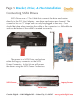
Page 13 Bracket, Drive, & Host Installation Installing the PCI Host Adapter The PCI Host Adapter has two SATA Data Connectors that plug into the two cables. Note the orientation of the connectors and make sure the cables lock into place. The card can be inserted into any of the G5 open slots. Make sure the card is seated properly. Use the Apple provided screw to secure the SATA PCI Host Adapter into place. Granite Digital • 3101 Whipple Rd. • Union City, Ca. 94587 www.granitedigital.
Bracket, Drive, & Host Installation Page 14 Installing the PCI Host Adapter Once the SATA PCI Host Adapter has been installed the plastic and aluminum doors can be reinstalled and the G5 is ready for driver installation. Granite Digital • 3101 Whipple Rd. • Union City, Ca. 94587 www.granitedigital.
Page 15 Bracket, Drive, & Host Installation Installing the Software Drivers & Formatting The PCI-e Host Adapter must have a driver installed in order for the G5 to recognize the drives. The PCI Host Adapter does not need a driver installed, go directly to page 17 for information on Formatting a Drive. Supplied with the PCI-e Host Adapter is a CD that contains drives. The G5 driver looks like the icon above. The card uses the Silicon Image 3132 chipset and the driver is written by Silicon Image.
Bracket, Drive, & Host Installation Page 16 Installing the Software Drivers & Formatting In order to install the driver you must have administrative privledges. If your user does not then your system administrator will need to log in and install the drivers. The driver installation should take a few minutes. Upon completion this dialog box will appear. At this point the application has installed the “siliconimage3132.kext” file into the system/library/extensions folder.
Page 17 Bracket, Drive, & Host Installation Installing the Software Drivers & Formatting Launch the G5’s Disk Utility Application. This program allows you to Format and prepare the new SATA Drives for use. Select the drive you want to work with, make sure your selection is correct because after you Format the drive and data that was on it is lost. Pick the type of Volume Format you wish to use. The default is “Mac OS Extended (Journeled)” and should be used unless your specific needs are different.
Page 18 Warranty and Service Granite Digital warrants your G5 Internal Drive System against any defects in material and workmanship, under normal use, for a period of one year following its date of purchase. In the event this product is found to be defective within the warranty period, Granite Digital will, at its option, repair or replace the defective unit.