
Instructions / Assembly

www.GrapeSolar.com
Tel. 1-877-264-1014 (toll free), 1-541-349-9000
Document Version 200618
©Copyright 2019, Grape Solar, Inc. All Rights Reserved
100 Watt Off-Grid Basic Charging Kit
(GS-100-BASIC)
Quick Connect Guide
IMPORTANT: Please read GS-PWM-20A charge controller
owner’s manual and GS-STAR-100W connection guide (both
included with products) before assembling kit.
For additional information about Grape Solar products:
email Support@GrapeSolar.com, or
call 1-877-264-1014 for live telephone support.
GS-100-BASIC PHOTOVOLTAIC
POWER GENERATION SYSTEM
QUICK CONNECT GUIDE Rev. 200618
1
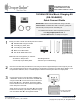
Check your order to make sure that all parts are included:
GS-PWM-20A Charge Controller
5-foot Ring-lug Cable, Red
5-foot Ring-lug Cable, Black
Black 15-foot MC4 Cable
GS- STAR-100W Solar Panel
Additional tools and equipment you will need:
◦Screwdriver– Philips Head ◦Wire Stripper/Cutter
◦12-Volt Deep-Cycle Battery Bank ◦Voltmeter (for Troubleshooting)
Mount the 100-watt solar panel so that it is facing due South at approximately the same angle as your lati-
tude. The ideal area has full sun and no shading. If the following connections are made during daylight, cover
the panel with cardboard, cloth, or a similar opaque material so that the panel does not output power.
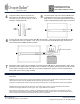
Connect the wire end of the red battery cable to the
“+BATTERY” terminal on the back of the GS-PWM-20A
charge controller . Connect the wire end of the 5-foot
black cable to the “-BATTERY” terminal. A Phillips
head screwdriver can be used to loosen and tighten the
screw clamps onto the wires.
Attach the ring lug end of the red cable to the positive
terminal of a 12V deep cycle battery. Attach the ring lug
end of the black cable to the negative terminal.
2
3
[diagrams not to scale]
*12V deep cycle battery
not included with kit