
Use and Care Manual

REV. 140908
GS-PWM-165W series Solar Intelligent Charging Controller
Operaon Manual
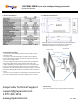
V. Electrical Specicaons VI. Mechanical Specicaons
Overall dimension: 4.72×2.91×0.93(inches), 120×74×23.6(mm)
Installaon dimension: 4.53×2.76(inches), 115×70(mm)
Installaon hole diameter: 0.11(inches), 3.0(mm)
4.52”
2.91”
4.72”
2.76”
0.85”
0.93”
BACK
0.12”
0.12”
4.74”
4.97”
SIDE
FRONT VIEW
REAR VIEW
Mounng Surface
Charge Controller
Mounng Bracket
Screw
Washer
Rubber Mat
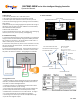
VII. Installaon and Seng
1. Use the back of the charge controller to trace a paern on the
mounng surface.
2. Cut a hole in the mounng surface to match the trace paern.
3. Insert the back of the charge controller through the front of the
hole in the mounng surface.
4. Lock the charge controller to the mounng surface from behind
using the mounng bracket, screws, washers and rubber mats.
5. Aer installaon, press the buon to turn on or turn o the load.
6. If the controller overloads or short circuits, turn o the load and
check that is not malfunconing before turning it on again. Press and
hold for the LOAD ON/OFF buon for 2 seconds to reset the load pro-
tecon.
7. If there is an over voltage or over discharge, the load will be turned
o. It will be acvated aer the system voltage returns to normal.
Grape Solar Technical Support
support@grapesolar.com
1.877.264-1014
www.grapesolar.com
VIII. Warranty
One year limited warranty on workmanship and materials