
Installation Guide

16
17
Step 8: Setup
Set up your action and intonation using the instructions in the Ghost Pickup user
manual.
Read through the instructions one more time and make sure everything is
connected up correctly. Make sure that there are no loose wires, wire “whiskers” or
metal lings that might make a short circuit.
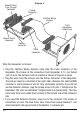
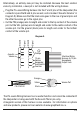
Connect the 13-pin socket via a 13-pin cable to a MIDI converter, sound processor
or other 13-pin compatible device. If the external device allows you to select
the type of pickups, choose “Acoustic” or “Piezo”. Make any other appropriate
selections according to the instructions for the external device.
Play one string at a time. Check that the signal is received by the external device,
and that it indicates the correct string. Many devices allow you to set the gain and
other parameters for each string. Do this now according to the instructions for the
13-pin device you are using.
If you have installed the optional Hexpander Volume or Hexpander Function
switches, check that these control the external device correctly.
If you have installed with an Acousti-Phonic pre-amp, check its operation according
to the descriptions in the Acousti-Phonic manual. If your external device provides a
socket for the analog signal that comes up the 13 -pin interface, connect this to an
amplier. Check that you get hear the blended acoustic and magnetic signal, and
that the volume and switch con trols you have tted work properly. You can also
check this signal if you have not installed the Acousti-Phonic pre-amp but you have
installed the Acoustic Volume control.
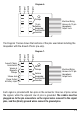
Step 9: Playing Your New Instrument
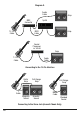
Diagram 9 (next page) shows just some of the ways you can connect up your
instrument to MIDI converters, sound processors, ampliers and effects.