
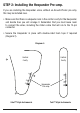
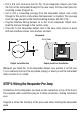
Installation Guide


8
9
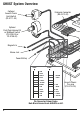
Cut a new cavity for the 13-pin Hexaphonic Output Jack from the front of the
instrument, using the measurements in Diagram 4.
Cut or drill a connecting passage from the new cavity through to the control
cavity where the Hexpander is mounted. This passage must be large enough
for the Interface Wiring Harness (BE-0512-00).
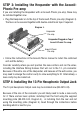
Plug the Interface Wiring Harness on to the connector assembly. Feed the
harness through to the 13-pin Hexaphonic Output Jack.
Place the 13-pin Hexaphonic Output Jack in the new cavity. Drill four pilot
holes for the Mounting Plate mounting screws and secure them in place.
•
•
•
•
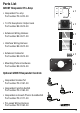
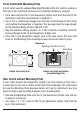
A front install uses the supplied Mounting Plate (BE-0514-00), which is visible on
the front of the instrument. All necessary mounting hardware is supplied.
Front Install with Mounting Plate
Output Jack Cavity Size Output Jack Front Installation
using Mounting Plate
1 1/4”
1”
Rear Install without Mounting Plate
A rear install mounts the Hexaphonic Output Jack from behind so that only a
circular hole for the Jack is visible on the front of the instrument. This option does
not use the Mounting Plate. Because details will vary by instrument, you may
need to supply some mounting hardware and a blanking plate.
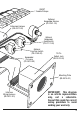
Unscrew the Mounting Plate from the 13-pin Hexaphonic Output Jack and put
it away for a rainy day.
Cut a new 1’ x 1 1/4” cavity for the 13-pin Hexaphonic Output Jack from the
rear of the instrument.
•
•
Diagram 4.
Guitar Body
Mounting Plate (BE-0514-00)