Instruction Manual 50 memories time switches D GB F I E P NL CZ
D Bedienungsanleitung ............................ (4...12) GB Operating Manual ................................ (13...21) F Mode d’emploi . ................................... (22...30) I Istruzioni per l’uso .............................. (31...39) E Instrucciones de uso............................ (40...48) P Manual de instruções ......................... (49...57) NL Bedieningshandleiding ....................... (58...66) CZ Návod k obsluze .................................. (67...
Sicherheitshinweise · Der Anschluß und die Montage elektrischer Geräte darf nur durch eine Elektrofachkraft erfolgen. · Eingriffe und Veränderungen am Gerät führen zum Erlöschen des Garantieanspruches. · Beachten Sie Ihre nationalen Vorschriften und die jeweiligen Sicherheitsbestimmungen. · Ausschaltbefehle haben Vorrang vor Einschaltbefehlen.
Zubehör Aufbau- und DIN-Schienenmontage Klemmenabdeckung Einbaumontage Einbausockel Aufbau- und DIN-Schienenmontage Plombierglas Plombierglas - IP40 Plombierschraube Verteilerschienenmontage, Riegel D
OK reset 1 6 12 18 24 D C C1 F 15:26:38 B A MENU 1 E Res. G H I J K Allgemein · Die mittlere Kommunikationszeile zeigt den zur Auswahl stehenden Menüpunkt. Bei einer Bestätigung mit OK wird dieser aktiviert. · Blinkende Texte oder Symbole erfordern eine Eingabe. · Erfolgt innerhalb von 2 Minuten keine Eingabe kehrt die Uhr in den Auto-Mode zurück.
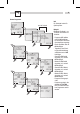
1. Erstinbetriebnahme - Wahl der Menüsprache 1 6 12 18 24 C1 15:26:38 MENU 1 Res. 12H 24H LANGUAGE ESC DATETIME DEUTSCH ENGLISH CZECH OK FRANCAIS DEUTSCH OK OK ENGLISH ESC OK MENU ESC Info Im Auslieferungszustand befindet sich die Zeitschaltuhr im Auto Mode mit voreingestellter Uhrzeit, Datum und Menüsprache Englisch. Prog. 1 6 12 18 24 C1 15:26:38 MENU 1 Res.
Prog. Neues Programm LESEN NEU OK LOESCHEN nur bei 2-Kanal ESC OK FREI 50 KANAL AUSWAHL KANAL OK I AUSWAHL OK I ESC OK ESC OK AUSWAHL TAG OK KAN EIN ESC OK STUNDEN 00 KAN EIN ESC OK MINUTEN 15:00 KAN EIN ESC OK STUNDEN 00 OK KAN AUS ESC OK MINUTEN 18:00 KAN AUS ESC OK SICHERN P01 P02 Info Die Schaltuhr besitzt 50 Speicherplätze. Beispiel EIN-Befehl für Kanal 1 um 15.00 Uhr. AUS-Befehl um 18:00 Uhr. · Programm NEU wählen und mit OK bestätigen.
Prog. Programm anschauen, bearbeiten LOESCHEN LESEN OK NEU ESC OK EIN OK P01 15:00 HH:MM AUS EDT OK OK Info · Mit ▼ ▲ kann durch die Programmschritte geblättert werden. · Durch Drücken von EDT kann das jeweilige Programm bearbeitet werden. Die Vorgehensweise entspricht dem Anlegen eines neuen Programmes.
Datum und Uhrzeit einstellen SPRACHE DAT/ZEIT OK PROGRAMM ESC OK Info Datum und Uhrzeit sind werksseitig voreingestellt. JAHR 2007 MONAT 2007:03 OK ESC OK ESC OK TAG 2007:03:25 ESC OK STUNDEN 13 MINUTEN 13:45 OK ESC OK ESC OK AM/PM- (12-Stunden-) bzw.
Umschaltung Sommer-/Winterzeit PROGRAMM SO WI OK 12H 24H ESC OK Info Folgende Einstellungen sind möglich: AUTO werksseitige Voreinstellung der gesetzlichen Vorgabe. Diese wird automatisch für jedes Jahr neu berechnet. KAL AUTO OK NEIN ESC OK NEIN keine Umschaltung NEIN KAL OK AUTO ESC OK SO START 03 MONAT ESC OK SO START 03:21 TAG ESC OK WI START 10 MONAT ESC OK WI START 10:31 TAG ESC OK SO WI 2103:3110 KAL ESC OK D KAL Programmierung.
Betriebsart Info Linke Taste = Kanal 1 Rechte Taste = Kanal 2 (nur bei 2-Kanal-Version) 1 6 12 18 24 C1 15:26:38 MENU 1 Res.
Safety precautions · The connection and installation of electrical devices may only be carried out by a qualified electrician. · Interventions in and changes to the device result in the voiding of the warranty claim. · Observe your national regulations and the respective safety provisions. · Switch-off commands have priority over switch-on commands.
Accessory Surface and DIN-rail mounting Terminal cover Flush mounting Flush mounting base Surface and DIN-rail mounting Sealing glas Sealing glas - IP40 Sealing screw Multi-terminal busbar, latch
OK 15 reset 1 6 12 18 24 D C C1 F 15:26:38 B A E MENU 1 Res. G H I J K General information · The middle communication line shows the selectable menu item. If confirmed with OK, this item is activated. · Flashing texts or symbols require an entry. · If no entries are made within the next 2 minutes, the clock reverts to Auto mode.
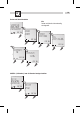
1. 16 Initial start-up - selection of menu language 1 6 12 18 24 C1 15:26:38 MENU 1 Res. 12H 24H LANGUAGE ESC DATETIME ESC OK MENU DEUTSCH ENGLISH DEUTSCH OK FRANCAIS ENGLISH OK OK FRANCAIS ESC Info In the delivered state the time switch is in the Auto mode with a preset time, date and the menu language English. Prog. 1 6 12 18 24 C1 15:26:38 MENU 1 Res.
Prog. 17 New program REVIEW NEW OK DELETE only with 2-channel version ESC OK FREE 50 CHANNEL SELECT CHANNEL OK I SELECT OK I ESC OK ESC OK SELECT DAY OK CHL ON ESC OK HOURS 00 CHL ON ESC OK MINUTES 15:00 CHL ON ESC OK HOURS 00 OK CHL OFF ESC OK MINUTES 18:00 CHL OFF ESC OK GB SAVED P01 P02 Info The time switch has 50 memory spaces. Example ON command for channel 1 at 3 pm. OFF command at 6 pm. · Select NEW program and confirm with OK. · The free memory spaces are briefly displayed.
Prog. 18 View, edit program DELETE REVIEW OK NEW ESC OK ON OK P01 15:00 HH:MM OFF EDT OK OK P02 18:00 HH:MM Info · The program steps can be scrolled through with ▼ ▲. · The respective program can be edited by pressing EDT. The procedure is the same as when creating a new program. EDT OK Delete all programs NEW DELETE OK REVIEW ESC OK DELETE ALL OK YES NO Info · It is possible to delete all programs with YES. · By pressing NO, individual programs can be deleted.
Set date and time LANGUAGE DATETIME OK PROGRAM ESC OK Info The date and time are preset at the factory.
Switchover for summer/winter time PROGRAM DAYLIGHT OK 12H 24H ESC OK Info The following settings are possible: AUTO Factory presetting of the published calendar dates. This is automatically recalculated for each year. CALIBRAT AUTO OK NO ESC OK NO CALIBRAT OK AUTO ESC OK SU START 03 MONTH ESC OK NO No switchover SU START 03:21 DAY ESC OK WI START 10 MONTH ESC OK WI START 10:31 DAY ESC OK CALIBRAT Programming. The start date of the summer time and winter time must be entered for this purpose.
Operating mode Info Left-hand button = Channel 1 Right-hand button = Channel 2 (only with 2-channel version) 1 6 12 18 24 C1 15:26:38 MENU 1 Res.
Consignes de sécurité · Le branchement et le montage d’appareils électriques ne peut être réalisé que par un électricien spécialisé. · Les interventions et des modifications apportées sans notre aval à l’appareil entraînent la nullité de la garantie. · Respectez la réglementation locale en vigueur et observez les consignes de sécurité spécifiques. · Commandes de déclenchements ont priorité sur les commandes d’enclenchement.
Accessoires Montage mural ou sur rails DIN Capot de protection cache-bornes Montage encastré Socle type bornes à vis Montage mural ou sur rails DIN Couvercle Couvercle transparente - IP40 Vis de plombage Montage sur rail, clip F
OK 24 reset 1 6 12 18 24 D C C1 F 15:26:38 B A MENU 1 E Res. G H I J K Généralités · La ligne de communication du milieu n’indique que le point de menu au choix. Celui-ci est activé avec une confirmation par OK. · Textes et symboles requièrent une entrée. · Si dans les 2 min il n’y a pas une entrée de donnés la minuterie se remets en mode auto.
1. 25 Première mise en route – choix de la langue 1 6 12 18 24 C1 15:26:38 MENU 1 Res. 12H 24H LANGUAGE ESC DATETIME ESC OK MENU DEUTSCH ENGLISH ENGLISH OK FRANCAIS FRANCAIS OK OK ESPANIOL ESC Information Lors de la livraison, l’horloge de commutation est en mode Auto avec heure et date préréglées, interface utilisateur en anglais. Prog. 1 6 12 18 24 C1 15:26:38 MENU 1 Res. DATE HMP PROGRAMM HEUR E H ESC OK MENU REVISION NOUVEAU OK SUPPRIM.
Prog. 26 Nouveau programme uniquement auprès du canal REVISION NOUVEAU OK SUPPRIM. ESC OK LIBRE 50CANAL OK SELECT CANAL OK I SELECT OK I ESC ESC OK SELECT JOUR OK CAN ON ESC OK HEURES 00 CAN ON ESC OK MINUTES 15:00 CAN ON ESC OK HEURES 00 OK CAN OFF ESC OK MINUTES 18:00 CAN OFF ESC OK SAUVEGAR P01 P02 Information L’horloge de commutation possède 50 pas de programme. Exemple Ordre ON pour le canal 1 à 15h00. Ordre OFF à 18h00. · Choisir programme NOUVEAU et confirmer avec OK.
Prog. 27 Visualiser et modifier un programme SUPPRIM. REVISION OK NOUVEAU ESC OK ON OK P01 15:00 HH:MM OFF EDT OK OK P02 18:00 HH:MM Information · Il est possible de parcourir les pas du programme avec ▼ ▲ . · EDT permet de modifier le programme affiché. La procédure correspond à la création d’un nouveau programme. EDT OK Effacer tous les programmes NOUVEAU SUPPRIM. OK REVISION ESC OK SUPPRIM. TOUT OK OUI NON Information · La touche OUI permet d’effacer tous les programmes.
Réglage de la date et de l’heure LANGUE DATE HMP OK PROGRAMM ESC OK Information La date et l’heure sont programmées en usine. ANNEE 2007 MOIS 2007:03 OK ESC OK ESC OK JOUR 2007:03:25 ESC OK HEURES 13 MINUTES 13:45 OK ESC OK ESC OK Mode AM/PM (12-heures), resp.
Commutation heure d’été/d’hiver PROGRAMM HEUR E H OK 12H 24H ESC OK Information Les réglages suivants sont possibles : AUTO Programmation au niveau de l’usine des dates officielles. Celles-ci sont recalculées automatiquement pour chaque année. CALIBRER AUTO OK NON ESC OK NON Pas de changement d’heure. NON CALIBRER OK AUTO ESC OK ETE DEBUT 03 MOIS ESC OK ETE DEBUT 03:21 JOUR ESC OK HIV DEBUT 10 MOIS ESC OK HIV DEBUT 10:31 JOUR ESC OK ETE HIV 2103:3110 CALIBRER ESC OK F CALIBRER Programmation.
Mode de fonctionnement Information Touche gauche = canal 1 Touche droite = canal 2 (seulement pour la version à deux canaux) 1 6 12 18 24 C1 15:26:38 MENU 1 Res.
Informazioni di sicurezza · Il collegamento e il montaggio delle apparecchiature elettriche devono essere effettuate solamente da un elettricista qualificato. · Interventi e modifiche sull’apparecchio comportano la cessazione del diritto di garanzia. · Osservare le prescrizioni nazionali e le corrispondenti normative sulla sicurezza. · I comandi di spegnimento hanno la priorità su quelli di accensione.
Accessori Monatggio a parete o su guida DIN Coprimorsetti Esecuzione da incasso Base a incasso Monatggio a parete o su guida DIN Protezione trasparente piombabile Protezione trasparente piombabile - IP40 Vite per piombatura Montaggio su barra di distribuzione, blocco
OK 33 reset 1 6 12 18 24 D C C1 E F 15:26:38 G B A MENU 1 H Res. I J K Display A Segnalazioni di entrambi i tasti sinistri B Segnalazione dello stato del canale = Canale 1 ON = Canale 1 OFF Canale 1 = C1, Canale 2 = C2 C 3 linee di comunicazione per l’indicazione dell’ora, le opzioni di menu, le richieste di input, ecc...
1. 34 Avviamento iniziale – Scelta della lingua 1 6 12 18 24 C1 15:26:38 MENU 1 Res. 12H 24H LANGUAGE ESC DATETIME ESC OK MENU DEUTSCH ENGLISH ESPANIOL OK FRANCAIS ITALIANO OK OK NEDERLAN ESC Informazione Alla consegna, il timer si trova in modalità automatica con ora, data e lingua inglese preimpostate. Prog. 1 6 12 18 24 C1 15:26:38 MENU 1 Res.
Prog. 35 Nuovo programma REVIS NUOVO OK CANCELLA solo con 2 canali ESC OK SELEZ LIBERO 50 CANALE SELEZ OK I CANALE OK I ESC OK ESC OK SELEZ GIORNO OK CH ON ESC OK ORE CH 00 ON ESC OK MINUTI 15:00 CH ON ESC OK ORE OK CH 00 OFF ESC OK MINUTI 18:00 CH OFF ESC OK I SALVATO P01 P02 Informazione Il timer dispone di 50 spazi di memoria. Esempio Comando ON per canale 1 alle ore 15:00. Comando OFF alle ore 18:00. · Scegliere il programma NUOVO e confermare con OK.
Prog. 36 Controllare il programma, modificare CANCELLA REVIS OK NUOVO ESC OK ON OK P01 15:00 HH:MM OFF EDT OK OK P02 18:00 HH:MM Informazione · Con ▼ ▲ si può scorrere nei passi di programma. · Premendo EDT si può modificare il corrispondente programma. La modalità di procedimento corrisponde a quella per la creazione di un programma.
Impostare la data e l’ora LINGUA DATA ORA OK PROGR ESC OK Informazione La data e l’ora sono già preimpostate.
Commutazione del periodo estivo/invernale PROGR ORA LEG OK AM/PM/24 ESC OK Informazione Sono possibili le seguenti impostazioni: AUTO preimpostazione in fabbrica secondo le prescrizioni legali. Questa viene effettuata automaticamente sempre per ogni anno.
Modalità di funzionamento Informazione Tasto sinistro = canale 1 Tasto destro = canale 2 (solo nella versione a 2 canali) 1 6 12 18 24 C1 15:26:38 MENU 1 Res.
Instrucciones de seguridad · La instalación y conexión de equipos eléctricos debe llevarse a cabo únicamente por electricistas profesionales. · Cualquier manipulación o modificación efectuada en la unidad invalidará los derechos de garantía. · Tenga en cuenta la legislación nacional y las correspondientes disposiciones en seguridad. · Los comandos OFF tiene preferencia sobre los comandos ON.
Accesorios Montaje mural ó montaje en carril DIN Cubrebornes Montaje traspanel Base de instalación Montaje mural ó montaje en carril DIN Cristal de precintado Cristal de precintado - IP40 Tornillo de precintado Montaje barra de distribución, pasador E
OK 42 reset 1 6 12 18 24 D C C1 F 15:26:38 B A MENU 1 E Res. G H I J K Generalidades · La línea de texto central muestra la opción de menú seleccionable. Si se confirma con OK, se activa la función. · Si un texto o símbolo parpadea, significa que es necesario introducir datos. · Si no se realiza ninguna entrada pasados 2 minutos, el reloj vuelve al modo automático.
1. 43 Primera puesta en servicio – Selección de idioma 1 6 12 18 24 C1 15:26:38 MENU 1 Res. 12H 24H LANGUAGE ESC DATETIME DEUTSCH ENGLISH FRANCAIS OK FRANCAIS ESPANIOL OK OK ITALIANO ESC OK MENU ESC Nota El interruptor horario se suministra preajustado en modo automático, fecha, hora, e idioma de menú inglés Prog. 1 6 12 18 24 C1 15:26:38 MENU 1 Res.
Prog. 44 Nuevo programa REVISAR NUEVO OK BORRAR sólo con 2 canales ESC OK Ejemplo Comando ON para canal 1 a las 15:00 h. Comando OFF a las 18:00 h. LIBRE 50CANAL SELEC CANAL OK I SELEC OK I ESC OK ESC OK SELEC DIA OK CAN ON ESC OK HORAS 00 CAN ON ESC OK MINUTOS 15:00 CAN ON ESC OK HORAS 00 OK CAN OFF ESC OK MINUTOS 18:00 CAN OFF ESC OK Nota El interruptor horario dispone de 50 posiciones de memoria. · Seleccione programa NUEVO y confirme con OK.
Prog. 45 Visualizar y editar programas BORRAR REVISAR OK NUEVO ESC OK ON OK P01 15:00 HH:MM OFF EDT OK OK Nota · Los pasos del programa pueden ser visualizados con ▼ ▲ . · Para editar el programa correspondiente pulse EDT. El procedimiento es el mismo que en la creación de un nuevo programa.
Ajuste de fecha/hora IDIOMA FECH HOR OK PROGRAMA ESC OK Nota La fecha y la hora se preajustan en fábrica.
Cambio de horario verano/invierno PROGRAMA VERA INV OK 12H 24H ESC OK Nota Puede seleccionarse una de las siguientes opciones: AUTO Preajuste de fábrica de acuerdo con la normativa vigente. Se recalcula cada año automáticamente. CALIBRAR AUTO OK NO ESC OK NO CALIBRAR OK AUTO ESC OK VER INICIO 03 MES ESC OK NO Sin cambio. VER INICIO 03:21 DIA ESC OK INV INICIO 10 MES ESC OK INV INICIO 10:31 DIA ESC OK VER INV 2103:3110 CALIBRAR ESC OK E CALIBRAR Programación.
Funcionamiento Nota Tecla izquierda = canal 1 Tecla derecha = canal 2 (sólo en la versión con 2 canales) 1 6 12 18 24 C1 15:26:38 MENU 1 Res.
Notas de segurança · A ligação e montagem de aparelhos eléctricos deve ser efectuada por um electricista. · Intervenções ou modificações do aparelho têm como consequência o caducar do direito de garantia. · Observar os regulamentos nacionais e as respectivas normas de segurança. · As ordens para desligar têm prioridade sobre as ordens para ligar.
Acessórios Montagem de superfície ou em calha DIN Cobertura de bornes Montagem embebida Base de montagem Montagem de superfície ou em calha DIN Vidro vedante Vidro vedante - IP40 Parafuso vedante Montagem das guias do distribuidor, barra
OK 51 reset 1 6 12 18 24 D C C1 F 15:26:38 B A MENU 1 E Res. G H I J K Generalidades · A linha de comando central indica apenas o ponto do menu a escolher. Em caso de confirmação com OK este será activado. · O texto a piscar ou símbolos exigem um comando. · Caso não se efectue nenhuma introdução dentro de 2 minutos, o relógio volta para o modo automático.
1. 52 Primeira utilização – Selecção da língua do menu 1 6 12 18 24 C1 15:26:38 MENU 1 Res. 12H 24H LANGUAGE ESC DATETIME ESC OK MENU DEUTSCH ENGLISH NEDERLAN OK FRANCAIS PORTUGES OK OK CZECH ESC Informação No fornecimento, o temporizador encontra-se configurado em automático com a hora, a data e a língua do menu em inglês predefinidos. Prog. 1 6 12 18 24 C1 15:26:38 MENU 1 Res.
Prog. 53 Programa novo Informação O temporizador dispõe de 50 passos de programação. apenas em caso de 2 canais REVER NOVO OK APAGAR ESC OK Exemplo Comando ON para o canal 1 para as 15.00 h. Comando OFF para as 18.00 h. LIVRE 50CANAL SELECCAO CANAL OK I SELECCAO OK I ESC OK ESC OK SELECCAO DIA ON OK CAN ESC OK HORA 00 CAN ON ESC OK MINUTOS 15:00 CAN ON ESC OK HORA 00 OK CAN OFF ESC OK MINUTOS 18:00 CAN OFF ESC OK GUARDADO P01 P02 P · Escolher o programa NOVO e confirmar com OK.
Prog. 54 Ver programa, modificar APAGAR REVER OK NOVO ESC OK ON OK P01 15:00 HH:MM OFF EDT OK OK P02 18:00 HH:MM Informação · Com ▼ ▲ pode-se folhear através dos passos do programa. · Ao premir o EDT pode-se modificar o respectivo programa. O procedimento é igual ao da criação dum programa novo.
Acertar a data e a hora LINGUA DATAHORA OK PROGRAMA ESC OK Informação A data e a hora estão predefinidas de fábrica.
Mudança hora de Verão/Inverno PROGRAMA HORADIA OK 12H 24H ESC OK Informação As seguintes definições são possíveis: AUTO predefinido de fábrica de acordo com a lei. Esta será calculada de novo todos os anos. CALIBRAR AUTO OK NO ESC OK NO CALIBRAR OK AUTO ESC OK VER INICIO 03 MES ESC OK NO sem mudança VER INICIO 03:21 DIA ESC OK INV INICIO 10 MES ESC OK INV INICIO 10:31 DIA ESC OK CALIBRAR Programação. Para tal, a data de início da hora de Verão e de Inverno tem de ser introduzida.
Modo operativo Informação Botão esquerdo = Canal 1 Botão direito = Canal 2 (apenas na versão de 2 canais) 1 6 12 18 24 C1 15:26:38 MENU 1 Res.
Veiligheidsinstructies · Elektrische apparatuur mag alleen door een geschoolde elektromonteur worden aangesloten en gemonteerd. · Door ingrepen en veranderingen aan het apparaat vervalt het recht op garantie. · Houdt u aan de landelijke voorschriften en de geldende veiligheidsbepalingen. · Uitschakelcommando’s hebben voorrang op inschakelcommando’s.
Toebehoren Opbouw- en DIN-rail montage Afdekkapje aansluitklemmen Inbouwmontage Verzonken sokkel Opbouw- en DIN-rail montage Afdichtglas Afdichtglas - IP40 Afdichtschroef Verzamelrail aansluitklemmen, grendel NL
OK 60 reset 1 6 12 18 24 D C C1 F 15:26:38 B A MENU 1 E Res. G H I J K Display A Functieaanduidingen van de beide linkertoetsen B Kanaalstatusindicatie = Kanaal 1 AAN = Kanaal 1 UIT kanaal 1 = C1, kanaal 2 = C2 C 3 communicatieregels voor tijdweergave, menupunten, invoeropdrachten etc.
1. 61 Eerste ingebruikstelling - Menutaal selecteren 1 6 12 18 24 C1 15:26:38 MENU 1 Res. 12H 24H LANGUAGE ESC DATETIME ESC OK MENU DEUTSCH ENGLISH ITALIANO OK FRANCAIS NEDERLAN OK OK PORTUGES ESC ESC OK Info Bij aflevering staat de tijdschakelklok in de Auto Mode: de tijd en datum staan op de fabrieksinstelling en de menutaal is standaard ingesteld op Engels. Prog. 1 6 12 18 24 C1 15:26:38 MENU 1 Res.
Prog. 62 Nieuw programma LEZEN NIEUW OK DELETE alleen bij kanaal 2 ESC OK VRIJ 50 KANAAL SELECTIEKANAAL OK I SELECTIE OK I ESC OK ESC OK SELECTIE DAG AAN OK KAN ESC OK UREN 00 KAN AAN ESC OK MINUTEN 15:00 KAN AAN ESC OK UREN 00 OK KAN UIT ESC OK MINUTEN 18:00 KAN UIT ESC OK OPGESI P01 P02 Info De schakelklok heeft 50 geheugenlocaties. Voorbeeld Inschakelcommando voor kanaal 1 om 15:00 uur. Uitschakelcommando om 18:00 uur. · Kies NIEUW programma en bevestig met OK.
Prog. 63 Programma bekijken, bewerken DELETE LEZEN OK NIEUW ESC OK AAN OK P01 15:00 HH:MM UIT EDT OK OK P02 18:00 HH:MM Info · Met ▼ ▲ kunt u door de programmastappen bladeren. · Door op EDT te drukken kunt u het actuele programma bewerken. De desbetreffende procedure is hetzelfde als de procedure voor het aanmaken van een nieuw programma. EDT OK Alle programma's wissen NIEUW DELETE OK LEZEN ESC OK DELETE ALLEMAAL OK JA NEE Info · Met JA kunt u alle programma's wissen.
Datum en tijd instellen TAAL DAT TJID OK PROGRAM ESC OK Info De datum en de tijd zijn bij aflevering al ingesteld. JAAR 2007 MAAND 2007:03 OK ESC OK ESC OK DAG 2007:03:25 ESC OK UREN 13 MINUTEN 13:45 OK ESC OK ESC OK AM/PM- (24 uurs) resp.
Omschakeling zomer-/wintertijd PROGRAM ZO WI OK 12H 24H ESC OK Info De volgende instellingen kunnen worden uitgevoerd: AUTO Fabrieksinstelling van de wettelijke omschakeltijden en -data. Dit wordt automatisch voor elk jaar opnieuw berekend. KALIBER AUTO OK NEE ESC OK NEE Geen omschakeling NEE KALIBER OK AUTO ESC OK ZO START 03 MAAND ESC OK ZO START 03:21 DAG ESC OK WI START 10 MAAND ESC OK WI START 10:31 DAG ESC OK ZO WI 2103:3110 KALIBER KALIBER Programmering.
Bedrijfsmodus Info Linkertoets = kanaal 1 Rechtertoets = kanaal 2 (alleen bij 2-kanaals versie) 1 6 12 18 24 C1 15:26:38 MENU 1 Res.
Bezpečnostní pokyny · Připojování a montáž elektrických přístrojů může provádět jen kvalifikovaný elektrikář. · Zásahy a změny přístroje vedou ke zrušení nároku na záruku. · Dodržujte vaše národní předpisy a příslušné bezpečnostní vyhlášky. · Pokyny k vypnutí mají přednost před pokyny k zapnutí.
Příslušenství Montáž na povrch a DIN-lištu Kryt svorek Zapuštěná montáž Montážní patice Montáž na povrch a DIN-lištu Sklíčko plomby Sklíčko plomby - IP40 Šroub plomby Montáž lišty rozdělovače, pojistka
OK 69 reset 1 6 12 18 24 D C C1 F 15:26:38 B A MENU 1 E Res. G H I J K Obecně · Střední komunikační řádek zobrazuje bod menu k příslušnému výběru. Bude aktivován po stisknutí tlačítka OK. · Blikající texty nebo symboly vyžadují provedení zadání. · Pokud nenásleduje do 2 minut žádné zadání, vrátí se hodiny zpět do režimu Auto.
1. 70 První uvedení do provozu - výběr jazyka nabídky funkcí 1 6 12 18 24 C1 15:26:38 MENU 1 Res. 12H 24H LANGUAGE ESC DATETIME ESC OK MENU DEUTSCH ENGLISH PORTUGES OK FRANCAIS CZECH OK OK DEUTSCH ESC Info Ve stavu při dodávce se spínací hodiny nachází v režimu Auto s přednastaveným přesným časem, datem a menu v anglickém jazyce. Prog. 1 6 12 18 24 C1 15:26:38 MENU 1 Res.
Prog. 71 Nový program pouze u dvoukanálové verze SOUHRN NOVY OK ZRUSIT ESC OK VOLNE 50KANAL VYBRAT KANAL OK I VYBRAT OK I ESC OK ESC OK VYBRAT DEN OK KAN ZAP ESC OK HODINY 00 KAN ZAP ESC OK MINUTY 15:00 KAN ZAP ESC OK HODINY 00 OK KAN VYP ESC OK MINUTY 18:00 KAN VYP ESC OK Info Spínací hodiny mají 50 paměťových míst. Příklad Instrukce ZAP pro kanál 1 v 15.00 hod. Instrukce VYP v 18:00 hod. · Zvolit program NOVY a potvrdit OK. · Budou krátce zobrazena volná paměťová místa.
Prog. 72 Prohlédnutí, upravení programu ZRUSIT SOUHRN OK NOVY ESC OK ZAP OK P01 15:00 HH:MM VYP EDT OK OK P02 18:00 HH:MM Info · ▼ ▲ lze listovat jednotlivými programovými kroky. · Po stisknutí EDT může být upraven aktuální program. Postup odpovídá vytváření nového programu. EDT OK Vymazání všech programů NOVY ZRUSIT OK SOUHRN ESC OK ZRUSIT VSE OK ANO NE Info · Pomocí ANO lze vymazat všechny programy · Po stisknutí NE mohou být vymazány jednotlivé programy.
Nastavení data a přesného času JAZYK DAT CAS OK PROGRAM ESC OK Info Datum a přesný čas jsou předběžně nastaveny z továrny. ROK 2007 MESIC 2007:03 OK ESC OK ESC OK DEN 2007:03:25 ESC OK HODINY 13 MINUTY 13:45 OK ESC OK ESC OK Nastavení zobrazení AM (dopoledne)/PM (odpoledne) 12 hodin popř.
Přepínání zimního/letního času PROGRAM L Z CAS OK CAS FORM ESC OK Info Jsou možná následující nastavení: AUTO předběžné nastavení zákonných údajů z továrny. Toto bude automaticky nově vypočítáno pro každý rok. PREPOCET AUTO OK NE ESC OK NE bez přepínání NE PREPOCET OK AUTO ESC OK LT START 03 MESIC ESC OK LT START 03:21 DEN ESC OK ZM START 10 MESIC ESC OK ZM START 10:31 DEN ESC OK LT ZM 2103:3110 PREPOCET ESC OK PREPOCET programování. K tomu zadat datum přechodu na letní a zimní čas.
Druh režimu Info Levé tlačítko = kanál 1 Pravé tlačítko = kanál 2 (jen u 2kanálové verze) 1 6 12 18 24 C1 15:26:38 MENU 1 Res.
80.10.1166.