
User's Manual

118
Program description: Telemetry menu
Telemetry
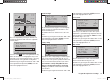
The menus grouped together under the overall heading
“Telemetry” are called up from the basic display of the
mx-12 HoTT transmitter by holding the central ESC
b
utton of the left-hand four-way button pressed in for
about three seconds. An alternative method of calling up
this menu, which also applies to the transmitter’s other
menus, is to briefl y press the central SET button of the
right-hand four-way button in the multi-function list:
mod. mem.
servo set.
D/R expo
wing mixer
base sett.
contr set.
phase trim
free mixer
servo disp basic sett
fail-safe
telemetry
Basic menu operation
In gener
al terms the “Telemetry” menu is operated just
like the other menus of the mx-12 HoTT transmitter.
The few differences are described below:
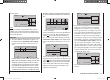
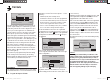
You can switch between the individual pages of the Te-
lemetry menu using the arrow buttons ef of the left or
right-hand four-way button: you will fi nd corresponding
direction indicators at top right of every screen page in
the form of angle brackets (< >); see illustrations. If only
one angle bracket is visible, then you are currently at the
fi rst or last page. In this case it is only possible to switch
pages in the direction indicated by the angle bracket.
Menu lines in which parameters can be altered are
marked with an angle bracket prefi x (>). Pressing the
arrow buttons cd of the left or right-hand four-way
button causes the “>” pointer to jump forward or back
by one line. Lines to which you cannot jump contain no
user-variable values.
If you wish to change a parameter, press the central
SET button of the right-hand four-way button to highlight
the parameter (black background)). Change the value
within the possible range using the arrow buttons of the
right-hand four-way button, and then press the SET but-
ton again br
iefl y to accept the value.
At this point you can use the arrow buttons cd of the
left or right four-way button to select the desired sub-
menu. However, if the message …
CAN‘T
RECEIVE
DATA
OK
… appears instead of the desired sub-menu when you
press the central SET button of the right-hand four-way
button, then the transmitter has no connection to a
receiver. In this case, switch your receiving system on,
or re-bind the receiver you wish to address, if this should
not be the last bound one; see “Important information”
on the previous page.
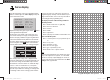
SETTING & DATA VIEW
TELEMETRY
SETTING & DATA VIEW
SIMPLE DATA VIEW
RF STATUS VIEW
VOICE TRIGGER
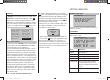
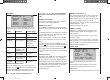
On the fi rst screen page of the sub-menu “Setting &
Data View”, headed …
RX DATAVIEW
… you cannot enter any settings. This page is for infor-
mation purposes only:
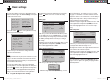
RX DATAVIEW
S–STR100% R–TEM.+28°C
L PACK TIME 00010msec
R-VOLT :05.0V
L.R-VOLT:04.5V
S–QUA100%S–dBM–030dBM
SENSOR1 :00.0V 00°C
SENSOR2 :00.0V 00°C
Value Explanation
S-QUA Signal quality in %
S-dBm Receive performance in dBm
S-STR Signal strength in %
R-TEM. Receiver temperature in °C
L PACK TIME Indicates the time in ms for which
the longest data packet was lost in
transmission between transmitter and
receiver
R-VOLT Current receiver operating voltage, in
Volt
SETTING & DATA VIEW
33112_mx12_HoTT_2_GB.indd Abs45:11833112_mx12_HoTT_2_GB.indd Abs45:118 06.06.2011 19:39:4206.06.2011 19:39:42