
User's Manual

134
Program description: Trainer system
Trainer Mode
Connecting two transmitters for trainer mode operations using a Trainer lead
Use the arrow buttons of the left or right-hand four-way
button to leaf through to the “Trainer” menu point of the
multi-function menu:
servo set.
D/R expo
wing mixer
contr set.
phase trim
free mixer
servo disp basic sett
fail-safe
telemetry
info dispteach/pupi
servo set.
D/R expo
free mixer
contr set.
heli mixer
swashp.mix
servo disp basic sett
fail-safe telemetry
teach/pupi info disp
Press the central SET button of the right-hand four-way
b
utton to open the menu:
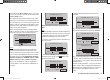
TRAINER/Pupil
–P
T
23
4
5
6
BIND:SW: –––
1
N/A
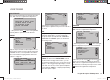
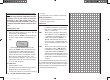
The illustration above shows the initial state of this
men
u: transmitter controls have not been released ( ) to
the pupil, and a switch has not been assigned (SW: ---
at bottom right and -P on the left of the display).
Teacher transmitter settings
Up to six transmitter control functions of the Teacher
transmitter “T” can be transferred individually or in any
combination to the pupil transmitter “P”.
The lower line of the display marked “T” therefore
indicates those transmitter controls which are perma-
nently connected to the inputs Ch 1, AIL, ELE and RUD
(dual-axis stick functions, fi xed-wing model) or 1 … 4
(dual-axis stick functions, model helicopter).
Notes:
This means that the rotary proportional knobs CTRL •
7 and 8, and the three-position switches SW 4/5 and
6/7, designated CTRL 9 and 10, explicitly CANNOT
be transferred.
Transmitter controls can only be assigned in the •
“Transmitter control settings” menu when the Train-
er connection is switched off.
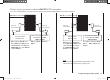
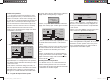
Use the arrow buttons ef of the left or right-hand
four-way button to select the transmitter controls 1 to 6
(z) to be transferred to the pupil, and briefl y press the
central SET button of the right-hand four-way button in
each case
, so that they switch from “T (Teacher)” ( ) to
“P (Pupil)” ( ):
–P
T
123
4
6
5
BIND:SW: –––
N/A
TRAINER/Pupil
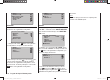
You still have to assign a Trainer transfer switch on the
r
ight of the screen so that you can actually transfer con-
trol to the Pupil. This is accomplished by using the arrow
buttons of the left or right-hand four-way button to place
the marker next to “SW” at bottom right, and assign a
switch as described on page 39.
We recommend that you use the momentary switch
SW 1 as the transfer switch, to ensure that the Teacher
transmitter can regain control instantly at any time.
¿
T
123
4
5
6
P
BIND:SW:
N/A
1
TRAINER/Teach
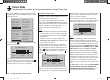
Note:
The s
witch assignment procedure described above
determines which transmitter provides the Teacher
function, and which provides the Pupil function. For this
reason a switch must NEVER be assigned to the Pupil
transmitter in this menu. To underline this, the menu
headline switches from “TRAINER / pupil” to “TRAI-
NER / teacher” as soon as a switch is assigned.
The model to be controlled by the pupil must be pro-
grammed completely in a model memory of the mx-
12 HoTT Teacher transmitter, i. e. with all its functions
including trims and any mixer functions. The HoTT re-
ceiver in the model must also be “bound” to the Teacher
transmitter, since it is this transmitter which actually
controls the model in Pupil mode, even in Trainer opera-
tions.
The mx-12 HoTT Teacher transmitter MUST ALWAYS
BE SWITCHED ON FIRST. ONLY THEN MAY THE
CONNECTING LEAD BE PLUGGED INTO IT. If you
neglect this, the RF module will not be activated.
33112_mx12_HoTT_2_GB.indd Abs41:13433112_mx12_HoTT_2_GB.indd Abs41:134 06.06.2011 19:39:4406.06.2011 19:39:44