
User's Manual

138
Program description: Trainer system
Wireless HoTT system
Two HoTT transmitters can also be combined by wire-
less means to form a Trainer system as an alternative to
the “classic” system using a Trainer lead, as described
on the preceding pages.
Preparations
The trainer model must be programmed completely,
i. e. with all its functions including trims and any mixer
functions, both in a model memory of the mx-12 HoTT
Pupil transmitter and also in the mx-12 HoTT Teacher
transmitter. This means that it must be possible to
control the trainer model fully, without restriction, by
both transmitters, i. e. by the Teacher and the Pupil
transmitters. It is very important to avoid any major
set-up differences, otherwise there is a risk that the
servos will jump abruptly from one position to another
when control is transferred between the Teacher and
Pupil transmitters, which can place a severe strain on
the servos. Nevertheless, it may be sensible to program
smaller control surface travels on the Pupil model at
least, as this makes it easier to learn the basic skills of
model fl ying.
Once both transmitters are prepared for training opera-
tions as described above, the trainer model should be
bound to the Pupil transmitter. A detailed description
of the binding procedure can be found on pages 61 and
70.
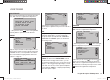
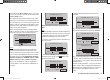
Binding the Teacher and Pupil transmitters
Switch both transmitters on, and use the arrow buttons
of the left or right-hand four-way button to leaf through
on both transmitters to the “Trainer” menu point of the
multi-function menu. (The trainer model’s receiving sys-
tem, previously bound to the Pupil transmitter, does not
need to be switched on during the following procedure.)
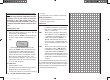
servo set.
D/R expo
wing mixer
contr set.
phase trim
free mixer
servo disp basic sett
fail-safe
telemetry
info dispteach/pupi
servo set.
D/R expo
free mixer
contr set.
heli mixer
swashp.mix
servo disp basic sett
fail-safe telemetry
teach/pupi info disp
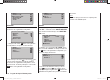
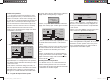
Press the central SET button of the right-hand four-way
b
utton to open the following menu point:
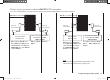
TRAINER/Pupil
–P
T
23
4
5
6
BIND:SW: –––
1
N/A
The illustration above shows the initial state of this
menu: no transmitter controls have been released to the
Pupil ( ), and no switches have been assigned (SW: ---
bottom right and -S on left of illustration).
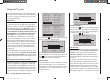
Pupil transmitter
Use the arrow buttons of the left or right-hand four-way
button to move the marker / cursor to the input fi eld
marked “Bind”. If a switch is displayed adjacent to “SW”
on the right, then it is essential to erase this: see the
following illustration:
–P
T
23
4
5
6
BIND: N/A
SW: –––
1
TRAINER/Pupil
Teacher transmitter
Press the central SET button of the right-hand four-way
b
utton to release the control channels to be transferred
to the Pupil. When you do this, the corresponding sym-
bol changes from to . For example:
–P
T
123
4
6
5
BIND:SW: –––
N/A
TRAINER/Pupil
Important Note:
In contrast to the wired Trainer system described in the
previous section, in which TRANSMITTER CONTROL
SIGNALS are released to the Pupil exclusively, it is
CONTROL CHANNELS which are transferred when
using the wireless HoTT system which is described in
this section.
For example, if the aileron function (2) is to be trans-
ferred, and if the model is equipped with two aileron
servos which are usually connected to receiver sockets
2 and 5, then in the wireless system control channels
2 and 5 must also be transferred, and not just - as with
the wired system - number 2; see illustration above. The
same applies to fl ap servos connected to 6 and 1 (“2AIL
33112_mx12_HoTT_2_GB.indd Abs41:13833112_mx12_HoTT_2_GB.indd Abs41:138 06.06.2011 19:39:4506.06.2011 19:39:45