
User's Manual

139
Program description: Trainer system
2FL” setting in the “Basic settings” menu), or two eleva-
tor servos connected to 3 and 6 (“2Sv EL” setting in the
“Basic settings” menu).
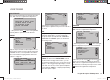
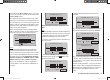
You still have to assign a Trainer transfer switch on the
right of the screen so that you can actually transfer con-
trol to the Pupil. This is accomplished by using the arrow
buttons of the left or right-hand four-way button to place
the marker next to “SW” at bottom right, and assign a
switch as described on page 39.
We recommend that you use the momentary switch
SW 1 as the transfer switch, to ensure that the Teacher
transmitter can regain control instantly at any time.
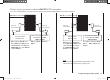
¿
T
123
4
5
6
P
BIND:SW:
N/A
1
TRAINER/Teach
Note:
The s
witch assignment procedure described above
determines which transmitter provides the Teacher
function, and which provides the Pupil function. For this
reason a switch must NEVER be assigned to the Pupil
transmitter in this menu. To underline this, the menu
headline switches from “TRAINER / pupil” to “TRAI-
NER / teacher” as soon as a switch is assigned.
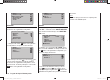
Now use the arrow buttons of the left or right-hand
four-way button to move the marker to “BIND: N/A” on
the right:
¿
T
123
4
5
6
P
BIND:SW:
N/A
1
TRAINER/Teach
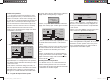
Binding the Pupil transmitter to the Teacher trans-
mitter
Note:
Dur
ing the binding procedure the distance between the
two transmitters should not be too great. You may need
to change the relative position of the two transmitters
and initiate the binding process a second time.
If necessary, close the Trainer transfer switch which you
have just assigned …
¿
T
123
4
5
6
P
BIND:SW:
N/A
1
TRAINER/Teach
… and start the “BINDING” process fi rst at the Pupil
tr
ansmitter by pressing the central SET button of the
right-hand four-way button …
–P
T
23
4
5
6
BIND:SW: –––
1
BINDING
TRAINER/Pupil
… and immediately afterwards that of the Teacher
tr
ansmitter:
¿
T
123
4
5
6
BIND:
SW: 1
P
BINDING
TRAINER/Teach
As soon as this process is concluded, both screens dis-
pla
y “ON” instead of the fl ashing message “BINDING”:
¿
T
123
4
5
6
BIND: ON
SW: 1
P
TRAINER/Teach
–P
T
23
4
5
6
BIND: ON
SW: –––
1
TRAINER/Pupil
This concludes the binding process, and you can return
to the basic displa
y of both transmitters, and start trainer
mode operations - once you have checked the operation
of all the functions.
However, if neither transmitter, or only one of the trans-
mitters, displays “ON”, indicating that the binding proce-
dure has failed, try changing the relative position of the
two transmitters, and repeat the whole procedure.
During …
33112_mx12_HoTT_2_GB.indd Abs41:13933112_mx12_HoTT_2_GB.indd Abs41:139 06.06.2011 19:39:4506.06.2011 19:39:45