
User's Manual

14
Operating Notes
Operating Notes
Transmitter power supply
The mx-12 HoTT transmitter is fi tted as standard with
a high-capacity rechargeable 4NH-2000 RX RTU Ni-MH
battery (Order No. 2498.4FBEC) (specifi cation re-
served). When delivered, the standard rechargeable
battery is not charged.
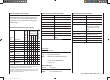
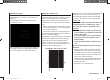
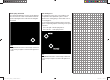
When you are using the transmitter you can monitor
the battery voltage on the LCD screen. If the voltage of
the transmitter battery falls below a certain point, you
will hear an audible warning signal. The screen then
displays a message reminding you that the transmitter
battery needs to be recharged.
GRAUBELE
#01
0:22h
stop
Flug
«normal »
K78
0:00
0:00
0.0V
10%
4.7V
HoTT
Mx
battery
needs
charging!!
x
Always recharge the transmitter battery in good time.
When you see this message, cease operations immedi-
ately and recharge the transmitter battery.
Charging the transmitter battery
The rechargeable Ni-MH transmitter battery can be
recharged with the battery charger (Order No. 33116.2)
supplied in the set, using the charge socket located on
the right-hand side of the transmitter. Leave the battery
inside the transmitter for charging, to avoid premature
damage to the internal battery socket.
As an approximate guideline a discharged battery
should be charged for twelve hours at a current cor-
responding to one tenth of the capacity printed on the
pack. If you are using the standard transmitter battery
and the charger supplied in the set, this current is
200 mA.
The transmitter must be switched “OFF” for the whole
period of the charge process. Never switch on the
transmitter when it is still connected to the charger; even
a very brief interruption in the process can cause the
charge voltage to rise to the point where the transmitter
is immediately damaged. For this reason check carefully
that all connectors are secure, and are making really
good contact.
Polarity of the mx-12 HoTT charge socket
Commercially available battery charge leads produced
by other manufacturers are often made up with the op-
posite polarity. For this reason it is essential to use only
the genuine Graupner charge lead, Order No. 3022.
Using automatic battery chargers
Although the standard transmitter charge socket is pro-
tected against reversed polarity, it is still possible to use
suitable chargers to fast-charge the transmitter battery.
If possible, set the delta peak voltage difference of your
fast charger to a value in the range 10 mV … 20 mV or
equivalent, as described in the charger’s instructions;
this ensures that it is suitable for fast-charging Ni-MH
cells.
First connect the banana plugs on the charge lead
to the charger, and only then connect the other end
of the charge lead to the charge socket on the trans-
mitter. When the charge lead is connected to the
transmitter, never allow the bare ends of the plugs to
touch! To avoid damage to the transmitter, the charge
current must never exceed 1 A. If necessary, limit the
current on the charger itself.
Removing the transmitter battery
To remove the transmitter battery, fi rst disengage the
cover over the battery compartment on the back of the
transmitter, then lift it off:
Remove the battery, then carefully pull on the power
lead to disconnect the transmitter battery connector.
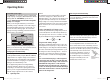
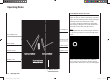
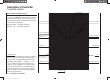
Installing the transmitter battery
Hold the connector attached to the transmitter battery
in such a way that the black or brown wire faces the
aerial, and the unused socket of the battery connector
is on the side facing the bottom, then push the battery
connector onto the three pins projecting out of the inside
of the transmitter, in the direction of the
circuit board. (The battery connector is
protected against reversed polarity by
two chamfered edges; see illustration).
Finally place the battery in the com-
partment, and close the cover.
Polarity of
transmitter battery
connector
33112_mx12_HoTT_2_GB.indd Abs5:1433112_mx12_HoTT_2_GB.indd Abs5:14 06.06.2011 19:39:2606.06.2011 19:39:26