
User's Manual


145
Programming example - fi xed-wing model
er of the model’s settings. As your piloting skills improve
and you gain experience, it is very likely that you will
feel the need to try out refi nements such as expanded
control systems, and to cater for these requirements you
may fi nd that the text deviates from the obvious order of
options, or that one or other of the options is mentioned
more than once.
On the other hand, it can certainly occur that not every
step described in these instructions is relevant to a
particular model, just as some users might miss the
description of a particular step which is relevant to his
model only …
Regardless of all this, it is worthwhile thinking carefully
about a sensible layout of the transmitter controls at this
point, just before you start programming the model data.
If the model in question is one with the emphasis on
“power” - whether the power of an electric motor or
internal-combustion engine (glow motor) - you will prob-
ably encounter few problems in this matter, because
the two stick units are primarily employed to control the
four basic functions “power control (= throttle)”, “rudder”,
“elevator” and “aileron”. Nevertheless, you still have to
call up the …
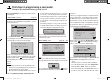
“Basic settings” menu (pages 56 … 62)
mod name
stick mode
motor at C1
1
no
tail type normal
GRAUBELE
aile/flap 1aile
… and defi ne your preferred throttle direction, i. e.
throttle minim
um forward (“Idle forward”) or back (“Idle
back”), because the program’s default setting is “none”
(i. e. no motor) when you fi rst set up a model memory.
The basic difference between “none” or “none/inv” and
“throttle min. forward / back” is the effect of the Ch 1 trim.
The trim is effective over the full stick travel if “none (/
inv)” is entered, but it only affects the idle range if you
enter “throttle min. forward or back”. However, it also
affects the “direction of effect” of the Ch 1 stick, i. e. if
you switch from “forward” to “back” or vice versa, you
do not also have to reverse the direction of the throttle
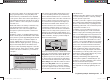
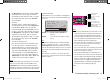
(or brake) servo. For safety reasons you will also see a
warning message, and hear an audible warning, if you
switch the transmitter on with the throttle stick positioned
towards “full-throttle” - but only if you have already set
“throttle min. forward or back”.
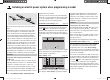
GRAUBELE
#01
0:33h
stop
Flug
K78
0:00
0:00
0.0V
50%
5.2V
HoTT
M
throttle
too
high !
Your choice of “none” (no motor) or “throttle min. forward
or bac
k” also affects the range of mixers available in the
“Wing mixers” menu. The mixers “Brake ¼ NN *” are
only present if you choose “none” (no motor) or “none/
inv”; otherwise they are suppressed. The same applies
to the selection facilities in the “Aileron / fl ap” line of the
“Basic settings” menu: “2AL 2FL”, and the associated
mixers in the “Wing mixer” menu, are only available if
you select “none” (no motor) or “none/inv”, otherwise
they are also suppressed. (In this case the second fl ap
servo should be connected to receiver output 1 instead
of the throttle servo.
In addition to these basic matters you will certainly need
to consider carefully how best to control any “auxiliary
functions” present on your model.
In contrast, if your model is a glider or electric glider the
whole situation may be rather different. The immediate
question is: what is the best way of operating the motor
and braking system? Now, some solutions have proved
to be practical, and others less so.
For example, it is not a good idea to be forced to let
go of one of the primary sticks in order to extend the
airbrakes or deploy the crow braking system when your
glider is on the landing approach. It surely makes more
sense to set up switchable functions for the Ch 1 stick
(see example 4 on page 152), or to assign the braking
system to the throttle stick, and shift the motor control
to a slider - or even a switch. With this type of model the
electric motor is often little more than a “self-launching
system”, and is used either to haul the model into the
sky at full power, or to pull it from one area of lift to the
next at, say half-power, and for such models a three-
position switch is usually quite adequate. If the switch is
positioned where you can easily reach it, then you can
turn the motor on and off without having to let go of the
sticks - even on the landing approach.
Incidentally, similar thinking can be applied to fl ap
control systems, regardless of whether they are “just”
the ailerons, or full-span (combination) control surfaces
which are raised and lowered in parallel.
Once you are satisfi ed that all these preparations have
been completed successfully, programming can com-
mence.
* NN = Nomen Nominandum (name to be stated)
33112_mx12_HoTT_2_GB.indd Abs42:14533112_mx12_HoTT_2_GB.indd Abs42:145 06.06.2011 19:39:4606.06.2011 19:39:46