
User's Manual


146
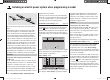
Programming example - fi xed-wing model
First steps in programming a new model
Example: non-powered fi xed-wing model aircraft
When programming a new model you should start by
activating the …
“select model” sub-menu (page 52)
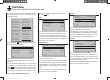
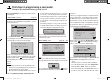
… in the “Model memory” menu. Use the arrow buttons
cd of the left or right-hand four-way button to select a
free model memory …
03
04
05
¿¿
free
¿¿
02
01
06
R06
¿¿
free
¿¿
¿¿
free
¿¿
¿¿
free
¿¿
¿¿
free
¿¿
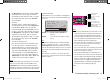
… then press the central SET button of the right-hand
four-way button. You are now immediately requested to
select the type of model you wish to program.
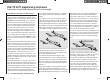
Sel model type
( empty mod mem )
Since in this example we are setting up a fi xed-wing
model, we simply confi rm the fi xed-wing model symbol
by pressing the central SET button of the right-hand
four-way button; the screen now reverts to the basic
display.
Notes:
Naturally you can also use the pre-defi ned model •
memory 01 for programming your fi rst model; this is
the “fi xed-wing model” type by default.
Once you have called up the “Model select” option it •
is not possible to interrupt the process, i. e. you must
choose one or other model type. Even if you switch
off the transmitter at this point, you cannot avoid this
select procedure. However, if you make a mistake
you can always correct it simply by erasing the mod-
el memory.
If the battery voltage is too low, you will not be able •
to change model memories for safety reasons. The
screen then displays an appropriate message:
not possible now
voltage too low
Once you have overcome this initial hurdle, you may
need to bind the receiv
er installed in the model to this
model memory in the …
“Basic settings” menu (pages 56 … 62)
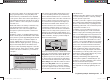
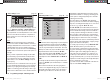
This is accomplished by moving to the “rx bind” line:
phase 3
speed
–––
receiv out
rx bind
–––
phase 2 takeoff
–––
timer
0:00
–––
Note:
When y
ou confi rm the model selection the following
message appears in the basic display for a few seconds:
BIND N/A
OK
If you confi rm your choice by pressing the SET button of
the r
ight-hand four-way button, you automatically taken
to this line:
In this line you trigger the bind process between model
memory and receiver, as described in detail on pages
61. Without this step you cannot address the receiver.
The next step is to press the c arrow button of the left-
hand or right-hand four-way four-way button to move up
into the fi rst line, where you can start the actual model
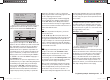
programming in the “mod name” line:
mod name
stick mode
motor at C1
1
no
tail type normal
aile/flap 1aile
At this point you can enter the “Model name”
by press-
ing the central SET button of the right-hand four-way
button in order to move to the character table:
0123456789
PQRSTUVWXYZ
model name
?
:
;
ABCDEFGHIJKLMNO
GRAUB
You should also check the settings for “Stick mode” and
“Motor at Ch 1” and change them if necessary:
“none”:•
The brake system is “retracted” at the forward posi-
tion of the throttle / brake stick; in the “Wing mixers”
menu the “Brake ¼ NN*” mixers are activated.
In the “Aileron/fl ap” line of the “base sett.” menu it is
possible to select “1AL”, “2AL” and “2AL 2FL”, and in
33112_mx12_HoTT_2_GB.indd Abs42:14633112_mx12_HoTT_2_GB.indd Abs42:146 06.06.2011 19:39:4606.06.2011 19:39:46