
User's Manual

152
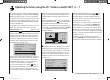
Programming example - fi xed-wing model
Controlling the electric motor and up-aileron braking system using the Ch 1 stick
Up-aileron defl ection as landing aid
Example 4
Butterfl y / crow system as landing aid: ailerons up,
fl aps down
Before we start the programming of this fourth example,
and turn our attention to expanding the basic program-
ming we have already discussed, we need to consider
briefl y the position of the throttle / brake stick at “motor
OFF” or “brake OFF”. Usually the Ch 1 stick is moved
forward to open the throttle, and back to extend the
brakes. However, if you adopt this “classic” confi gura-
tion, and switch, say, from “motor OFF” (stick “back”)
to the braking system, “full brake” would immediately
be applied, and vice versa: if you switch from “brakes
retracted” to power, this would instantly switch to “full
power”.
It is certainly possible to make a “virtue” out of this
“vice”: a “glider pilot” - usually fl ying with “brakes re-
tracted = forward” will only switch to motor “ON” when
necessary, and then reduce power to suit the situation
(and - we hope - does not forget to move the Ch 1 stick
back to the “forward” position when switching back). In
contrast, a typical “power pilot” would probably operate
with the reverse priority, i. e. he would only switch to
“brake” when necessary, etc. In any case, it is possible
to avoid these inter-connected effects by positioning the
“zero point” of both systems so that they coincide. The
above considerations mean that a “glider pilot” will prob-
ably prefer the “zero point forward” arrangement, while a
“power pilot” might well decide on “zero point back”.
The mx-12 HoTT transmitter can cope with whichever
arrangement you prefer. However, the following section
assumes that both “OFF” positions will be set to “for-
ward”. If you prefer the alternative arrangement, there is
no problem: the only difference compared with the ver-
sion described here is that you would select “none/inv”
in the “Motor at Ch 1” line of the “Basic settings” menu
instead of “none”. All the other settings can be adopted
as described.
In the …
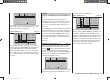
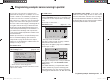
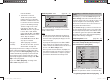
“Transmitter control settings” menu (page 74)
mod name
stick mode
motor at C1
1
no
tail type normal
GRAUBELE
aile/flap 2aile
… leave the “motor at Ch 1” line at
“none” if you have
set “Motor ON = forward”, or switch to “none/inv” if
preferred. This is essential, otherwise the “Brake 1 ¼
NN *” mixers which we need will be suppressed in the
“Fixed-wing mixers” menu.
Important Note:
As it is essential to set the motor to “none”, this also
automatically disables the “Throttle too high” power-
on warning! For this reason please take great care
to set the Ch 1 stick to the correct position before
you switch the receiving system on.
The next step is to ensure that the speed controller con-
nected to receiver output 1 is switched off “at the right
end”. To accomplish this you may have to move to the …
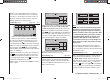
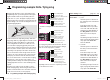
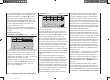
“Servo settings” menu (page 72)
S1
S2
S3
rev cent
+
trav
0%
0%
0%
100%
100%
100%
100%
100%
100%
0%
0%
100%
100%
100%
100%
S4
S5
… and reverse the direction of servo 1.
For safety’s sake you should check this setting now,
before you continue with the programming procedure.
Take the transmitter and model to a location where it
is safe to run the motor. Switch the transmitter on, and
move the Ch 1 stick to the motor “OFF” position, i. e. ei-
ther fully forward or back. Hold your model fi rmly, or ask
a friend to hold it for you. Check that the propeller is free
to rotate without causing havoc, then connect the fl ight
battery and switch your model’s receiving system on.
If the motor does NOT run when the stick is in the “for-
ward” or “back” position (as appropriate), then everything
is in order. However, please check the system anyway by
gradually advancing the stick until the motor begins to
run. When you are satisfi ed, stop the motor, then switch
off the receiving system in the model and fi nally switch
off the transmitter.
Note:
If the motor does not start, or spins in the wrong direc-
tion, this indicates that there are other problems which
you must correct before you continue with programming.
For example, check the wiring of your motor, and refer
to the operating instructions supplied with your speed
controller.
* NN = Nomen Nominandum (name to be stated)
33112_mx12_HoTT_2_GB.indd Abs42:15233112_mx12_HoTT_2_GB.indd Abs42:152 06.06.2011 19:39:4606.06.2011 19:39:46