
User's Manual

153
Programming example - fi xed-wing model
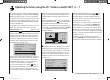
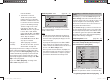
MIX1 c1 c1
trv
0%offs
ASYSYM
–100%
–100%
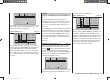
Now move to the “Offs” line: when you do this, the SYM
and ASY fi elds are replaced by STO and SET. With
the STO button highlighted, move the Ch 1 stick to the
“OFF” position you have selected, and then press the
central SET button of the right-hand four-way button: the
value to the right of “Offs” now changes from 0% to ap-
prox. +100%, and the graphic display of the mixer curve
displayed on the right also changes accordingly:
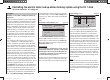
MIX1 c1 c1
trv
+100%offs
SETSTO
–100%
–100%
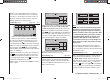
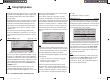
If you now press the ef buttons of the left-hand four-
way button simultaneously to move to the …
“Servo display” menu (page 113),
… you can immediately check the effect of the settings
you have entered so far: with the mixer switched off,
the bar display for Channel 1 follows the movement of
the Ch 1 stick. With the mixer switched on it stops - as
shown - at around -100%.
Once you are confi dent that the direction of the Ch 1
stick is “correct” as far as the motor is concerned, the
next step is to ensure that you can switch its effect on
the motor on and off, so that you can also control the
braking system. This is carried out in the …
“Free mixers” menu (pages 107 … 111)
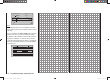
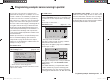
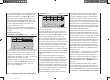
typ fro
to
M1
M2
M3
??
??
c1
??
c1
??
3
… where you need to program a free mixer “c1 ¼
c1”. When you have done this, use the arrow button
f of the left or right-hand four-way button to move to
the column above the symbol, and assign your
selected “change-over switch” to this mixer; for example
SW 3. This is done by activating the switch assignment
by pressing the central SET button of the right-hand
four-way button, and moving the switch from “forward” to
“back”, i. e. towards you.
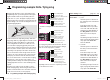
With the mixer switched on, move to the column above
the
symbol using the arrow button f of the left or
right-hand four-way button, and then on to the second
screen page by pressing the central SET button of the
right-hand four-way button once more.
At this point you should set an initial SYMmetrical mixer
value of -100%.
1
3
5
2
4
6
0%
0%
0%
–100%
0%
0%
Note:
If y
ou carry out this test with the receiving system
and power system switched on, please take great
care that you operate the change-over switch only
in the “motor OFF” position! If you ignore this, there
is a danger that the power system will be severely
overloaded by being switched on abruptly, and it
could even suffer damage. For the same reason
you should be careful only to use the change-over
switch at the “motor OFF” setting when you are fl y-
ing the model.
To conclude the programming procedure, return the
selected “change-over switch” to the “motor ON” posi-
tion, i. e. “forward”; move back to the multi-function menu
and from there to the …
“Fixed-wing mixers” menu (pages 88 … 93)
where - assuming that you have not already done this
in your general model programming - you can select
the “Brake ¼ AIL” line and set the desired aileron
travel when the Ch 1 stick is operated in the up direction
(“Brake”). In the column above the
symbol press
the central SET button of the right-hand four-way button
before assigning your selected “change-over switch” by
moving your preferred switch from “forward” to “back”.
33112_mx12_HoTT_2_GB.indd Abs42:15333112_mx12_HoTT_2_GB.indd Abs42:153 06.06.2011 19:39:4606.06.2011 19:39:46