
User's Manual

166
Programming example: model helicopter
Programming example: model helicopter
In this programming example we assume that you
have already read and understood the descriptions of
the individual menus, and are by now familiar with the
general handling of the transmitter. We also assume that
you have assembled and adjusted the helicopter exactly
according to the kit instructions. The electronic facilities
provided by the transmitter should never be used to
compensate for major mechanical inaccuracies.
As so often in life, there are various ways and means of
reaching a particular destination when programming the
mx-12 HoTT. In this example our intention is to provide
a sensibly structured course of action, so that you have
a clear idea of logical programming techniques. Where
there are several possible methods, we fi rst describe the
simplest and most easily understood solution. It is likely
that the helicopter will work perfectly when set up in this
way, but naturally you are still free to try out other solu-
tions at a later stage, in case they suit you better.
As our programming example we take the Graupner
STARLET 50 helicopter, with right-hand rotation, three
swashplate linkage points distributed evenly at 120°
(“3Sv (2 roll)” type), a beginner’s set-up without en-
hanced throttle curve, without heading-lock gyro system,
no method of infl uencing the gyro’s “normal operating
mode” from the transmitter, and with no speed governor
(regulator).
We have deliberately chosen this simple programming
project in order to demonstrate that it is possible to set
up a helicopter which fl ies extremely well with relatively
little programming effort.
Nevertheless, we do not want to forfeit all the possible
refi nement facilities: after the basic description you will
also fi nd set-up notes on gyro gain, speed governors
and fl ight phase programming.
Note:
If, in contrast to the glow-powered machine described
here, your main interest lies in electric-powered model
helicopters, then please read on! Apart from the idle
adjustments, which naturally do not apply, you can adopt
most of the settings described in the following section
virtually unchanged.
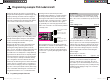
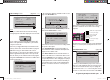
To initiate this typical programming exercise move to the
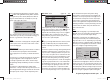
“Model memory” menu, then to the …
“select model” sub-menu (page 52),
… where you select a free model memory using the ar-
row buttons of the left or right-hand four-way button:
03
04
05
¿¿
free
¿¿
02
01
06
R06
¿¿
free
¿¿
¿¿
free
¿¿
¿¿
free
¿¿
¿¿
free
¿¿
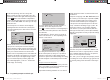
After pressing the central SET button of the right-hand
four-way button, you can use the f button of the left or
right-hand four-way button to select …
Sel model type
( empty mod mem )
… the “Helicopter” model type. Confi rm your choice by
pressing the centr
al SET button of the right-hand four-
way button, and the screen immediately switches to the
basic display.
Notes:
Once you have called up the “Model select” option it •
is not possible to interrupt the process, i. e. you must
choose one or other model type. Even if you switch
the transmitter off, then on again, you still have to
make this choice. However, if you make a mistake
you can always correct it simply by erasing the mod-
el memory.
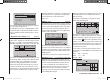
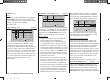
If the warning message “Throttle too high” appears, •
you can erase it by turning the rotary proportional
knob CTRL 7 anti-clockwise to its end-point.
If the battery voltage is too low, you will not be able •
to change model memories for safety reasons. In this
case the screen displays an appropriate message:
not possible now
voltage too low
Once you have overcome this initial hurdle, it is essential
to bind the receiv
er installed in the model to this model
memory in the …
33112_mx12_HoTT_2_GB.indd Abs48:16633112_mx12_HoTT_2_GB.indd Abs48:166 06.06.2011 19:39:4706.06.2011 19:39:47