
User's Manual

167
Programming example: model helicopter
“Basic settings” menu (pages 64 … 71)
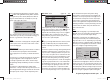
This is accomplished by moving to the “rx bind” line:
autorotat.
receiv out
rx bind
–––
phase 2 hover
–––
–––
–––
timer 0:00
Note:
When y
ou confi rm the model selection the following
message appears in the basic display for a few seconds:
BIND N/A
OK
If you confi rm your choice by briefl y pressing the SET
b
utton of the right-hand four-way button, you automati-
cally move to this line:
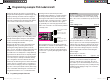
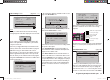
In this line you trigger the bind process between model
memory and receiver, as described in detail on page 70.
Without this step you cannot address the receiver.
The next step is to press the c arrow button of the left-
hand or right-hand four-way button to move up into the
fi rst line, where you can start the actual model program-
ming in the “mod name” line. Now enter a suitable name
for the model memory, …
mod name
stick mode
rotor direct
swashplate
1
right
1 servo
cut off
–––
+150%–100%
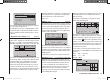
… by selecting the characters available on the second
page of the
“mod name” line:
0123456789
model name
?
:
;
ABCDEFGHIJKLMNO
STAR
PQRSTUVWXYZ
Once you have entered the “Model name”
you should
check that the “Stick mode” is correct:
mod name
stick mode
rotor direct
swashplate
1
right
1 servo
cut off
–––
+150%–100%
STARLET
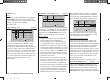
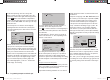
In the next four lines we come to the fi rst settings which
are specifi c to helicopters:
In the “Swashplate type” line select the number of
servos which are used to actuate the swashplate. See
page 65 for more details of this.
In the “Rotor direction” line we enter the direction of
rotation of the main rotor as viewed from above. In the
“Collective pitch min.” line set “forward” or “rear” to suit
your personal preference. This setting applies equally to
all subsequent mixers, and it is therefore vital that you
do not change it later in order to alter individual mixer
directions, such as the direction of collective pitch or
throttle.
stick mode
rotor direct
swashplate
1
right
3sv(2rol)
cut off –100% +150%
1
pitch min
rear
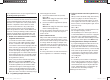
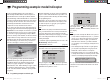
At this point, if you have not already done so, the servos
should be connected to the receiv
er in the following
sequence:
Telemetry sensor or gyro gain
Receiver power supply
Receiver power supply
Roll 2 servo
Tail rotor servo (gyro system)
Roll 1 servo
Pitch-axis 1 servo
Throttle servo or speed controller
The mixer ratios and mixer directions for the swashplate
servos for collective pitch, roll and pitch-axis are set in
the …
“Swashplate mixer” menu (page 112),
SP – MIXER
ptch
roll
nick
+61%
+61%
+61%
… where you will fi nd that they are pre-set to +61% in
each case. If the swashplate does not respond correctly
to the stick movements, the fi rst step is to change the
mixer directions from “+” to “-” if necessary. The second
recourse is to reverse the servo directions in the “Servo
33112_mx12_HoTT_2_GB.indd Abs48:16733112_mx12_HoTT_2_GB.indd Abs48:167 06.06.2011 19:39:4806.06.2011 19:39:48