
User's Manual


22
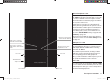
Description of transmitter
PUPIL
#11
0:01h
stop
flt
«normal »
DSC
0:00
0:00
6.0V
0.0V
99%
HoTT
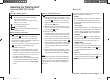
The transmitter is now ready for use.
In contr
ast, when the mx-12 HoTT is used in
Teacher mode, the transmitter must be switched on
before the appropriate cable is plugged in.
Connect the other end of the connecting lead to the 3.
appropriate apparatus, taking into account the oper-
ating instructions supplied with that device.
Important:
Ensure that all connectors are fi rmly seated in
their sockets.
Note regarding fl ight simulators:
The range of fl ight simulators available commercially
is now very wide, and you may fi nd that it is necessary
to swap over certain contacts at the barrel connector
or the DSC module. This work must be carried out by a
Graupner Service Centre.
DSC
Direct Servo Control
The original function of this socket was for “Direct Servo
Control”, and that’s why the abbreviation is still in use.
However, for technical reasons “direct servo control” is
no longer possible with the HoTT system using a diag-
nosis lead.
The mx-12 HoTT transmitter’s standard two-pole DSC
socket is now used as a Trainer (buddy box) socket
(Teacher or Pupil), and as an interface for fl ight simula-
tors.
For the DSC connection to work you must check the
following:
Carry out any adjustments required in the appropri-1.
ate menus:
See page 134 for information on setting up the mx-
12 HoTT transmitter to work as part of a Trainer sys-
tem.
ALWAYS2. leave the transmitter’s On / Off switch in
the “OFF” position when using a fl ight simulator, and
when using the mx-12 HoTT transmitter as a Pu-
pil unit in a Trainer system, for only in this position is
the RF section of the transmitter module switched off
(no RF signal) even when the DSC lead is plugged
in. At the same time the transmitter’s current drain is
reduced slightly.
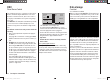
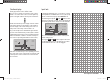
The central Status LED should now glow a con-
stant red, and the abbreviation “DSC” appears in the
transmitter’s base display on the left, below the mod-
el number. At the same time the display of telemetry
symbols is suppressed:
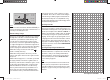
Data storage
Card slot
micro-SD and micro-SDHC
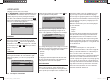
When you switch off the mx-12 HoTT transmitter and
remove the battery compartment cover, you will see the
card slot for memory cards (of the micro-SD and micro-
SDHC type) in the right-hand side of the compartment:
Any standard commercial micro-SD memory card with a
capacity of up to 2 GB can be used, and also any micro-
SDHC card of up to 32 GB. However, the manufacturer
recommends the use of memory cards with capacities
up to only 4 GB, as these are completely adequate in all
normal circumstances.
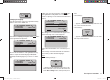
The memory cards for which the transmitter is intended
are familiar from their use in digital cameras and mobile
telephones. Place the card in the slot with the contacts
facing up, towards the back panel, and push it in until it
locks. Re-install the battery and close the battery com-
partment; the transmitter can now be switched on again.
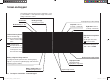
The base display shows a stylised memory card symbol
to indicate that a memory card is present:
33112_mx12_HoTT_2_GB.indd Abs6:2233112_mx12_HoTT_2_GB.indd Abs6:22 06.06.2011 19:39:3206.06.2011 19:39:32