
User's Manual


33
Using the receiver for the fi rst time
* Battery Elimination Circuit
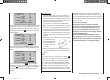
RX CURVE
TYPE : A
CURVE1 CH : 02
TYPE : A
CURVE2 CH : 05
TYPE : B
CURVE3 CH : 04
5CH FUNCTION:SERVO
On this menu page locate the “>” symbol at the left-hand
edge of the screen, use the d arrow button of the left or
right-hand four-way button to move it to the bottom line,
and then press the central SET button of the right-hand
four-way button:
RX CURVE
TYPE : A
CURVE1 CH : 02
TYPE : A
CURVE2 CH : 05
TYPE : B
CURVE3 CH : 04
5CH FUNCTION:SERVO
Now select the alternative “SENSOR” setting using one
of the two arrow buttons cd of the right-hand four-way
button:
RX CURVE
TYPE : A
CURVE1 CH : 02
TYPE : A
CURVE2 CH : 05
TYPE : B
CURVE3 CH : 04
5CH FUNCTION:SENSOR
A further press of the central SET button of the right-
hand four-way button concludes your choice. Now press
the central ESC button of the left-hand four-way button
repeatedly until you return to the transmitter’s base
display.
Concluding notes:
The much higher servo resolution of the HoTT sys-•
tem results in a substantially more direct response
compared with previous technologies. Please take a
little time to become accustomed to the fi ner control
characteristics offered by the system!
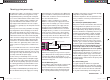
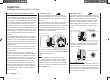
If you wish to use a speed controller with integral •
BEC* system in parallel with a separate receiver bat-
tery, in most cases (depending on the speed control-
ler) the positive terminal (red wire) must be removed
from the three-pin connector, as shown in the dia-
gram. Be sure to read the appropriate notes in the in-
structions supplied with your speed controller before
doing this.
Carefully raise the central lug of the connector slight-
ly (1), withdraw the red
wire (2) and insulate the
bare contact with tape
to avoid possible short
circuits (3).
red
1
2
3
Observe the installation notes regarding the receiv-
er, receiver aerial and servos, which you will fi nd on
page 34.
Reset
If you wish to carry out a receiver reset, locate the SET
b
utton on the top of the receiver and hold it in while you
connect its power supply; release the button again.
If the reset is carried out with the transmitter switched
off, or if the receiver is not already bound, the receiver
LED fl ashes red slowly after about two or three sec-
onds; at this stage it is immediately possible to initiate a
binding process at the transmitter. If the reset is carried
out with an already bound receiver, if the transmitter is
switched on, and if the associated model memory is ac-
tive, then the LED lights up green after a short interval to
indicate that your transmitter / receiving system is ready
for use once more.
Please note the following:
Resetting the receiver resets ALL the settings
stored in the receiver to the default settings, with
the exception of the binding information! If you
carry out a reset by mistake, this means that you
will have to restore all the receiver settings entered
using the Telemetry menu.
On the other hand, a deliberate RESET is particu-
larly useful if you wish to “re-house” a receiver in a
different model, as it represents an easy method of
avoiding the transference of unsuitable settings.
33112_mx12_HoTT_2_GB.indd Abs10:3333112_mx12_HoTT_2_GB.indd Abs10:33 06.06.2011 19:39:3506.06.2011 19:39:35