
User's Manual


64
Program description: base settings - model helicopter
Base settings
Basic model-specifi c settings for model helicopters
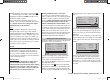
Before you start programming specifi c parameters,
some basic settings must be entered which apply only
to the currently active model memory. Select the “Basic
settings” (Basic model settings) menu using the arrow
buttons of the left or right-hand four-way button, and
press the central SET button of the right-hand four-way
b
utton:
mod.mem.
servo set.
D/R expo
free mixer
contr set.
heli mixer
swashp. mix
servo disp basic sett
fail-safe telemetry
base sett.
Model name
mod name
stick mode
rotor direct
swashplate
1
right
1 servo
cut off
–––
+150%–100%
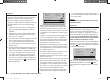
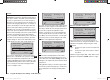
Press the SET button of the right-hand four-way button
to mo
ve to the next screen page, where you can select
characters to assemble the model name. You can enter
up to nine characters to defi ne a model name:
0123456789
model name
?
:
;
ABCDEFGHIJKLMNO
STAR
PQRSTUVWXYZ
Use the arrow buttons of the left-hand four-way button
to select the desired character. Press one of the arrow
buttons ef of the right-hand four-way button, or its
central SET button, to move to the next position in the
name
, at which point you can again select a character.
Simultaneously pressing the cd or ef buttons of the
right-hand four-way button (CLEAR) inserts a space at
that point. You can move to any character position within
the input fi eld using the ef buttons of the right-hand
four-way button.
You can return to the previous menu page by briefl y
pressing the central ESC button of the left-hand four-
w
ay button.
The model name entered in this way appears in the
basic display, and also in the sub-menus of the “Model
memory” menu point.
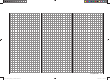
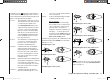
Stick mode
Basically there are four possible ways of arranging the
principal control functions of a model helicopter on
the two dual-axis sticks: the primary functions are roll,
pitch-axis, tail rotor and throttle / collective pitch. Which
of these options you select depends on your individual
preferences and fl ying style:
“MODE 2” (Throttle at left stick)
“MODE 3” (Throttle at right stick)
“MODE 4” (Throttle at left stick)
“MODE 1” (Throttle at right stick)
pitch axis
tail rotor
pitch axis
tail rotor
throttle
roll
roll
throttle
tail rotor
tail rotor
throttle throttle
pitch axis
pitch axis
roll
roll
pitch axis
pitch axis
roll
roll
Motor/Pitch
throttle
tail rotor
tail rotor
throttle
throttle
roll
roll
pitch axis
pitch axis
tail rotor
tail rotor
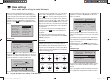
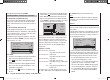
Use the arrow buttons cd of the left or right-hand four-
way button to select the “Stick mode” line; the select
fi eld is now framed:
mod name
stick mode
rotor direct
swashplate
1
right
1 servo
cut off
–––
+150%–100%
STARLET
Briefl y press the SET button: the current stick mode
appears highlighted. Now use the arrow buttons of the
right-hand four-way button to choose one of the options
1 to 4.
By simultaneously pressing the cd or ef buttons
of the right-hand four-way button (CLEAR) the display
reverts to stick mode “1”.
A further brief press on the SET button disables the
select fi
eld again, so that you can change to a different
line.
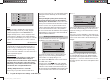
Swashplate type
mod name
stick mode
rotor direct
swashplate
1
right
1 servo
cut off
–––
+150%–100%
STARLET
You will require a particular program variant to suit the
number of servos which operate the collective pitch
function.
Select “Swashplate” with the arrow buttons cd of the
left or right-hand four-way button, and the select fi eld
33112_mx12_HoTT_2_GB.indd Abs25:6433112_mx12_HoTT_2_GB.indd Abs25:64 06.06.2011 19:39:3806.06.2011 19:39:38