
User's Manual


70
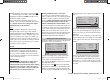
Program description: base settings - model helicopter
S
S
S
S
6
2
3
4
1
2
3
4
output
S
5
5
S6
1
output
output
output
output
output
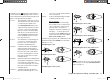
Note:
It is also possib
le to distribute the control functions
amongst as many receivers as you wish, using the
channel-mapping function in the mx-12 HoTT’s
integral Telemetry menu, or even to assign the same
control function to multiple receiver outputs. However,
we strongly recommend that you use only one of the two
options, as a combination will soon lead to confusion.
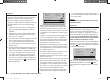
rx bind (Bound receiver)
Graupner HoTT receivers have to be “instructed” to
communicate exclusively with a particular model (i. e.
model memory) of a Graupner HoTT transmitter. This
process is known as “binding”, and is only necessary
once for each new combination of receiver and model. It
can be repeated at any time.
Important note:
When carrying out the binding procedure, please
ensure that the transmitter aerial is always an
adequate distance from the receiver aerials: keeping
the aerials about 1 m apart is safe in this respect.
Otherwise you risk a failed connection to the down-
link channel, and consequent malfunctions.
“Binding” multiple receivers to one model
If necessary, it is possible to bind more than one re-
ceiver to a single model. This is accomplished by initially
binding the receivers individually, as described in the
next section.
When operating the system, please note that only
the receiver which was bound last will establish a
telemetry link to the transmitter. For this reason all te-
lemetry sensors installed in the model must be connect-
ed to this receiver, since only the last bound receiver
is able to transmit their data via the down-link channel.
The second, and all other receivers, run in parallel to
the receiver last bound to the transmitter, but completely
independently of it; they operate in Slave mode with the
down-link channel switched off.
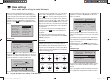
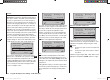
“Binding” transmitter and receiver
Use the arrow buttons cd of the left or right-hand four-
way button to move to the “rx bind” line:
phase 2 hover
5
4
autorotat.
receiv out
rx bind
–––
10:01 G3
timer
If you have not already done so, switch on the power
supply to y
our receiver now: the green LED on the
receiver flashes once briefly, then goes out.
Press and hold the SET button on the receiver until the
green LED starts to flash.
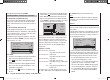
Briefly press the central SET button of the right-hand
f
our-way button to initiate the so-called binding process
between a receiver and the current model memory. At
the same time the word “BINDING” starts flashing on the
screen in the frame of the “rx bind” line, instead of the
three “---”:
phase 2 hover
5
autorotat.
4
receiv out
rx bind
BINDING
10:01 G3
timer
If the receiver LED glows a constant green within about
ten seconds
, then the binding process has been com-
pleted successfully; you can now release the receiver’s
SET button.
Your model / receiver combination is now ready for use.
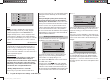
In parallel with this the screen displays the code number
for the receiver now “bound” to this model memory. For
example:
phase 2 hover
5
4
autorotat.
receiv out
rx bind
R06
10:01 G3
timer
Conversely, if the green LED on the receiver fl ashes
f
or longer than about ten seconds, then the binding
process has failed. In parallel with this the screen will
display three “---” once more. If this should occur, alter
the relative position of the aerials, and repeat the whole
procedure.
33112_mx12_HoTT_2_GB.indd Abs25:7033112_mx12_HoTT_2_GB.indd Abs25:70 06.06.2011 19:39:3906.06.2011 19:39:39