
User's Manual


71
Program description: base settings - model helicopter
Range test
The integral range-check reduces the transmitter’s output
power in such a way that you can test the system’s
operation at a distance of up to about fi fty metres.
Carry out the range-check of the Graupner HoTT system
in accordance with the following instructions. We recom-
mend that you ask a friend to help with range-checking.
Install the receiver in the model as required, prefer-1.
ably after completing the binding process with the
transmitter.
Switch the radio control system on and wait until the 2.
green LED on the receiver glows. Now you can ob-
serve the servo movements.
Place the model on a fl at surface (paving, close-mown 3.
grass or earth), with the receiver aerials at least 15
cm above the ground. This means that you may have
to place the model on a raised object for the period of
the check.
Hold the transmitter at hip-height, and away from your 4.
body. Do not point the aerial straight at the model; in-
stead rotate and / or angle the aerial tip so that it is
vertical while you carry out the check.
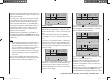
If you have not already done so, use the arrow but-5.
tons cd of the left or right-hand four-way button
to move to the “Test range” line, and initiate range-
check mode by pressing the central SET button of
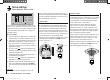
the r
ight-hand four-way button:
phase 2
speed
5
autorotat.
4
receiv out
rx bind
R06
range test
99sec
When you start the range-check, the transmitter’s
output power is signifi cantly reduced, and the blue
LED on the aerial base starts to fl ash. At this point
the time display on the transmitter screen starts
counting down, and a double beep sounds every fi ve
seconds.
From fi ve seconds before the end of the range-check
you will hear a triple beep every second. When the
99 seconds of the range-check period have elapsed,
the transmitter switches back to full power, and the
blue LED glows constantly once more.
Within this period walk away from the model, moving 6.
the sticks all the while. If at any point within a distance
of about fi fty metres you notice a break in the connec-
tion, attempt to reproduce it.
If the model is fi tted with a motor, switch it on in order 7.
to check the system’s interference rejection.
Walk further away from the model until you no longer 8.
have full control over it.
At this point wait until the test period has elapsed, 9.
with the model still switched on and ready for use.
When the range-check period is over, the model
should respond again to control commands. It this is
not 100% the case, do not use the system. Contact
your nearest Graupner Service Centre.
Carry out a range-check before every fl ight, and sim-10.
ulate all the servo movements which are likely to oc-
cur in a typical fl ight. To ensure safe operation of the
model, the range must always be at least fi fty metres
on the ground.
Caution:
Never initiate a range-check when you are actually
operating a model!
RF transmit
In this menu line you can manually switch the transmit-
ter’s RF transmission on and off again for a specifi c
model for the period that the transmitter is currently
switched on. For example, you might wish to do this to
save power when demonstrating the programming of a
model. If you switch the transmitter off with the RF
module switched off, next time you switch the trans-
mitter on it will be switched back on again.
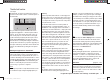
Use the arrow buttons cd of the left or right-hand four-
way button to move to the “RF transmit” line, and press
the central SET button of the right-hand four-way button
to activ
ate the value window:
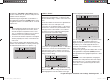
autorotat.
4
receiv out
rx bind R06
range test
99sec
RF transmit
ON
Now you can use the right-hand arrow buttons to switch
betw
een OFF and ON. Press the central SET button
of the right-hand four-way button again to conclude the
input.
33112_mx12_HoTT_2_GB.indd Abs25:7133112_mx12_HoTT_2_GB.indd Abs25:71 06.06.2011 19:39:3906.06.2011 19:39:39