
User's Manual


84
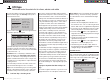
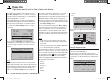
Program description: Dual Rate / Expo – model helicopter
D/R Expo
Switchable control characteristics for roll, pitch-axis and tail rotor
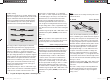
100%
100%
100%
0%
0%
0%
DUAL EXPO
–––
–––
–––
roll
nick
tail
The Dual Rate / Expo function provides a means of
s
witching to reduced control travels, and infl uencing the
travel characteristics, for the roll, pitch-axis and tail rotor
servos (control functions 2 … 4).
A separate curve for control function 1 (motor / collective
pitch) can be set individually for throttle, collective pitch
and tail rotor in the “Helicopter mixers” menu. These
curves feature up to fi ve separately programmable
points; see the sections starting on page 94 and 169.
Dual Rate works in a similar way to transmitter control
travel adjustment in the “Transmitter control settings”
menu, i. e. it affects the corresponding stick function, re-
gardless of whether that function controls a single servo
or multiple servos via any number of complex mixer and
coupling functions.
For each switch position the servo travels can be set to
any value within the range 0 to 125% of full travel.
Expo works in a different way. If you set a value greater
than 0%, exponential provides fi ne control of the model
around the centre position of the primary control func-
tions (roll, pitch-axis and tail rotor), without forfeiting full
travel at the end-points of stick movement. If you set
a value lower than 0%, travel is increased around the
neutral position, and diminishes towards the extremes of
travel. The degree of “progression” can be set within the
range -100% to +100%, where 0% equates to normal,
linear control characteristics.
Another application for exponential is to improve the
linearity of rotary-output servos, which are the standard
nowadays. With a rotary servo the movement of the
control surface is inevitably non-linear, as the linear
movement of the output disc or lever diminishes pro-
gressively as the angular movement increases, i. e. the
rate of travel of the control surface declines steadily
towards the extremes, dependent upon the position of
the linkage point on the output disc or lever. You can
compensate for this effect by setting an Expo value
greater than 0%, with the result that the angular travel of
the output device increases disproportionately as stick
travel increases.
Like Dual Rates, the Expo setting applies directly to the
corresponding stick function, regardless of whether that
function controls a single servo or multiple servos via
any number of complex mixer and coupling functions.
The Dual Rate and Expo functions can also be switched
on and off together if you assign a switch to the func-
tion. The result of this is that Dual Rates and Expo can
be controlled simultaneously using a single switch, and
this can be advantageous - especially with high-speed
models.
Flight phase dependent Dual-Rate and Expo set-
tings
If you have assigned a switch and - if you wish - a more
appropriate name to one of the phases 2 or Auto-rota-
tion in the “Basic settings” menu (see page 68 and 69),
then this appears at bottom left, e. g. “normal”. If neces-
sary, operate the associated switch in order to switch
between the fl ight phases.
The basic set-up procedure
Switch to the desired fl ight phase, and then select 1.
the desired line “Roll”, “Pitch” or “Tail” using the arrow
buttons cd of the left or right-hand four-way button.
If necessary, use the 2. ef buttons of the left or right-
hand four-way button to select the desired column.
Press the central 3. SET button of the right-hand four-
w
ay button: the corresponding input fi eld is now high-
lighted (black background).
Set the desired value using the arrow buttons of the 4.
right-hand four-way button.
Press the central 5. SET button of the right-hand four-
w
ay button to conclude the input process.
Simultaneously press the 6. cd or ef buttons of
the right-hand four-way button (CLEAR) to reset any
changed settings to the default values.
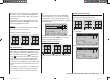
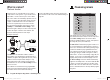
Dual Rate function
If you wish to switch between two possible D/R set-
tings, use the f button of the left or right-hand four-way
button to move to the right-hand column, marked at the
bottom edge of the screen with the switch symbol
,
press the central SET button …
100%
100%
100%
0%
0%
0%
roll
Nick
Heck
DUAL EXPO
–––
–––
–––
push desired switch
into position ON
… and assign a physical switch as described in the sec-
tion
“Assigning switches and control switches” on page
39. The assigned switch appears on the screen together
with a switch symbol which indicates the direction of
operation of the switch.
Select the left-hand column, marked DUAL at the bottom
33112_mx12_HoTT_2_GB.indd Abs30:8433112_mx12_HoTT_2_GB.indd Abs30:84 06.06.2011 19:39:4006.06.2011 19:39:40