
Instructions / Assembly


1.
INSTALLATION INSTRUCTIONS
Description: Loading/ATV Ramp
Applications: Varies by Model, ATVs, Cycles, Mowers and other wheeled vehicles/equipment
Warranty: 2 Years
Installation, Safety, Maintenance and Use Instruction
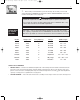
1. Portable Ramps Specifications by Model See page 2
2. Stabilizer Straps Part A55
Please read this manual and follow its instructions
carefully. To emphasize special information, the
symbol and the words WARNING, CAUTION
and NOTE have special meanings. Pay special
attention to the messages highlighted by these
signal words:
NOTE: Indicates special information to make
maintenance easier or instructions clearer.
The loading ramp is a convenient, effective tool for helping you transport your equipment or ATVs. A ramp
is also a piece of equipment that must be respected and used in a cautious and well-planned manner.
WARNING
WARNING
Indicates potential hazard that could
result in death or injury.
CAUTION
Indicates potential hazard that could
result in vehicle damage.
• Improper use of this product could result in injury or death.
WARNING
• To maintain balance, be sure the ramp is
centered on the tailgate.
WARNING
CAUTION
NOTE
1. DO NOT use the ramp if the ramp is damaged
or without utilizing the stabilizer straps.
2. Adjust the width of the ramp so the wheeled
vehicle tires are centered on the ramp panels. Use
the clips provided to lock the telescoping tubes
together after adjustment. This will help stabilize the
ramp panels during loading. (Applies to adjustable
models only.)
3. Make sure the engine of the truck onto which
you are loading is turned off and the parking brake is
set.
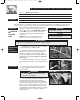
1. Place loading ramp on tailgate of truck with
the holding fingers (A) resting on the tailgate as
shown in Figure 1.
2. Secure each side of ramp to the third or fourth
tread (B) depending on the truck bed height as
shown in Figure 1 by pulling the s-hook and buckle
around the tread through the loop at opposite end of
strap as shown in Figure 2. Attach the s-hook to the
bumper, Figure 3, and pull tight using the buckle to
make adjustments and making sure the top tread (C)
and fingers (A) of ramp is touching the tailgate as
shown in Figure 1.
Contents
Important
Installation
Preparation
Prior to
Installation
Figure 1
Figure 2
Figure 3
B
A
C
46724 great day install ins.qxd 8/7/03 1:49 PM Page 1