Owner’s Manual 1/4 Sheet Sander 80152 CAUTION: Before using this sander or any of its accessories, read this manual and follow all Safety Rules and Operating Instructions.
SECTION Warranty ….………………………. Product specifications …………... Power tool safety ………………… Specific safety rules …………….. Extension cord guidelines ..…….. Symbols ………………………….. PAGE 2 2 3–5 5–6 6 7 SECTION Know your pad sander ………. Accessories …………………… Carton contents……..……….... Assembly & operation ..……… Maintenance …….…………….. Parts & service ..……..……….. ® WWW.GREATNECKTOOLS.
POWER TOOL SAFETY ! WARNING: To avoid electrical hazards, fire hazards or damage to the pad sander, use proper circuit protection. The sander is wired at the factory for 120 V operation. It must be connected to a 120 V, 15 A time delayed fuse or circuit breaker. To avoid shock or fire, replace power cord immediately if it is worn, cut or damaged in any way. ! ALWAYS WEAR EYE PROTECTION THAT CONFORMS WITH CSA REQUIREMENTS or ANSI SAFETY STANDARD Z87.1 FLYING DEBRIS can cause permanent eye damage.
POWER TOOL SAFETY Do not abuse the cord. Never use the cord to carry the tools or pull the plug from an outlet. Keep cord away from heat, oil, sharp edges or moving parts. Replace damaged cords immediately. Damaged cords increase the risk of electric shock. GENERAL SAFETY RULES ! WARNING: Read and understand all instructions. Failure to follow all instructions listed below may result in electric shock, fire and/or serious personal injury.
POWER TOOL SAFETY Do not overreach. Keep proper footing and balance at all times. Proper footing and balance enables better control of the tool in unexpected situations. Check for misalignment or binding of moving parts, breakage of parts and any other condition that may affect the tool’s operation. If damaged, have the tool serviced before using. Many accidents are caused by poorly maintained tools. Use safety equipment. Always wear eye protection.
SPECIFIC SAFETY RULES ! WARNING: Non-compliant eyewear can cause serious injury if broken during operation of a power tool. overheating. The table below shows the correct size to use according to cord length and nameplate ampere rating. If in doubt, use the next heavier gauge. The smaller the gauge number the heavier the cord. ! WARNING: Always use a dust mask when sanding. Be sure your extension cord is properly wired and in good condition.
SYMBOLS WARNING: Some of the following symbols may be used on your tool. Please study them and learn their meaning. Proper interpretation of these symbols will allow you to operate the tool better and safer.
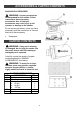
KNOW YOUR SANDER 8
ACCESSORIES & CARTON CONTENTS AVAILABLE ACCESSORIES ! WARNING: Use only accessories recommended for this sander. Follow instructions that accompany accessories. Use of improper accessories may cause injury to the operator or damage to the sander. Do not use any accessory unless you have completely read the instructions or Owner’s Manual for that accessory.
ASSEMBLY & OPERATION INSTALLING DUST BAG ASSEMBLY 1. Insert dust duct bag assembly sleeve (1) into dust chute (2) (see Fig. 1). NOTE: Make sure the tabs (3) insert into the matching slots (4) in the dust chute. 2. Rotate dust chute sleeve CLOCKWISE to lock it into place. 3. Carefully shake the dust bag with the elasticized opening pointing downward to remove the sanding dust. NOTE: It is best to perform this function outdoors over a trash can to prevent sanding dust from escaping into the work area. 4.
ASSEMBLY & OPERATION INSTALLING SANDPAPER – cont’d 3. 4. Wrap sandpaper sheet (3) over backing pad and insert it into the open rear sandpaper clamp (5) (see Fig. 4). NOTE: Make sure sandpaper is pulled tight over the backing pad for proper sanding operation. Lift sandpaper clamp lever up and inward to lock sandpaper into clamp. Fig. 4 PUNCHING HOLES IN SANDPAPER The sandpaper must have 8 holes punched in it to allow the sanding dust to escape from the working surface.
ASSEMBLY & OPERATION ! In general, coarse grit will remove the most material and finer grit will produce the best finish in all sanding operations. The condition of the surface to be sanded will determine which grit will do the best job. If the surface is rough, start with a coarse grit and sand until the surface is uniform. Medium grit may then be used to remove scratches left by the coarser grit. Fine grit should be used for finishing the surface.
ASSEMBLY & OPERATION SANDING – cont’d DO NOT FORCE THE SANDER. The weight of the sander usually provides adequate pressure. Let the sander and sandpaper do the work. Applying added pressure will slow the motor, increase the wear on the sandpaper and greatly reduce sander speed. Excessive pressure will overload the motor causing possible damage from the motor overheating. It will also create an inferior finish on sanded work.
MAINTENANCE GENERAL It has been found that electric tools are subjected to accelerated wear and possible premature failure when they are used on fiberglass boats and sports cars, wallboard, spackling compounds or plaster. The chips and grindings from these materials are highly abrasive to electric tool parts such as bearings, brushes, commutators, etc. Consequently, it is not recommended that this tool be used for extended work on any fiberglass material, wallboard, spackling compounds or plaster.
PARTS DIAGRAM – MODEL 80152 Sander 10 9 11 8 7 12 6 13 5 14 4 15 3 16 2 1 17 33 32 18 31 19 30 20 29 21 28 27 22 26 23 24 25 15
2 2 2 2 4 6 2 2 2 2 2 2 2