TM Vortex Cotton Candy Machine Owner’s Manual Copyright 2012 DTX International All Rights Reserved
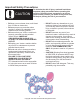
Important Safety Precautions CAUTION To minimize the risk of injury, read and heed these important safety precautions when operating this machine. Following these precautions, as well as general safety rules as you would for any work area, will help to prolong the life of your machine. • DO keep your work area clean, well-lit and free of clutter or obstruction. • DO wear proper eye protection when servicing, cleaning or maintaining your machine such as safety glasses.
IMPORTANT SAFEGUARDS & TECHNIQUES When using electrical appliances, basic safety precautions should always be followed including the following: 1. Read all instructions. 2. To protect against risk of electrical shock do not put the unit in water or other liquid. 3. Close supervision is necessary when any appliance is used by or near children. 4. Unplug from outlet when not in use, before putting on or taking off parts, and before cleaning. 5. Avoid contacting moving parts.
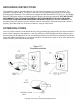
GROUNDING INSTRUCTIONS This appliance must be grounded while in use to protect the operator from electrical shock. The appliance is equipped with a 3-conductor cord and a 3-prong grounding-type plug to fit the proper grounding-type receptacle. The machine has a plug that looks like sketch A in Figure 73.1. An adaptor, sketch B, should be used for connecting sketch-A plugs to two-prong receptacles, BUT WE DO NOT RECOMMEND THIS.
TM Congratulations on your Vortex Cotton Candy machine purchase! You have chosen one of the finest and most reliable Cotton Candy machines on the market. We are committed to your satisfaction. Should you have questions or comments, or if you would like to find out about our other products, please call: 1-800-665-0728 or find us on the web at www.greatnorthernpopcorn.com.
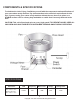
COMPONENTS & SPECIFICATIONS To minimize the risk of injury, familiarize yourself with the components and specifications of your new cotton candy machine. Pay close attention to the electrical requirements for this unit. If you are using your cotton candy machine without the cart, be sure to place on a STABLE surface such as a heavy duty worktable or a table that is securely fastened to the floor.
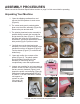
ASSEMBLY PROCEDURES Please consult the Electrical Specifications section on page 5 of this manual before operating. Unpacking Your Machine 1. Open the shipping cardboard box and remove the foam packers in each corner (Figure A). 2. The cotton candy pan is packed upside down over the motor assembly (Figure B). Remove the pan and set aside. 3. The spinning head and motor assembly is packed directly beneath the inverted pan and protected by foam (Figure C).
OPERATING PROCEDURES Please consult the Electrical Specifications section on page 5 of this manual before operating. Initial Setup After unpacking your machine: NOTE: If your machine came with a cart, skip forward to page 12 and complete the cart assembly before completing this portion of the setup. 1. Wipe the pan and floss head with a clean, soft cloth moistened with water. Dry thoroughly.
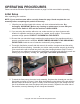
OPERATING PROCEDURES Cotton Candy Machine Controls & Operation 1. Turn the Power Switch to ON by pushing down on the red switch (Figure M). Observe the stability of your machine. Check for excessive vibration and if you notice this, turn the Power Switch to OFF, unplug the machine and make sure that your working surface is level. Check to see that the floss head is sitting levelly and evenly. 2. To bring the machine up to temperature, turn the Heating Controller Switch (Figure N) to ON.
MAKING COTTON CANDY Cotton Candy Sugar You may use any pre-mixed commercial cotton candy floss in your machine. Pre-mixed preparations are convenient to use and commonly packaged in sealed containers designed for easy pouring. Alternately, you may choose to add a floss concentrate to high quality sugar to produce your own mixture. Please be sure to use high quality sugar with no additives as these may clog your machine and require higher heat settings.
MAKING COTTON CANDY Cotton Candy Production TO MAKE CONES: 1. Follow the instructions on page 9 to create floss. Grip floss cone by the small tapered end and insert the larger end into the spun mat of floss. IMPORTANT! Take care when cone building to keep jewelry or loose clothing away from the spinning floss head. Floss head will be hot! 2. Twirl the floss onto the cone in a counter-clockwise direction. 3. Lift off and roll the floss onto the cone to the desired size.
Vortex Cart Assembly TM NOTE: It is recommended that you assemble the cart before the machine as you will need to get inside the unit to insert nuts and bolts that hold the shelves on. Should you already have the cotton candy maker assembled, you must remove the pan and the grey lid from the machine in order to complete these steps.
Ensure that you have all the parts needed by comparing to the parts list on Page 12. Once you have determined that you have all the parts necessary you may begin assembly. If anything is missing, contact Great Northern Popcorn at 1-800-665-0728 to resolve any missing parts issues. NOTE: Refer to parts list on Page 12 for all parts references. Cart Assembly 1) Obtain one Axle Post (D), one Leg (F), and one Cross bar (E). Assemble using two Frame Bolts (bb) as shown in Figure R.
Cart Assembly - Cont. 5) See figure U. Place the axle (G) on top of the two slots in the axle posts (D). Push down firmly until the axle is seated completely into the bottom of the slots. A rubber mallet might be helpful if the axle is difficult to seat properly. Figure V shows the axle seated completely. G G D D Figure V Figure U 6) Locate an axle lock (aa) from the bag of nuts and bolts.
Cart Assembly - Cont. 10) Slide the frame into the base of the cotton candy machine top, ensuring that there are no bits of metal still inside the machine base from the drilling process. Use a small screwdriver or pick to remove any stubborn burs or metal flakes. The frame should slide fairly easily into the base of the machine (Figure Z). Secure each corner with two short screws (ee) as shown in Figure AA. NOTE: The cart can be attached to the machine one of two ways.
Cart Assembly - Handle 14) Install one of the handle brackets (I) on the edge of the shelf (B) so that the open end of the bracket is facing inward. Use two tapered bolts (dd) and two 8mm nuts (gg) to secure the handle bracket. See Figure CC. 15) Place one end of the handle (H) into the not attached handle bracket. While holding the handle in place set the other handle bracket (I) in position and secure with the remaining two tapered bolts (dd) and 8mm nuts (gg). See Figure DD.