Update Manual 7’ & 10’ End Wheel No-Till Clutch Linkage Manufacturing, Inc. P.O.
General Information General Information Important Notice Great Plains Manufacturing, Inc. provides this publication “as is” without warranty of any kind, either express or implied, while every precaution has been taken in the preparation of this manual, Great Plains Manufacturing, Inc. assumes no responsibility for errors or omissions. Neither is any liability assumed for damages resulting from the use of the information contained herein. Great Plains Manufacturing, Inc.
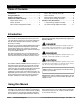
Using this Manual Table of Contents Introduction . . . . . . . . . . . . . . . . . . . . . . . . . . . . . . . 1 Using this Manual . . . . . . . . . . . . . . . . . . . . . . . . . . . 1 Section 1 Safety Rules . . . . . . . . . . . . . . . . . . . . . . . 2 Section 2 Assembly & Set-Up . . . . . . . . . . . . . . . . . 2 Torque Values Chart . . . . . . . . . . . . . . . . . . . . . . 2 Before You Start . . . . . . . . . . . . . . . . . . . . . . . . . 3 Old 7’ Clutch Linkage Disassembly . . . . . . . . . .
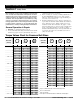
Section 2 Assembly & Set-Up Section 1 Safety Rules Most accidents are the result of negligence and carelessness, usually caused by failure of the operator to follow simple but necessary safety precautions. The following safety precautions are suggested to help prevent such accidents. The safe operation of any machinery is a big concern to consumers and manufacturers. Your Clutch Linkage Update Kit have been designed with many builtin safety features.
Assembly Before You Start Read and understand the owners manual for your Clutch Linkage Update Kit. A basic understanding of how the kit works will aid in the assembly, setup and operation of your drill. Before attempting to assemble the Clutch Linkage Update Kit, use the following as a checklist. Having all the needed parts and equipment readily at hand will speed up your assembly task and will make the job as safe as possible.
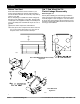
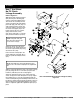
Assembly New 7’ End Wheel No-Till Clutch Linkage Assembly Refer to Figure 2-1: Sliding the inside retaining washers (#22) and the pivot bushing (#8) onto the clutch rod weldment (#21). Then insert this assembly into the clutch rod support (#3) and add the pivot tube (#9), push arm (#5), outside retaining washers (#22) and cotter pins (#23) as shown.
Assembly Before You Start Read and understand the owners manual for your Clutch Linkage Update Kit. A basic understanding of how the kit works will aid in the assembly, setup and operation of your drill. Before attempting to assemble the Clutch Linkage Update Kit, use the following as a checklist. Having all the needed parts and equipment readily at hand will speed up your assembly task and will make the job as safe as possible.
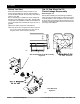
Assembly New 10’ End Wheel No-Till Clutch Linkage Assembly Refer to Figure 2-6: Attach the clutch mounting plate (#8) to the bottom of the hanger sub-weldment using the existing hardware that fastens the gearbox on. Then fasten the clutch rod support (#5) to the hanger using 5/16"-18 x 1" bolts (#13), 5/16" washers, & nuts.(#14,18,22). Preassemble the clutch rod weldment (#4), and inside cotter pin (#23). Slide the inside retaining washers (#21) & pivot bushing (#7) onto the clutch rod.
Notes: 5/3/96 Great Plains Mfg., Inc.
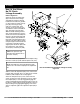
Section 3 7’ EWNT Clutch Linkage Update Assembly 13804 5 7’ & 10’ End Wheel No-Till Clutch Linkage 152-156M Great Plains Mfg., Inc.
Section 3 7’ EWNT Clutch Linkage Update Assembly Ref. Part No. Part Description 1. 2. 3. 4. 5. 6.
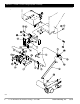
Section 3 10’ EWNT Clutch Linkage Update Assembly 13807 7 7’ & 10’ End Wheel No-Till Clutch Linkage 152-156M Great Plains Mfg., Inc.
Section 3 10’ EWNT Clutch Linkage Update Assembly Ref. Part No. Part Description 1. 2. 3.
Great Plains Manufacturing, Inc. Corporate Offices: PO.