
Manual
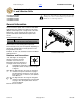


4 2-Outlet Selector Front Parts Great Plains Mfg., Inc.
194-033M Front Parts 2014-04-15
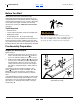
Install Valve Mount
If markers are already installed, and a valve is already
present at the mount, skip to Step 8 on page 4.
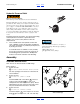
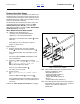
Mount as First Valve
Refer to Figure 4
7. Select: one new
194-249D BRACKET, 2ND SELECTOR VALVE,
two new
802-168C HHCS 3/8-16X3 1/4 GR5,
and two new
803-013C NUT LOCK 3/8-16 PLT.
Position the valve assembly to the left of the
tongue valve mount , handle pointing to machine
left. Position the new bracket to the right of the
mount , with the bottom holes of the bracket
aligned with the mount holes.
Insert the screws through the valve, mount and
bracket. Secure with lock nuts .
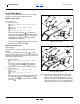
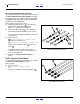
Mount as Second Valve
Refer to Figure 5
(shown with hoses disconnected from existing valve for
clarity)
If markers are already installed, a valve is already
present on the tongue mount. The new valve mounts on
the bracket from the kit, but the old valve screws must be
removed to mount the bracket.
8. Select: one new
194-249D BRACKET, 2ND SELECTOR VALVE
Remove the existing nuts from the existing
screws and install the bracket . Align the
bottom holes of the new bracket with the screws.
9. Select: two new
802-168C HHCS 3/8-16X3 1/4 GR5
and two new
803-013C NUT LOCK 3/8-16 PLT
Mount the new valve assembly on the left side of
the new bracket , above the existing valve .
Insert the screws from the left and secure with
lock nuts .
1
U
D
F
B
L
R
18
2
16
12
Figure 4
Mount as First Valve
27025
12
16
18
2
1
12
1
16
18
U
D
F
B
L
R
18
2
16
12
1
57
56
Note: Although this sequence leaves the marker/fold
selector valve on the bottom, you may prefer to
have it on top (a more intuitive location, as the
markers are above the lift cylinders). The existing
valve may be moved, or you can change the hose
connections later (the valves are identical parts).
Figure 5
Mount as Second Valve
27026
1
12
57
56 12
16
18
2
12 1
16
18