Table of Contents Index Installation and Reference Swath Command™ Section Control Manufacturing, Inc. www.greatplainsmfg.com Read the installation manual entirely. When you see this symbol, the subsequent instructions and warnings are serious - follow without exception. Your life and the lives of others depend on it! 31548 Illustrations may show optional equipment or components not supplied with your kit.
Table of Contents Index Table of Contents Index
Great Plains Manufacturing, Inc. Cover Index iii Table of Contents Important Safety Information ......................................1 General Information .....................................................3 Prerequisites ..................................................................3 Components ...................................................................3 Additional Components Always Required ......................3 Additional Components That May Be Required .............
iv Swath Command™ Table of Contents 402-275K Two-Row RH 15-Inch .............................. 38 402-275K-ASY: 402-275K Installation Details ......... 39 402-276K Two-Row LH 15-Inch............................... 40 402-276K-ASY: 402-276K Installation Details ......... 41 402-279K Twin-Row (RH Clutch)............................. 42 402-279K-ASY: 402-279K Installation Details ......... 43 402-281K Twin-Row Reverse (LH Clutch) ............... 44 402-281K-ASY: 402-281K Installation Details .........
Great Plains Manufacturing, Inc. Table of Contents Index 1 Index 402-382M Important Safety Information Look for Safety Symbol The SAFETY ALERT SYMBOL indicates there is a potential hazard to personal safety involved and extra safety precaution must be taken. When you see this symbol, be alert and carefully read the message that follows it.
2 Swath Command™ Table of Contents Index Great Plains Manufacturing, Inc. Index 2012-08-23 Wear Protective Equipment ▲ Wear protective clothing and equipment. ▲ Because prolonged exposure to loud noise can cause hearing impairment or hearing loss, wear suitable hearing protection such as earmuffs or earplugs. ▲ Because working on equipment safely requires your full attention, avoid wearing entertainment headphones while perform the installation.
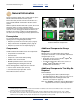
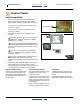
Great Plains Manufacturing, Inc. Table of Contents Index 3 General Information These instructions explain how to install and set up the Swath Command™ Section Control system. This manual also provides reference information for a factory-installed Swath Command™ Section Control system. With the optional Swath Command™ system, all row unit final drive chains are clutch-controlled. Swath Command™ can turn seed metering on and off for 6 to 8 sectionsa of rows.
4 Swath Command™ Table of Contents Index Great Plains Manufacturing, Inc. Models and Kits Covered This manual provides information for Swath Command™ system on the following specific models of Yield-Pro® planters. Kit part numbers are for field-install kits.
Great Plains Manufacturing, Inc. Table of Contents Related Documents General Information 5 Notations and Conventions Have your planter Operator and Parts manual available during installation.
6 Swath Command™ Table of Contents Index Great Plains Manufacturing, Inc. Prepare Planter Verify Compatibility 1. Verify that you have the correct kit. Check your planter model number (from the serial number plate) against the kit part number table on page 4. If your planter is not listed (or has an N/A), stop. Contact your dealer. Kit: 402-381A If the kit you have is not for your planter, stop. Contact your dealer. 2. Verify that the planter has a compatible seed monitor.
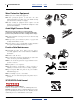
Great Plains Manufacturing, Inc. Table of Contents Index Prepare Planter 7 Tools Required Shaft Locator Tool 232 Refer to Figure 2 Kit installation requires removal and re-installation of meter line shafts and their bearings. Bearing flanges must be aligned during re-installation. Great Plains offersa a tool kit to simplify this task, shown at right. 4. 1 Check that alignment bolts 232 are set correctly.
8 Swath Command™ Table of Contents Index Great Plains Manufacturing, Inc. Replace Electric Clutches Depending on planter model and drive type, there are two or three electric clutch assemblies that are replaced with a simple sprocket. Due to their electrical load, these cannot be left connected to the system harness, and without electrical control, would leave the drive system disabled.
Great Plains Manufacturing, Inc. Table of Contents Index 9 Install Air Clutches Install Center Air Clutches If the planter frame does not have a center section, for example Models YP1225 and YP1625, continue at “Install Wing Air Clutches” on page 12. 11 26. Connect the hitch hydraulics and harnesses at the tractor. 27. a. For Model 3PYP and 3PYPA, completely fold the wings. b. For all other Models, partially or completely fold the wings. This provides access to center section shaft ends.
10 Swath Command™ Table of Contents Index Great Plains Manufacturing, Inc. Remove Center Shaft Refer to Figure 6 (which depicts a 3PYPA center section shaft) 35. Relax the idlers on the chain driving the shaft input sprocket. 12 36. At each center section row, relax the row unit idlers 17 to slacken the final drive chain 12 . 17 37.
Great Plains Manufacturing, Inc. Table of Contents Index Install Air Clutches 11 Install Center Air Clutches 44. Consult the layout drawing for your kit (found in pages 48 through page 97). 45. Note which types of clutch assemblies are supplied in your kit (there are six different total assemblies, and as many as four combinations per kit). Find the detailed assembly drawing and instructions for each in the Appendix, found on pages listed at right.
12 Swath Command™ Table of Contents Index Great Plains Manufacturing, Inc. Install Wing Air Clutches 59. Connect the hitch hydraulics and harnesses at the tractor. 60. a. For Model 3PYP and 3PYPA, completely unfold the wings. b. For all other Models, Refer to Figure 8: take note of the location of the outside end of the line shaft 14 . Partially or completely fold the wings, leaving the wing-end casters 1 oriented so that they do not obstruct shaft removal. 1 14 61. Lower the openers. 62.
Great Plains Manufacturing, Inc. Table of Contents Index Install Air Clutches 13 Remove Wing Shaft Refer to Figure 10 (which depicts a YP24 wing shaft) 69. Relax the idlers on the chain driving the shaft input sprocket. 26 70. At each center section row, relax the row unit idlers (not shown) to slacken the final drive chain 12 . 71.
14 Swath Command™ Table of Contents Index Great Plains Manufacturing, Inc. Install Wing Air Clutches 78. Consult the layout drawing for your kit (found in pages 48 through page 97). 79. Note which types of clutch assemblies are supplied in your kit (there are six different total assemblies, and as many as four combinations per kit). Find the detailed assembly drawing and instructions for each in the Appendix, found on pages listed at right.
Great Plains Manufacturing, Inc. Table of Contents Index 15 Install Compressor Compressor installation varies by hitch type: Pull Type, Hydraulic Tongue: below Pull Type, Three-Point: page 17 3PYP/A Three-Point: page 18 Hydraulic Tongue (H.T.) Compressor Installation U Refer to Figure 12 If the hydraulic tongue already has a compressor mount bracket 209 available, continue at “Install Compressor Mount (H.T.)” on page 16.
16 Swath Command™ Table of Contents Index Great Plains Manufacturing, Inc. Install Compressor Mount (H.T.) Note: By convention, the Swath Command™ compressor is installed on the right hand side of the hitch. If a Row-Pro™ compressor is already installed there, the Swath Command™ compressor may be installed on the left hand side. U R Refer to Figure 14 98.
Great Plains Manufacturing, Inc. Table of Contents Index Install Compressor 17 Pull-Type 3-Point Compressor Installation Note: By convention, the Swath Command™ compressor is installed on the right hand side of the hitch. If a Row-Pro™ compressor is already installed there, the Swath Command™ compressor may be installed on the left hand side. U B R F Refer to Figure 16 105.
18 Swath Command™ Table of Contents Index Great Plains Manufacturing, Inc. 3PYP and 3PYPA Compressor Installation Note: By convention, the Swath Command™ compressor is installed on the right hand side of the hitch. If a Row-Pro™ compressor is already installed there, the Swath Command™ compressor may be installed on the left hand side. Refer to Figure 17 112.
Table of Contents Great Plains Manufacturing, Inc. Index 19 Install Valve Blocks Refer to Figure 18 The air clutches now installed are controlled by solenoid valves 272 provided in blocks of 4 valves, each valve controlling a number of rows. A Swath Command™ kit includes 1, 2 or 3 valve blocks. 255 U L WSMB-TCOMa 218 . Each The valves are controlled by a TCOM controls up to eight valves. A Swath Command™ kit includes 1 or 2 WSMBs.
20 Swath Command™ 402-382M Table of Contents Index Great Plains Manufacturing, Inc.
Great Plains Manufacturing, Inc. Table of Contents Index 21 Install Air Tank(s) Refer to Figure 19 The solenoid valves now installed are supplied by one or two air tanks 262 . 238 Start at the left side of the planter. A section may have one tank or no tank. 124. Consult the clutch layout drawing for the kit (page 48 through page 132). Note locations of any: 262 238 245 U L 245 R F D B 262 823-329C TRU-COUNT AIR TANK ASM If none, move to the next section. 125.
22 Swath Command™ Table of Contents Index Great Plains Manufacturing, Inc. Install Air Lines Install Row Air Lines 273 128. Find the Clutch Layout for your planter model (these are on page 48 through page 132). 275 1 272 Start with the left wing, first clutch and valve Port 1. Valve ports are numbered 1-4 on the top cover. 1 2 283 3 AIR IN 283 273 4 274 34084 Refer to Figure 20 129. Locate the next available port block 272 . 1 Figure 20 Valve Block Tubing of the valve 130.
Great Plains Manufacturing, Inc. Table of Contents Index Install Air Lines 23 Install Section Air Lines All of the tanks and valve inlets are interconnected, forming a single shared reservoir system. 272 274 On a smaller planter, this topic is a simple connection of a single tank 262 and valve 272 . Use a tee 274 at the inside end of the tubing, for the supply connection. Refer to Figure 22 137. Locate the left 1 and right 3 extents of the tank and valve 272 set now installed.
24 Swath Command™ Table of Contents Index Great Plains Manufacturing, Inc. Install Harness Determine Connections Insert Right Wing WSMB Harness If your kit only had one WSMB, continue at “Connect Valve Blocks” on page 25. 146. Find the Clutch Layout for your planter model (these are on page 48 through page 132). 149. On the right wing, locate a CANbus connection near the second WSMB-TCOM 218 . This connection may be at an existing WSMB, but is more likely to be at the CANbus terminator 18 .
Great Plains Manufacturing, Inc. Table of Contents Index Install Harness 25 Connect Valve Blocks Connect 1st Valve Block 151. Connect the 6-pin weatherpak connector marked for outputs 1-4 to the first solenoid valve 272 . Connect 2nd Valve Block (if any) 152. Move to the next (second) valve.
26 Swath Command™ Table of Contents Index Great Plains Manufacturing, Inc. System Set Up Implement Considerations For a standard configuration, no components typically need to be installed on the planter. Continue at “Install Satellite Receiver” on page 28. If after-market clutch control systems are to be used, consult the supplier documentation for installation.
Great Plains Manufacturing, Inc. Table of Contents Index System Set Up 27 Mount Pressure Gauge For a standard configuration, using the supplied compressor pre-installed on the planter, continue at “Install Cab Components” on page 28. 2 Leaky Connect Risk: When cutting hose, use a sharp knife or scissor-type tubing cutter. Make the cuts smooth and perpendicular to the length of the hose. Avoid angled and ragged cuts.
28 Swath Command™ Table of Contents Index Great Plains Manufacturing, Inc. Install Satellite Receiver If the augmented coordinate receiver is already installed, continue at “Install Cab Components”. Otherwise, consult the instructions supplied with the primary and augmentation receiver(s). The primary, and any augmentation receiver may need to be configured or programmed via an office computer prior to mechanical installation. Receivers are typically mounted on the rear center of the tractor cab roof.
Great Plains Manufacturing, Inc. Table of Contents Index System Set Up 29 Install Control Terminal Planter Option 57 (AI120) Console Refer to Figure 29 This console is a complete super-set of any existing DICKEY-john® AI100 (formerly A1) console that might be installed. It also performs the combined functions of and A1 and an A5 console. Consult the DICKEY-john® Auto Section Control System Operator’s Manual (11001-1561A) for installation of the auto section control terminal in the tractor cab.
30 Swath Command™ Table of Contents Index Great Plains Manufacturing, Inc. System Harness Diagram (Option 57) This diagram shows the factory-installed configuration, plus optional GPS receiver. The components changed or added for Swath Command™ are outlined with dashes. CFM Switch Module Battery Tractor Power Harness 467980455 NOTE: The GPS receiver connects to the cab harness RS232 port. Refer to Auto Section Control Setup to transmit GPS signal directly over CANbus.
Table of Contents Great Plains Manufacturing, Inc. Index System Set Up 31 System Harness Diagram (Kit) This diagram shows a configuration using only components available through Great Plains. CFM Switch Module Auto Section Control Terminal Battery Tractor Power Harness 467980455 The components changed or added for Swath Command™ are outlined with dashes.
32 Swath Command™ Table of Contents Index Great Plains Manufacturing, Inc. IntelliAg® PDC Setup The system needs know where all seed drop points are located, so that it can accurately turn seeding on and off, as well as record seeded areas. Detailed steps are provided in the 403-857M Feature Operation manual. The present manual (402-382M Installation and Reference) provides reference information needed for console setup.
Table of Contents Great Plains Manufacturing, Inc. Index 33 Appendix A - Reference Information Torque Values Chart Bolt Head Identification Bolt Head Identification Bolt Size Bolt Size Grade 2 in-tpia Grade 5 N-mb ft-lbd N-m 1 7.4 5.6 1 ⁄4-28 8.5 6 5⁄ 16-18 15 5⁄ 16-24 17 ⁄4-20 3⁄ 8-16 3⁄ Grade 8 ft-lb pitchc 5.8 8.8 10.9 Class 5.8 Class 8.8 Class 10.9 N-m N-m N-m ft-lb N-m 11 8 16 12 M 5 X 0.
34 Swath Command™ Table of Contents Index Great Plains Manufacturing, Inc.
Table of Contents Great Plains Manufacturing, Inc.
2-382M L F D B R U 1 2 3 4 5 6 7 8 9 REF 106 192 193 203 230 234 236 237 249 261 c/o PART NO 402-273K 402-529D 402-530D 402-630D 802-167C 802-575C 802-904C 803-006C 804-032C 823-328C DESCRIPTION TRU-COUNT SINGLE ROW ASM ADAPTER TC CLUTCH 41A12 SPKT TRU-COUNT SPKT RETAINER RING SPKT 41A12 3HOLE TC HHCS 1/4-20X1 1/2 GR5 HSHCS #10-32X5/8 HSHCS #10-32X7/8 NUT HEX 1/4-20 PLT WASHER LOCK INTERNAL #10 SS TRU-COUNT LH AIR CLUTCH 402-273K Single-Row Left Hand 1 2 1 1 3 3 1 3 1 QTY 35 Page 36 Swath
Table of Contents Great Plains Manufacturing, Inc. Index Appendix A - Reference Information 37 402-273K-ASY: 402-273K Installation Details Steps: c/o Install during shaft 1 re-insertion. Only the shaft secures the clutch to the opener mount 2 .
402-382M R B D F L U c/o 109 105 188 189 190 191 196 201 224 226 228 236 237 238 242 245 250 251 252 257 258 259 260 REF 1 2 3 4 5 6 7 8 9 10 11 12 13 14 15 16 17 18 19 20 21 22 PART NO 402-275K 402-272H 402-523D 402-524D 402-525D 402-527D 402-534D 402-541D 802-017C 802-023C 802-097C 802-904C 803-006C 803-014C 804-006C 804-013C 804-046C 804-054C 805-446C 808-415C 816-648C 817-852C 823-327C 402-275K Two-Row RH 15-Inch DESCRIPTION QTY Page TRU-COUNT 15 IN ASM TRU-COUNT 15 IN SPKT TUBE 1 OFFSET BRG BR
Table of Contents Great Plains Manufacturing, Inc. Index Appendix A - Reference Information 39 402-275K-ASY: 402-275K Installation Details Steps: c/o This installation relocates both original bearings 26 , presumed to be removed. 15 PART NO 402-025S LOCK COLLAR, 7/8 HEX W/ SET SC 26 822-239C PEER 7/8 HEX BRG AND MNT (TYP ROW) 1. Add a lock collar ( 15 or 101 ) to shaft 1 before installing the clutch only if specified on the clutch layout drawing for your planter and kit.
402-382M L F D B R U 1 2 3 4 5 6 7 8 9 10 11 12 13 14 15 16 17 18 19 20 21 22 REF 111 105 189 190 191 194 196 199 201 224 228 233 236 237 238 245 250 251 252 257 258 259 261 c/o PART NO 402-276K 402-272H 402-524D 402-525D 402-527D 402-532D 402-534D 402-539D 402-541D 802-017C 802-097C 802-382C 802-904C 803-006C 803-014C 804-013C 804-046C 804-054C 805-446C 808-415C 816-648C 817-852C 823-328C 402-276K Two-Row LH 15-Inch DESCRIPTION TRU-COUNT 15 IN LH ASM TRU-COUNT 15 IN SPKT TUBE ADAPTER 7/8 HEX 1 1/
Table of Contents Great Plains Manufacturing, Inc. Index Appendix A - Reference Information 41 402-276K-ASY: 402-276K Installation Details Steps: This installation relocates both original bearings presumed to be removed. c/o PART NO DESCRIPTION 15 402-025S LOCK COLLAR, 7/8 HEX W/ SET SC 26 , 1. Add a lock collar ( 15 or 101 ) to shaft 1 before installing the clutch only if specified on the clutch layout drawing for your planter and kit. Not all rows have collars.
402-382M L F D B R U 1 2 3 4 5 6 7 8 9 10 11 12 13 14 15 16 17 18 19 20 21 22 REF 115 114 188 189 190 191 196 201 224 226 228 236 237 238 242 245 250 251 252 257 258 259 261 c/o PART NO 402-279K 402-278H 402-523D 402-524D 402-525D 402-527D 402-534D 402-541D 802-017C 802-023C 802-097C 802-904C 803-006C 803-014C 804-006C 804-013C 804-046C 804-054C 805-446C 808-415C 816-648C 817-852C 823-328C DESCRIPTION TRU-COUNT TR ASM TRU-COUNT TR SPKT TUBE REP OFFSET BRG BRACKET ADAPTER 7/8 HEX 1 1/4 RND BORE TRU
Table of Contents Great Plains Manufacturing, Inc. Index Appendix A - Reference Information 43 402-279K-ASY: 402-279K Installation Details Steps: This installation relocates both original bearings presumed to be removed. c/o PART NO DESCRIPTION 15 402-025S LOCK COLLAR, 7/8 HEX W/ SET SC 26 , 1. Add a lock collar ( 15 or 101 ) to shaft 1 before installing the clutch only if specified on the clutch layout drawing for your planter and kit. Not all rows may have collars.
402-382M L R F D B U 1 2 3 4 5 6 7 8 9 10 11 12 13 14 15 16 17 18 19 20 21 22 23 24 REF 118 117 189 190 191 196 198 199 201 222 224 225 226 236 237 238 244 245 250 251 252 257 258 259 261 c/o PART NO 402-281K 402-280H 402-524D 402-525D 402-527D 402-534D 402-538D 402-539D 402-541D 802-005C 802-017C 802-022C 802-023C 802-904C 803-006C 803-014C 804-012C 804-013C 804-046C 804-054C 805-446C 808-415C 816-648C 817-852C 823-328C DESCRIPTION TRU-COUNT TR REVERSE ASM TRU-COUNT TR REVERSE SPKT TUBE ADAPTER 7
Table of Contents Great Plains Manufacturing, Inc. Index Appendix A - Reference Information 45 402-281K-ASY: 402-281K Installation Details Steps: This installation relocates both original bearings presumed to be removed. c/o PART NO DESCRIPTION 15 402-025S LOCK COLLAR, 7/8 HEX W/ SET SC 26 , 1. Add a lock collar ( 15 or 101 ) to shaft 1 before installing the clutch only if specified on the clutch layout drawing for your planter and kit. Not all rows have collars.
402-382M L F D B R U c/o 144 193 202 203 229 234 235 237 251 260 REF 1 2 3 4 5 6 7 8 9 PART NO 402-329K 402-530D 402-591D 402-630D 802-152C 802-575C 802-901C 803-006C 804-054C 823-327C DESCRIPTION TRU-COUNT SHORT ROW SINGLE ASM TRU-COUNT SPKT RETAINER RING SPACER EXTENDED SNGL CLUTCH TC SPKT 41A12 3HOLE TC HHCS 1/4-20X2 GR5 HSHCS #10-32X5/8 HSHCS #10-32X1 NUT HEX 1/4-20 PLT WASHER LOCK #10 TRUE COUNT RH AIR CLUTCH 402-329K Single-Row Short Mount (RH Clutch) 2 1 1 1 3 3 1 3 1 QTY 34 Page 46 Sw
Table of Contents Great Plains Manufacturing, Inc. Index Appendix A - Reference Information 47 402-329K-ASY: 402-329K Installation Details Steps: c/o This installation presumes that the original bearing is still in place. 1. 2. 26 Add a lock collar ( 15 or 101 ) to that shaft 1 before installing the clutch. Do not secure set screws until all clutches are installed and shaft is in its final position.
48 Swath Command™ Table of Contents Index Great Plains Manufacturing, Inc.
Great Plains Manufacturing, Inc.
50 Swath Command™ Table of Contents Index Great Plains Manufacturing, Inc.
Great Plains Manufacturing, Inc.
52 Swath Command™ Table of Contents Index Great Plains Manufacturing, Inc.
Great Plains Manufacturing, Inc.
54 Swath Command™ Table of Contents Index Great Plains Manufacturing, Inc.
Great Plains Manufacturing, Inc.
56 Swath Command™ Table of Contents Index Great Plains Manufacturing, Inc.
Great Plains Manufacturing, Inc.
58 Swath Command™ Table of Contents Index Great Plains Manufacturing, Inc.
Great Plains Manufacturing, Inc.
60 Swath Command™ Table of Contents Index Great Plains Manufacturing, Inc.
Great Plains Manufacturing, Inc.
62 Swath Command™ Table of Contents Index Great Plains Manufacturing, Inc.
Great Plains Manufacturing, Inc.
64 Swath Command™ Table of Contents Index Great Plains Manufacturing, Inc.
Great Plains Manufacturing, Inc.
66 Swath Command™ Table of Contents Index Great Plains Manufacturing, Inc.
Great Plains Manufacturing, Inc.
68 Swath Command™ Table of Contents Index Great Plains Manufacturing, Inc.
Great Plains Manufacturing, Inc.
70 Swath Command™ Table of Contents Index Great Plains Manufacturing, Inc.
Great Plains Manufacturing, Inc.
72 Swath Command™ Table of Contents Index Great Plains Manufacturing, Inc.
Great Plains Manufacturing, Inc.
74 Swath Command™ Table of Contents Index Great Plains Manufacturing, Inc. Kit: 402-389A Clutch Layout: 3PYP/A 32 Twin Row 30 Inch Layout applies to Planter Models: 3PYP-32TR30, 3PYPA-32TR30 Layout also applies to Option 57 factory bundle: 402-294A Row Clutch Connections Map 01 02 03 04 05 06 Row Section 07 08 09 10 11 12 13 14 15 16 17 18 19 20 21 22 23 24 25 26 27 28 29 30 31 32 Left Wing Center CFM Switch (Depends on Drive Type: See Below) Ground Drive 1/Left 2/Center Hydraulic Drv.
Great Plains Manufacturing, Inc.
76 Swath Command™ Table of Contents Index Great Plains Manufacturing, Inc.
Great Plains Manufacturing, Inc.
78 Swath Command™ Table of Contents Index Great Plains Manufacturing, Inc.
Great Plains Manufacturing, Inc.
80 Swath Command™ Table of Contents Index Great Plains Manufacturing, Inc.
Great Plains Manufacturing, Inc.
82 Swath Command™ Table of Contents Index Great Plains Manufacturing, Inc. Kit: 402-392A Clutch Layout: 3PYP/A 12 Row Layout applies to Planter Models: 3PYP-1236, 3PYP-1238, 3PYP-1240, 3PYPA-1236, 3PYPA-1238, 3PYPA-1240 Layout also applies to Option 57 factory bundle: 402-298A Row Clutch Connections Map 01 02 Row Section 03 04 05 Left Wing 08 09 10 11 12 Right Wing (Depends on Drive Type: See Below) Ground Drive 1/Left 2/Center Hydraulic Drv.
Great Plains Manufacturing, Inc.
84 Swath Command™ Table of Contents Index Great Plains Manufacturing, Inc.
Great Plains Manufacturing, Inc.
86 Swath Command™ Table of Contents Index Great Plains Manufacturing, Inc.
Great Plains Manufacturing, Inc.
88 Swath Command™ Table of Contents Index Great Plains Manufacturing, Inc.
Great Plains Manufacturing, Inc.
90 Swath Command™ Table of Contents Index Great Plains Manufacturing, Inc.
Great Plains Manufacturing, Inc.
92 Swath Command™ Table of Contents Index Great Plains Manufacturing, Inc.
Great Plains Manufacturing, Inc.
94 Swath Command™ Table of Contents Index Great Plains Manufacturing, Inc.
Great Plains Manufacturing, Inc.
96 Swath Command™ Table of Contents Index Great Plains Manufacturing, Inc.
Great Plains Manufacturing, Inc.
98 Swath Command™ Table of Contents Index Great Plains Manufacturing, Inc.
Great Plains Manufacturing, Inc.
100 Swath Command™ Table of Contents Index Great Plains Manufacturing, Inc.
Great Plains Manufacturing, Inc.
102 Swath Command™ Table of Contents Index Great Plains Manufacturing, Inc.
Great Plains Manufacturing, Inc.
104 Swath Command™ Table of Contents Index Great Plains Manufacturing, Inc.
Great Plains Manufacturing, Inc.
106 Swath Command™ Table of Contents Index Great Plains Manufacturing, Inc.
Great Plains Manufacturing, Inc.
108 Swath Command™ Table of Contents Index Great Plains Manufacturing, Inc.
Great Plains Manufacturing, Inc.
110 Swath Command™ Table of Contents Index Great Plains Manufacturing, Inc.
Great Plains Manufacturing, Inc.
112 Swath Command™ Table of Contents Index Great Plains Manufacturing, Inc.
Great Plains Manufacturing, Inc.
114 Swath Command™ Table of Contents Index Great Plains Manufacturing, Inc.
Great Plains Manufacturing, Inc.
116 Swath Command™ Table of Contents Index Great Plains Manufacturing, Inc.
Great Plains Manufacturing, Inc.
118 Swath Command™ Table of Contents Index Great Plains Manufacturing, Inc.
Great Plains Manufacturing, Inc.
120 Swath Command™ Table of Contents Index Great Plains Manufacturing, Inc.
Great Plains Manufacturing, Inc.
122 Swath Command™ Table of Contents Index Great Plains Manufacturing, Inc.
Great Plains Manufacturing, Inc.
124 Swath Command™ Table of Contents Index Great Plains Manufacturing, Inc.
Great Plains Manufacturing, Inc.
126 Swath Command™ Table of Contents Index Great Plains Manufacturing, Inc.
Great Plains Manufacturing, Inc.
128 Swath Command™ Table of Contents Index Great Plains Manufacturing, Inc.
Great Plains Manufacturing, Inc.
130 Swath Command™ Table of Contents Index Great Plains Manufacturing, Inc.
Great Plains Manufacturing, Inc.
132 Swath Command™ Table of Contents Index Great Plains Manufacturing, Inc.
Great Plains Manufacturing, Inc.
134 Swath Command™ Table of Contents Index Great Plains Manufacturing, Inc. This page intentionally blank.
Table of Contents Great Plains Manufacturing, Inc. Index 135 Index A I abbreviations .................................. 133 after-market ...................................... 26 AgGPS® ..................................... 3, 5 AgGPS® 262 ................................... 28 AgGPS® 900 ................................... 28 air flow .............................................. 26 air source ......................................... 26 AI100, console ...................................
136 Swath Command™ YP3025-3610 ..................................... 4 YP4025AF-1670 .............4, 52, 120 YP4025A-1630 ...............4, 52, 120 YP4025A-1670 ....................... 4, 120 YP4025A-24TR36 ...........4, 96, 122 YP4025A-2420 ...............4, 64, 121 YP4025A-3115 ...............4, 48, 123 YP4025A-32TR ...............4, 50, 125 YP4025A-32TR70 ...........4, 50, 125 YP4025A-3215 ...............4, 54, 124 YP4025A-4810 .................................. 4 YP4025F-1630 ................
Table of Contents Index Table of Contents Index
Table of Contents Index Great Plains Manufacturing, Inc. Corporate Office: P.O.