
User Manual


10
tick marks. If mounting the Great Planes Brushless Motor
Mount for Large Motors drill the holes through the fi rewall
at the four angled tick marks. If mounting the optional wood
motor mount box, refer to the instructions on page 28 and
assemble/mount the box as illustrated.
❏
3. Enlarge the holes with a 7/32" [5.6mm] drill to
accommodate the 8-32 blind nuts. Draw the blind nuts into
the back of the fi rewall with a #8 SHCS (socket-head cap
screw) and washers.
❏
4. If you will be mounting the cowl with the optional cowl
ring, drill 1/8" [3.2mm] holes 3/8" [9.5mm] deep into the
fuselage sides through the two laser-cut holes in F-1. (If
you’re not certain how you will mount the cowl, read ahead
about what’s involved to help you decide.)
If mounting an electric brushless motor skip ahead to
“Mount an Electric Motor” on page 13.
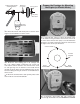
Mount a Glow Engine
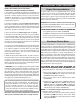
Refer to this photo for the following two steps.
❏
1. Temporarily mount the included engine mount to the
fi rewall with four 8-32 x 1" [25mm] SHCS, #8 lock washers
and fl at washers. Clamp your engine to the mount so the
drive washer will be 6-7/16" [164mm] from the fi rewall.
❏
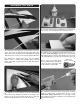
2. Mark the engine mounting bolt holes with a Great
Planes Dead Center Hole Locator (GPMR8130).
❏
3. Take the mount off the fi rewall and drill #29 (or 9/64"
[3.6mm]) holes at the marks. Tap 8-32 threads into the
holes—a variable speed hand drill makes tapping the
threads fast and easy!
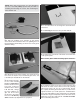
❏
4. Fasten the engine mount back onto the fi rewall and bolt
the engine to the mount with four 8-32 x 1" [25mm] SHCS
and #8 lock washers.