
User Manual


18
The degree of spoilerons is not critical and how much is
needed is up to your personal taste. About 3/8" [9.5mm] is
a good place to start. If possible, control the spoilerons with
a proportional dial or slider so you can extend the spoilerons
proportionally (instead of using a switch which is all or nothing).
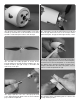
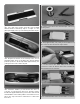
Arm the ESC
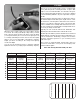
Before the motor will rotate, the ESC must be armed rst:
1. To arm the ESC, move the throttle stick to the lowest
position, turn the transmitter on, and wait for the initiation
tones followed by a single beep. Note: The ESC will auto-
calibrate the low throttle stick position when powered on.
Be sure that throttle stick is at its lowest point when you
plug the ight battery in (or at the highest point for setting
the brake function- see below).
2. Move the throttle stick to full throttle and the ESC will
con rm this position with a double beep.
3. Lower the throttle again and the ESC will con rm this
lowest position with a sequence of four beeps. THE ESC
IS NOW ARMED. Advancing the throttle stick will cause
the motor to rotate. The propeller blades should not be
installed on the motor until you are ready for ight and
you have con rmed the Fail Safe is operating correctly!
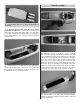
Set the Fail Safe and the Motor Brake
FAIL SAFE: While you have your radio operational and without
the propeller mounted, now would also be a good time to
set and check the Fail Safe function of your transmitter. Refer
to the instructions that came with your radio control system
to set Fail Safe on the throttle channel so that, in the event of
loss of signal, the motor will stop. To test the Fail Safe, with
the propeller removed and the radio control system turned on,
advance the throttle slightly (just enough to make the motor
turn) and turn off the transmitter. If the Fail Safe is set correctly,
the motor will stop when the transmitter is turned off.
MOTOR BRAKE: While you still have your radio system
powered up and without the propeller mounted, check
the motor brake.
Advance the throttle stick to run the motor, and then move
the throttle stick down to stop the motor. The motor should
stop abruptly (not coast gradually to a stop). If the motor
does not come to an abrupt stop and the brake in the ESC
is not activated, activate the brake as described below:
A. Disconnect the battery from the ESC so it will not
receive power.
B.
With the transmitter turned on, advance the throttle stick.
C.
Connect the battery to the ESC to power the motor. Listen
for the series of beeps. There will be three single beeps
separated by pauses (for brake OFF), then a series of
three double beeps separated by pauses (for brake ON).
To turn the brake ON, lower the throttle during the series
of double beeps. If you wish to turn the brake OFF, lower
the throttle during the three single beeps. Now the brake
is set to the desired function and you may disconnect
the battery and turn off the transmitter.
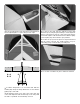
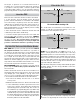
Check the C.G.
2-1/2" [63mm]
2-1/2" [63mm]
Recommended starting C.G.
❏
1. Set the rulers on a Great Planes C.G. machine to 2-1/2"
[63mm], or mark the recommended, starting C.G. location
on the bottom of the wing where shown.
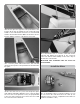
2" [50mm]
2" [50mm]
3" [75mm]
3" [75mm]
Recommended C.G. range
NOTE: The recommended C.G. range is from 2" to 3"
[50mm - 75mm] back from the leading edge of the wing
approximately where it meets the fuselage. As long as the
Tori is balanced within this range it will y and respond well.
Balanced nearer the front end of the C.G. range the Tori will
be more stable and penetrate wind a little better. Balanced
nearer the aft end of the C.G. range the Tori will “ oat” and
respond to lifting air a little better.
❏
2. Mount the wing to the fuselage and install the propeller
assembly, battery, and the canopy. Do not connect the
battery at this time.
❏
3. At this point the Tori should be completely ready to y.
Check the C.G. by placing the model on the C.G. machine,