
Manual

5
the wing in position. Use a square to check that the wing is
perpendicular to the fuselage. Since the fuselage is tapered,
make sure the gap is the same on both sides.
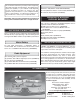
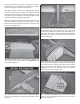
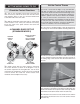
❏ 5. With the plane setting on your building table, apply a
bead of foam-safe thin CA along the top joint between the
fuselage and the wing. Once the CA has cured (do not use
CA activator yet), turn the plane over and again apply a bead
of foam-safe thin CA along the bottom joint.
❏ 6. Once the foam-safe thin CA has cured, apply a bead of
foam-safe medium CA along the joint where there is a gap
between the fuselage and the wing. Now use foam-safe CA
activator on the glue joints.
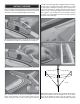
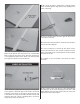
❏ 7. Bevel the ends of the two 3mm x 6mm x 290mm wing
reinforcement strips. Glue the strips to the underside of the
wing and fuselage joint.
INSTALL THE STABILIZER
❏ 1. Carefully insert the elevator in the stabilizer slot. Make
sure the counter balances are facing forward and the correct
side is up.
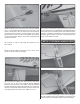
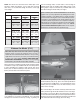
❏ 2. Insert the stab in the stab slot and center it side-to-side.
Measure the distance from the tip of the stab to the center
of the fuselage. Adjust the position of the stab until they are
equal. Also check that the stab is parallel with the wing when
viewed from the aft end. Use thin foam-safe CA to glue the
stab to the fuselage.
❏ 3. Cut two 170mm long pieces of clear tape for the elevator
hinges. Apply one of the pieces of tape to the leading edge of
the left elevator half so that half of the tape is on the elevator.
Center the elevator on the stabilizer and with the elevator
hanging down, press the hinge tape onto the stabilizer.
Repeat the process on the right side.
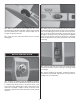
❏ 4. Insert one of the plywood control horns in the slot in the
bottom of the elevator. Glue the control horn in the elevator
with foam-safe thin CA.