
User guide


D 8. Glue the 3/8" x 1" x 7" balsa fin top to the top
edge of the fin assembly. Trim and sand the front end
of this piece to match the plan.
HINT: Using an X-acto knife, sharpen the inside of
one end of a 1/8" diameter brass tube, and use it to
cut the groove in the leading edge of the rudder.
D 9. Temporarily tape the rudder to the fin. While
holding the rudder in the neutral position, sand the
3/8" x 1" fin top to match the rudder.
D 10. Draw a centerline on the fin leading edge and
fin top, which will help you maintain symmetry while
sanding.
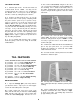
D 11. Using a sanding block, sand the fin leading
edge to the approximate shape as shown in the fin
cross-section on the plan. Sand the fin top to a
rounded shape.
D 12. If you are building your Ultra-Sport 1000 as a
"taildragger," check the plans and mark the location of
the tailgear on the rudder. Drill a 7/64" hole in the
rudder (the hole is drilled slightly oversize to allow for
positioning, and to create a hard epoxy "sleeve"
around the wire). Then groove the rudder leading
edge to accept the tailgear wire and the nylon
tailgear bearing.
PARTS NEEDED TO BUILD THE ELEVATORS AND
STABILIZER:
D
(1)
US10S14
3/8"
x
2-3/4"
x
5" Balsa Stab Center
D
(1)
US10S15
3/8" Shaped Plywood Stab "Spar"
D
(2)
US10S12
3/8"
x
3/4"
x
26-3/4"
Balsa
Stab
TE, Elev
LE
D
(1)
US10S13
3/8"
x
1/2"
x
30" Balsa Elev TE
D
(1)
US10S11
1/4"
x
3/8"
x
4" Balsa
Elev
End
D
(4)
US10S16
1/8"
x
3/8"
x
30" Balsa Stab "Ribs"
D (2) US10S09 1/2" x 2" x 14-7/8" Balsa Stab LE
D (2) US10S10 1/2" x 1" x 6-1/4" Balsa Stab Tips
D
(6)
US10S17
1/16"
x
3"
x
30" Balsa Stab/Fin
Sheeting
D (1)US10S21 1/32" x 1-1/4" x 11-1/2" Ply Spar
Thickener
BUILD THE ELEVATORS
D 1. Tape the stabilizer plan (side view) down to
your flat work surface, and cover with waxed paper.
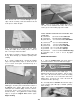
D 2. In the same manner as the rudder (steps 1 - 5),
build the framework of both elevators. Cut one of the
3/8" x 3/4" x 26-3/4" balsa sticks to make the leading
edges. Use the 3/8" x 1/2" x 30" balsa stick for the
trailing edges. Cut up the 1/8" x 3/8" x 30" sticks as
needed for the "ribs" (trussing).
D 3. Carefully draw a centerline all around the edges
of the elevators (this will help to maintain symmetry
when sanding).
10